Archived Production Notes
The following are miscellaneous notes on some of the production steps we
undertook for various school projects. They are not part of the lecture notes,
but are here for the curious.
Production Tips: Reducing grain in Color Photographs
(Special thanks to Karl Kuntz of the Columbus Dispatch for these tips!)
The appearance of film grain is strongest in the Blue Channel of an RGB
image. Because Photoshop can break an image into separate color channels, you can greatly
reduce the appearance of grain by smoothing the blue channel to reduce grain and follow up
with an unsharp mask on the red and green channels.
Open a grainy image
Select the Channels tab
Choose the Blue channel
Experiment with various small Gaussian blur settings in the blue channel
to smooth grain. Check your work by either switching back to the RGB mode or by using a
Window, New Window command to place another view of your image onscreen.
After blurring the Blue channel, try Unsharp Mask on the Red and Green
channels to sharpen the image.
NOTE: If the Blue channel is excessively grainy, try using
Filter>Noise>Despeckle as a last resort to smooth the image.
Production Tips: Working with Digital Cameras.
Digital cameras often produce CMYK images that have excessive Cyan. Use
Image>Adjustments>Selective Color to reduce the cyan in the image.
Production Tips: Reducing the Green in Fluorescent Light Images
Fluorescent lights impart an excessive greenish cast to photos. (Allen green.psd in
Exercises 4 will work for this demonstration). First, get the image close in color by
using Image>Adjustments>Curves or by creating a new Curves Adjustment Layer. Correct
remaining greenish hue by:
Choose Image>Adjust>Hue/Saturation. (Or create a new Adjustment
Layer and choose Hue/Saturation)
Choose Green from the Edit list in the Hue/Saturation dialog box.
Move the eyedropper cursor found in the Hue/Saturation dialog box into
the photo and select one of the more greenish tones. That places the selected color into
the Sample patch of the Hue and Saturation dialog box.
Reduce the Saturation and adjust Lightness in the Hue/Saturation dialog
box.
If the image is CMYK, then select only the Cyan and Yellow channels in
the Channels Palette, use Image>Adjustments>Curves to make the changes. View the
effect of any changes using Window>Documents> New Window showing the document with
all channels visible (CMYK).
These steps will work on other photos with color imbalances, i.e., red
casts in tungsten light scenes. Remember that these steps will work within an Adjustment
Layer. An Adjustment won't alter the original scan in case something goes wrong, and they
can be tweaked without accumulating data loss.
Production Tips: Degree of Unsharp Mask
The Columbus Dispatch uses the following settings in Unsharp Mask as a starting point for
200 dpi scans for the newspaper :
Amount - 100%
Pixel Radius - 1.5
Threshold - 5-10
Always use the preview to judge results of the settings. If the picture starts to have
a halo around objects in the picture, you have too much sharpening.
Production Tips: Placing files in QuarkXPress or InDesign for
Printing Press
When placing Photoshop files in a QuarkXPress or InDesign document for separation and
publication, pre-separated CMYK TIF or EPS files are preferred - not RGB
pictures. Before you convert your
images to CMYK, you MUST have the proper CMYK printing specification in Edit>Color
Settings. While most desktop printers (Epson, HP Deskjet) prefer that RGB images
be sent to them, printing press work demands CMYK color files.
A useful workflow is to keep images in RGB format for all color corrections and other
modifications, and convert to CMYK mode just before placing the picture in a publication
going to a printing press. The reason why is because CMYK presses and printers differ
widely. Even the paper choice has an impact on color purity achieved. Once converted to
CMYK for one press and paper, subsequent reconversion for another press may involve loss
of color. That's why a toned RGB backup is good to have.
Some publishers desire pictures that have been already separated into individual CMYK
files. Here's some information about using Desktop Color Separations (DCS) files from the
Photoshop 4 help file:
"When you save a CMYK image in Photoshop EPS format, you have the option of saving
the image in an extension of the standard EPS format, developed by Quark, called Desktop
Color Separations ( "DCS). The DCS format enables certain applications, such as
QuarkXPress, to read imported Photoshop files and print color separations. Saving in DCS
format creates five files: one file for each of the color channels in the CMYK image and a
fifth master file corresponding to the composite color channel. To save the file in
standard EPS format without the DCS option, choose Off.
When you turn on the DCS option, you can choose to include a 72-ppi grayscale or color
version of the image in the master file. You can then proof the image by printing this
low-resolution file from the destination application. If you want to proof the color
accurately, choose On (72 pixels/inch color); keep in mind, however, that this option may
substantially increase the file size. If you’re certain that you will print directly
to film, choose Off (no composite PostScript).
Photoshop 7's help file contains this additional information about DCS files:
"DCS (Desktop Color Separations) format is a version of EPS that lets you save
color separations of CMYK or multichannel files.
To save a file in Photoshop DCS format:
Save the artwork, and choose Photoshop DCS 1.0, or Photoshop DCS 2.0 from the Format
menu. (See Saving files.)
In the DCS Format dialog box, select the options you want, and click OK.
The dialog box includes all the options available for Photoshop EPS files. For more
information, see Saving files in Photoshop EPS format (Photoshop). Additionally, the DCS
menu gives you the option of creating a 72-ppi composite file that can be placed in a page
layout application or used to proof the image:
- DCS 1.0 format creates one file for each color channel in the CMYK image. You can also
create a fifth file: a grayscale or color composite. To view the composite file, you must
keep all five files in the same folder.
- DCS 2.0 format retains spot-color channels in the image. You can save the color channels
as multiple files (as for DCS 1.0) or as a single file. The single-file option saves disk
space. You can also include a grayscale or color composite."
2003 Update
For the 2003 Dawn to Dusk project, we no longer used Photoshop DCS files. The Athens News
requested a PDF document that included pictures in CMYK TIF format at 300 dpi. The CMYK
ink specification we used was SWOP (Newsprint) selected from the Color Settings dialog
box. Here's how to do it:
On the Mac, choose Edit>Color Settings. Click on the CMYK working space drop down
list and choose Custom CMYK at the top of the list (see picture below).
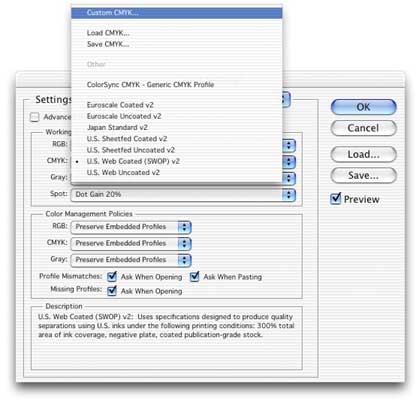
This opens a new dialog box where all sorts of CMYK settings can be adjusted for
various printing presses. Simply choose SWOP (Newsprint) in the "Ink Colors"
drop down list and click OK. Don't change any other settings. See illustration below.
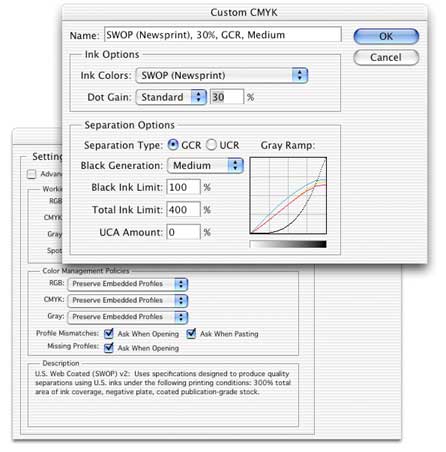
After choosing SWOP (Newsprint), Click OK in this dialog box, then click OK once again
to close the Color Settings dialog box. You are now ready to convert toned RGB files to
CMYK files (saved in TIF format) to place in Quark or InDesign pages destined for
newsprint.
2008 Update - Athens News Publications Settings
For 2008 the Athens News has provided three files to employ when
preparing InDesign pages for their press.
There are three files to deal with. I have placed these on my
Fall2008>VICO371
BSa>Temporary Student Files server space. You will need a password to access
these files.
1) PantherPro62.ppd (copy to system/library/printers/PPDs/contents/resources/en.lproj
folder. This will require authentication using administrator access and
password.) Install this file first.
2) ANews Presets.prst (copy anywhere, but perhaps we should
standardize on the
applications>Adobe InDesign Cs3 folder
3) anews.csf (copy to the Library>application
support>adobe>color>settings folder
to be made widely available to all Adobes apps through synchronization in
Bridge).
Employing these settings files.
Open Bridge, choose Edit>Creative Suite Color Settings, click the checkbox
"Show
Expanded List of Color Settings Files", choose ADD Inc. (This applies the
settings
from the anews.csf file to all Adobe applications on the computer.)
Close Bridge.
Open InDesign CS3, choose File>Print Presets>Define. Click the Load button
and
navigate to where you saved the Anews Presets.prst file (I had suggested the
Applications>Adobe InDesign CS3 folder above.) ADD INC will now show in the
list of
presets, so click it, then click OK.
2009/2010 Update - printed at the Columbus Dispatch printing plant...
If you need to make the separations before I get into the office at 9:00am
Monday (to send you our color profile - COLUMBUS_New_3) here are the color
guidelines and tips. Check out the black and white details below. Sharpening
is at the bottom.
Separating photos:
Keep the default color space in Adobe RGB
Don't CMYK the images until I send you the profile. Keep them in Color in a
full range nice color, with detail in the white and detail in the shadow (if
you want that). The press runs a higher dot gain in the cyan 4-7 points,
higher in yellow 1 or 2 points then magenta. Black has a custom curve that
allows GCR but it doesn't start until 35% then bows to 95%.
If you want to make a Photoshop color sep that will work. (screenshots
attached)
CMYK
Custom Color
Ink color Swop uncoated
Dot Gain 25%
GCR
Black generation Custom (start at 35 end at 95%)
Black ink limit 95%
Total ink 235%
UCA amount 0%
BLACK & WHITE
The black and white is pretty straight forward - they are almost full
range black and white.
From Memory
0 = 2
50 = 43
75= 80
90=89
95=92
100=100
Sharpening:
For an image about 4 columns / sharpen using Smart sharpen:
Image with Grain
Radius .85
Amount 85%
Remove Lens Blur
High Quality image
Radius 1.0
Amount 105%
Remove Lens Blur
Karl Kuntz
Picture Desk
The Columbus Dispatch
34 South Third Street
Columbus,Ohio 43215
614-374-9568