Meeting 5
Non e' mai troppo tardi
Topics: Quickly leveling horizons, the
Edit>Transform menu, Sharpening a photo, Content Aware scaling, Andrea Levy's work.
Files needed from the server:
| Exercise Folder | Filename |
| #1 | Beach.jpg |
| #4 | 70s skating |
| #4 | aubrey_spiral_small.tif |
| #6 | 03 Golf Content Aware.psd |
Nicknames for grade printouts - be sure to email a confidential nickname to the instructor for grading purposes.
Quickly Leveling Horizons and Straightening Vertical Lines
Sometimes a camera isn't being held level when a picture is made. Tilted horizons result.
Photoshop's Ruler Tool makes quick work of leveling a horizon or straightening a
vertical line in a picture. The Ruler tool is grouped with the Eyedropper tool in the
Toolbox . The icon for the tool is a small ruler.
Open the file named Beach.jpg in Exercises 1.
Choose the Ruler Tool (it may be nested under the Eyedropper tool in the Tools Palette) and drag a line matching the tilted horizon or vertical line you wish to straighten.
Then choose Image>Image Rotation>Arbitrary. The rotation angle necessary to correct the tilted horizon or vertical line will be entered automatically in the Arbitrary dialog box and you merely have to click OK to straighten the picture.
Crop to suite.
The Edit>Transform Menu
Transforms can stretch, rotate, and distort your image to fix image problems or
for creative effect. In order to use the transformations in the menu (Scale,
Rotate, Skew, Distort, Perspective, Warp, and more), you must first select all
of the picture when you have a single layer. In multi-layer pictures, no
selection is necessary when working on any background other than the Background.
Be careful when applying these transformations. They can distort the shape of objects within the picture. For example, using Scale to shrink a picture horizontally may "slenderize" people in an unnatural way. Holding the Shift key down when re-sizing a picture will constrain the changes to be proportional, which is desirable in most cases.
Real-World Example
Show the 2011 Soul of Athens iPad promotion project in Stump the Chump. In this
example, Edit > Transform > Distort is used to place a design onto a blank iPad
screen as if it were actually showing it on screen. This is comparable to how
photos of TVs in advertising show simulated pictures on screens.
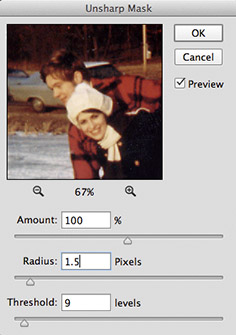
Sharpening a Scan
Open 70s skating.jpg from Exercises 4 for experimentation.
Most scans require a wisely applied Unsharp Mask (Filter>Sharpen>Unsharp Mask) to
look their best. There are three controls to manipulate - Amount (percent), Radius
(pixels), and Threshold (levels).
As a rule of thumb, larger pictures will require larger Radius values than small files. Threshold determines how different in tone a pixel has to be from its neighbor pixel before sharpening takes place. Usually a 5-10 Threshold amount works best. Small values of Threshold (<5) permit blemishes and grain to be sharpened as well as actual edges in the picture - and this may be undesirable. Values larger than 10 tend to suppress the overall sharpening effect of the filter.
Many workplaces will have guidelines for sharpening settings that work well with their equipment. For example, the Columbus Dispatch suggests the following values as a starting point for their 200 dpi images for newspaper reproduction. A magazine printed on higher quality paper may not need as much as when printing to newsprint. These settings will work for pictures that are already sharp, but some softness caused by lens aberations, slight camera movement, etc will require more.
| Amount - 100% |
| Pixel Radius - 1.5 |
| Threshold - 5-10 |
Always use the preview to judge results of the settings. Very soft focus pictures will require a larger Pixel Radius. If the picture starts to have a strong halo around objects in the picture, you have too much sharpening.
The drawback to sharpening pictures using this method is that it is not reversible at a later time. Because it changes actual pixels in the picture, it is considered "destructive" to the picture. Done in excess without a backup is dangerous. Camera RAW permits reversible sharpening, and would be a preferred place to sharpen a picture. Still, the Unsharp Mask filter in Photoshop is often used.
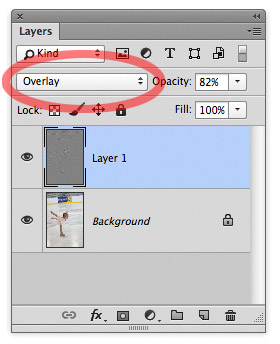
Using the High Pass filter as sharpening filter (uses Layers)
One advantage of using the High Pass filter as a means to sharpen photos is
that it is non-destructive to the underlying photograph. However, as noted
below, there may be a disadvantage as well. Use aubrey_spiral_small.tif
(Exercises 4) for the following steps.
Steps:
Be sure the Layers palette is visible (Window > Layers)
Make a copy of your background layer (Layer>New>Layer Via Copy or type Command-J).
In the Layers Palette, choose Overlay in the drop-down list of layer modes. Contrast will look exceedingly high at this point in the sharpening process.
Run Filter>Other>High Pass on the copied picture layer (Layer 1). Adjust the Radius setting 2-3 pixels for most pictures, more for noticeably unsharp pictures. You should be able to judge the sharpening effect as you slide the Radius setting left and right.
Afterward, you can adjust opacity to suite, or completely delete the layer if you no longer desire it. This process is non-destructive to the picture.
In a future lecture, we will discuss layer masks. These combined with a high-pass sharpening layer will permit selective sharpening of parts of a picture while leaving other parts of the picture untouched.
One disadvantage to this method is that it appears to sharpen noise in pixels that are a few levels apart. There is no threshold control as there is in the Unsharp Mask filter to suppress sharpening of minor noise.
Content Aware Scaling
Photoshop CS4 added a new Content Aware Scale function (Edit>Content-Aware
Scale) that will smartly shrink one dimension of your picture and attempt to
keep it natural looking. It isn't magic 100% of the time, but with photos that have a plain or
simple background, it is a great expedient.
Open 03 Golf Content Aware.psd (Exercises 6).
Choose Edit> Content-Aware Scale
(NOTE: If the picture you are working on has only one layer, you will have to Select>All first)
Slide the right edge marker to the left to make this horizontal picture fit a vertical magazine layout.
Working Professional's Work
Show Andrea Levy's editorial illustration work.
If there's time, possibly Storm Thorgerson's work, linked from my Other Digital Information and News page.
And possibly show a video of Alexander Koshelkov creating a plane crash scene - http://www.youtube.com/watch?v=53m0syaPg9A
| Class Prep Assignment 2: | Place files into the Collaboration>Class-Prep-2 folder - Due by the start of the next meeting - Meeting 6 | ||||||
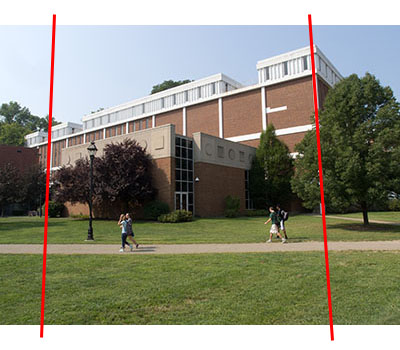
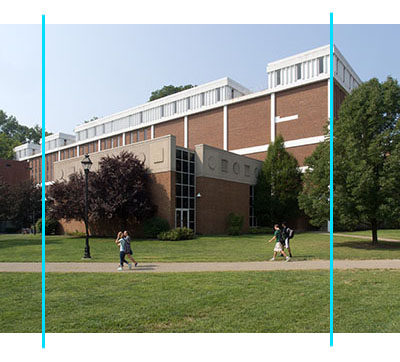
| 1) Here's a little problem solving exercise... For the next class, take a picture of a building that shows it's sides leaning. Tipping your camera somewhat upward to include the top of a tall building will automatically make the sides lean inward at the top, but don't overdo it. For example, standing at the foot of a very tall building would create perspective too extreme to fix. Also shoot "loose" - leave a little space around the building to be cropped out later. A cell phone photo is fine if that's all you have. In Photoshop, Select >All, then explore the Edit>Transform menu. Attempt to fix the picture to make the vertical edges of the building go straight up and down before the next lecture. Be prepared to show both before and after versions of your picture in the next class meeting. Submit the original photo you took and the fixed version to the class prep folder. Be sure to include your last name as the first part of the file names for both files. Note that work submitted to the folder after class begins will not be counted. Submit the pictures early to be safe. If you have server troubles, bring them on a flash drive. We will work to perfect the correction in the next class meeting, but for now, see what you can do with a little critical thinking about the problem. Note - do not draw lines on your submission. They are shown below just for reference.
|
|||||||
![]()