Note how the shadows are "blocked up" with very
little detail.
and thresholded in Photoshop. Note the
detail retained in the shadows.
Meeting 11
Topics: Optimizing scans of line art, Advanced Dodging and Burning, Quick Mask Mode, Layer Masks
Stump the Chump
Files needed from the server:
| Exercise Folder | Filename |
| #1 | Grayscale Church.tif & Great taste.tif |
| #3 | capital_gray.tif & capital_bw.tif |
| #3 | Studio1.jpg & Studio2.jpg |
| #3 | JUSTMAN.TIF and J_MANOUT.TIF |
| #4 | Joe.tif |
| #5 | fresco.tif |
| #5 | redtomat.tif |
| #6 | Ants_stacked.psd |
Optimizing Scans of Line Art
Most flatbed scanners have a black-and-white only (bitmap mode) setting that is meant for
scanning line art. This often suffices for "quicky" scans of documents, or for artwork without much
detail, but much better results can be obtained using the following steps (use the
file capital_gray.tif (Exercises 3):
1. Scan the black and white artwork in grayscale mode.
2. Sharpen the grayscale scan using Unsharp Mask (Filter>Sharpen>Unsharp mask)
3. Use Threshold (Image>Adjustments>Threshold) to convert it to black and white only.
4. Convert to Bitmap mode (Image>Mode>Bitmap) using the 50% threshold conversion setting.
Compare the results to capital_bw.tif which was scanned directly into bitmap mode using the scanner software only.
|
|
|
|
| Scanned using the scanner's default line-art setting.
Note how the shadows are "blocked up" with very little detail. |
Scanned as grayscale, sharpened, and thresholded in Photoshop. Note the detail retained in the shadows. |
Advanced Dodging and Burning
Dodging and burning tricks using feathered selections.
Method 1 - Feathered Lasso Selections
Open Joe.tif (in Exercises 4) for this demonstration
Select an area that needs dodged or burned with the lasso tool.
Feather the edges of the selection (Select>Modify>Feather) a fair number of pixels - probably 10 or higher will be necessary to minimize visible edges.
Image>Adjustments>Levels to lighten or darken the selected area.
Deselect when done.Method 2 - Using Quick Mask Mode to make feathered selections.
Demonstrate with fresco.tif (Exercises 5) how to gradually dodge the whole lower right area of this photo using the Gradient Fill tool in Quick Mask mode.
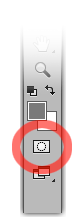
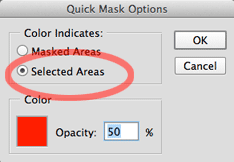
To set up the Quick Mask tool to work intuitively, double click on the Quick Mask mode icon near the bottom of the Toolbox to open Quick Mask Options dialog box. Choose Color Indicates -> Selected Areas. This will change the appearance of the mask when you are working in Quick Mask mode. The Quick Mask color will now indicate the selected parts of the image, not the unselected parts. This selection will "stick" as a preference until changed later. Once you click OK, you should be in Quick Mask mode.
Note that in the future you will not need to set the Selected Areas preference (it's "sticky"). Merely click the Quick Mask mode button to toggle between Quick Mask Mode and normal mode. When Quick Mask mode is selected, the round button in its icon on the toolbar will show a fill. When inactive, it looks similar to the adjacent picture showing a dashed circle with no fill in the icon.
Tip: "Q" is the keyboard shortcut to toggle between Quick Mask mode and normal mode.
Once you are certain that you are in the Quick Mask mode, then select the Gradient Fill tool.
Select default Black/White colors (or type d on the keyboard).
Drag a gradient fill from an area where you want a strong change to where you want no change in image tone. By default, it will show as a semi-transparent red overlay. (NOTE: If you are NOT in Quick Mask mode, you will see a black gradient instead of a red one. If this happens, immediately undo the gradient, then click once on the Quick mask tool to enter into it before proceeding further.)
Toggle back to Standard Mode from Quick mask mode (either click the Quick Mask button again, or press "Q" again). The red overlay changes to the "marching ants" view of your gradual selection.
Adjust levels to lighten or darken the selected area. (Image>Adjustments>Levels).
Select>Deselect (or type Command-D)
Done.
One thing to note is that marching ants will not display if something is less than 50% selected. If you made a long gradient in Quick Mask mode, the marching ants will likely show about halfway through the gradient where the selection percent goes from 100% selected to the halfway point. Marching ants also cannot show how far a feathered selection reaches, but Quick Mask will.
More work with Quick Masks
A gradient-created mask can permit gradually subtracting color from selected parts of a photo.
Try a standard linear gradient fill first. Then try a radial gradient to select a part of
the image for manipulation.
Open redtomat.tif (Exercises 5)
Ensure you have default Black/White colors (type "d" on the keyboard).
Ensure that Quick Mask mode has Color indicates Selected Areas chosen. (Double click on the Quick Mask tool to check this.)
Enter Quick Mask mode using a single click to the Quick Mask Tool or by typing the keyboard shortcut "Q".
Drag a gradient across image using the default Foreground to Background option for the Gradient Fill tool.
Exit Quick Mask mode by clicking on the Standard mode icon (or press "Q"). Marching ants replace the colored areas created in Quick Mask mode.
Image>Adjustments>Hue & Saturation and lower saturation completely. Part of the picture will be still in color, and the remaining part is b/w with a gentle transition between the two.
Try another approach
Undo.Select>Deselect.
Enter Quick Mask mode. (After you have deselected (Select>Deselect), there should be no mask color if you return to Quick Mask mode.)
Choose Radial Gradient option for Gradient fill tool (Options bar).
Invert standard colors to White/ Black
Drag radial gradient from center.
Exit Quick Mask mode by choosing Standard Mode (or press "Q").
Image>Adjustments>Hue & Saturation and lower saturation completely.
Reducing saturation is just one of many things that can be done to the selected area. You can experiment with using another tool, control, or filter.
Layer Masks - A Better Way to Make a Collage
Layer Masks are a superior way to produce collaged pictures than just
erasing unwanted parts of them. It allows greater
freedom in experimentation because you never really delete parts of pictures
away. They are merely hidden, and the hidden parts may be restored later.
Use Grayscale Church.tif + Great taste.tif files.
Reset all tools. (Click on the tool icon in the Options bar, choose Reset All Tools).
Open Grayscale Church.tif and Great Taste.tif.
Select all of the Great Taste.tif image (Command-A).
Click on the Move Tool (V)
Click in Great Taste.tif and drag the image onto the Grayscale Church window to create a new layer. Check to see if a new layer holding Great Taste.tif has indeed been created.
Layer>Add Layer Mask>Reveal All to create a layer mask that makes top layer opaque to underlying layer. By default, it will be the selected thumbnail in the Layers palette. Don't click on another layer (yet) because this will deselect the layer mask thumbnail.
Choose Black as the foreground color and select the Paintbrush tool.
"Paint" on the top layer (you're actually painting on its layer mask when the mask icon is selected). Areas you painted over will be hidden., leaving just the women superimposed on the church background.
Paint over areas with white to make them visible again. Gray gives partial opacity.
You can see changes made on the Layer Mask thumbnail after you paint.
Layer masks have an advantage over merely erasing part of the image away because you can change your mind about any part of the image later on. Just paint white to make opaque, paint with black to make transparent. Any painting tool or command will work (Paintbrush, Pencil, Gradient Fill, Edit>Fill, etc.)
CAUTIONARY NOTE: After you click away from a layer that has a layer mask and you want to return to adjust the layer mask, be sure to click on the layer mask icon itself in the layers palette. If you click on the picture thumbnail, you will be painting black or white or gray onto the original image, destroying it. You are not painting on the layer mask if you have a paintbrush icon showing in the layers palette!
Using Layer Masks to Blend the Best Parts of Studio Photos
Layer masks can be used to combine the best parts of two similar images.
It's always been challenging to do group photos where someone always blinks.
Worse, if you have young children to deal with, you may have only a frame or two
where they are looking "normal".
For an exercise showing this, go to Exercises 3 and open the two files named Studio1.jpg and Studio2.jpg. Paste Studio 1 as a layer above Studio 2...
Select>All of the Studio1.jpg picture, and Copy (Command-C)
Switch to the Studio2.jpg picture (click the appropriate tab at the top of the picture windows).
Paste it into Studio2.jpg (Command-V). The copied picture (Studio1.jpg) should become a new layer positioned above the bottom layer.
Notice the problem expression of the woman on the left side.
You first have to align the layers if the camera wasn't held stationary on a tripod. A step that was first introduced in Photoshop CS4 makes it easy to do. First, click on the background layer in the Layers palette, then shift-click on the top layer. This selects both layers simultaneously, and they should both show as highlighted in the layers palette.
Edit>Auto Align Layers, and click the Auto button in Projection. This will stack the layers in alignment as much as possible.
In the Layers palette, now click on just the top layer alone. Only the top layer should be highlighted for the following step.
After selecting just the top layer, choose Layer>Layer Mask>Reveal All. This step places a layer mask on the layer. You can then paint on the mask to hide unwanted parts of the top layer.
Choose the paintbrush tool, make black your foreground color, and paint over the problem face. You are hiding the top layer in the painted areas, and letting the better expression from the bottom layer show through.
TIP: You can open multiple files from Bridge into Photoshop and have them automatically stack as layers if you wish. It saves the copying and pasting that is necessary otherwise. To do this, click on all the files you wish to stack as layers from within Bridge, then choose Tools>Photoshop>Load Files into Photoshop Layers.
Producing unusual effects using two similar images by blending between them using the Layer Mask.
Open the files called JUSTMAN.TIF and J_MANOUT.TIF in Exercises 3.
Select All of the J_MANOUT.TIF file, and drag it onto the other picture using the Move Tool. Note that it's important to drag a bitmap mode picture over a grayscale or color picture (not the other way around) if you wish to retain gray/color tones.
Add a new Layer Mask to the top layer (Layer>Add Layer Mask>Reveal All)
Use the Gradient fill tool with Default colors (black and white) to drag across the picture. This creates a transition between visibility of the top layer and of the bottom layer. It blends them together.
If it doesn't look right, drag another gradient and repeat until the picture is mostly acceptable.
Touch up any areas that need more or less transparency using the Brush tool set to a low Pressure setting in the Options Bar (use ~10% for gentle blending).
The resulting picture should look like a drawing that makes a transition to a more fully rendered image.
Focus Stacking Automatically Creates Layer Masks
Some operations in Photoshop create Layer Masks automatically. The panorama exercise done earlier is one such operation, and it created Layer Masks to blend between the overlapping pictures. Edit>Auto Blend Layers is another such operation that will automatically use Layer Masks to achieve the effect.
In macro images, achieving great depth of field in one shot may be
impossible. However Focus Stacking allows multiple pictures to be combined,
showing only the sharpest parts of each frame.
The photos in each of the Ants_stacked.psd layers were made by changing the
camera focus a little bit in each shot. The shallow depth of field is easy to
see in each of them individually. More importantly, there is some sharp
information contained in each picture, and the sharp parts of each layer can be
combined to increase the apparent depth of field.
Open Ants_stacked.psd (Exercises 6).
The Ants-stacked.psd file should open with all layers already selected. On most pictures, this won't be the case, so be sure to select all layers first when using your your own files. [Click the top layer in the Layers palette, hold shift and click on the bottom layer to select all layers].
Once all the layers are selected, choose Edit>Auto Blend Layers. In the next dialog box, click Stack Images, and check Seamless Tones and Colors.
When Photoshop is finished, note the layer masks that were created to blend the
sharp parts of each of the pictures together to create the illusion of a much
greater depth of field.
If there is a difference in framing of each of the individual photos, you can
use Edit > Auto Align to correct that before performing the above steps. It has
already been done in the Ants_stacked demo file.
When Photoshop is finished, note the layer masks that were created to blend the sharp parts of each of the pictures together to create the illusion of a much greater depth of field. The soft parts were hidden.
| Tech Exercises 5: | Turn-in_05 folder for the file - Due by Feb 24 |
|
a) Blend dollar bill images using a layer mask. Use BUCK$.JPG and BUCKLINE.TIF (Exercises 3). Resample size or resolution as needed. Gently blend together both halves of the illustration using a Layer Mask. Make the "forward" part photographic, with the "rear" portion appearing as line-art as shown in the thumbnail below. Please save the file as a Photoshop PSD with your layers intact. |
|
|
| © 1991 Wm Schneider All Rights Reserved |
![]()