Meeting 15
Topics: Stump the Chump, Photoshop work by Michelle Kappeler, Channels, Adjustment Layers, Tracing software
Files needed from the server:
| Exercise Folder | Filename |
| #1 | musicians.tif |
| #4 | 07final.psd |
| #4 | Joe.tif |
| #3 | globe.tif |
| #3 | JUSTMAN.TIF |
| #3 | J_MANOUT.TIF |
| #3 | bw_cupids_chapel_edit.psd |
| #4 | MAPLE.JPG |
Channels:
Channels carry color information in color pictures, and additional channels can
be added to be used as a place to store selections that might get used more than
once. Channels can be viewed by clicking on the Channels tab
in the Layers Palette or by going to Window> Show Channels.
Open 07final.psd and show how the red, green, and blue channels are displayed in the
channels tab.
An exercise in manipulating the color Channels:
Open JOE.TIF and convert to RGB.
Click on the Channels tab in the Layers Dialog box.
Choose the red channel (click its name) and Filter>Pixelate>Mezzotint for special effect. Click back on on the RGB channel to view the effects on the picture.
Choose the green channel and Image>Adjustments>Threshold. Slide the adjustment to give a fairly good representation of the image.
Return to the RGB channel to view these effects.
Saving selections as channels, and turning a channel back into a
selection:
This is a handy way to save a hard-won selection and to be able to use it
repeatedly - even after a file is closed, then reopened.
Open Maple.jpg.
Use the Magic Wand tool (W) to select the background.
Select>Inverse
Click the Save Selection as Channel button at the bottom of the Channels Palette. It looks like a shaded square with a round dotted circle inside.
A new Channel appears named "Alpha 1" by default.
Now choose Select>Deselect (Command-d) to drop the selection. The marching ants disappear.
Bring back the selection area by going to Channels, and dragging the new channel to the Load Channel as Selection icon at the bottom of the Channels Palette. It looks like a dotted circle without a bounding box.
The marching ants reappear, confirming that the previous selection has been re-applied.
This technique is invaluable in complex images after you spend time carefully selecting a part of your picture. You can reapply a selection any time after it has been created and saved as a channel.
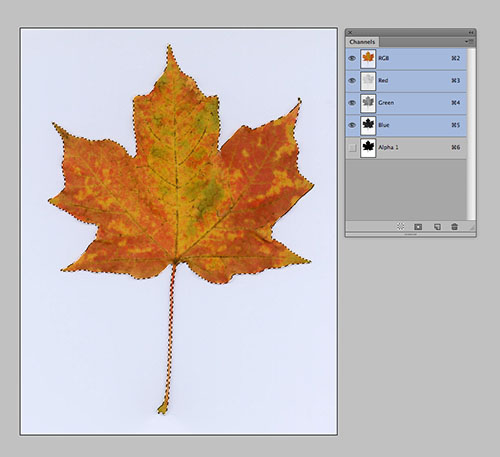
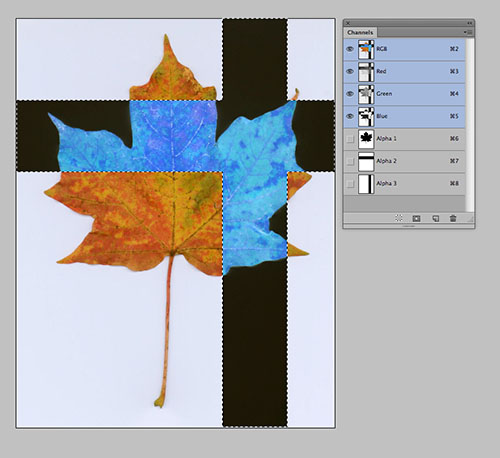
More fun with the Leaf picture
With the Magic Wand tool, using a tolerance of 32, select the background of the Maple.jpg file.
Inverse the selection (Select>Inverse, or press Cmd-Shift-I). this selects the multi-colored leaf itself.
Contract the selection by one pixel for this small picture (Select>Modify>Contract, choose 1 pixel)
Save this selection as a Channel by pressing the "Save selection as Channel" button at the bottom of the Channels palette. It looks like a rectangle with a small circle inside it. You should then have a new channel called Alpha 1 showing in your channels palette.
Deselect (Cmd-D)
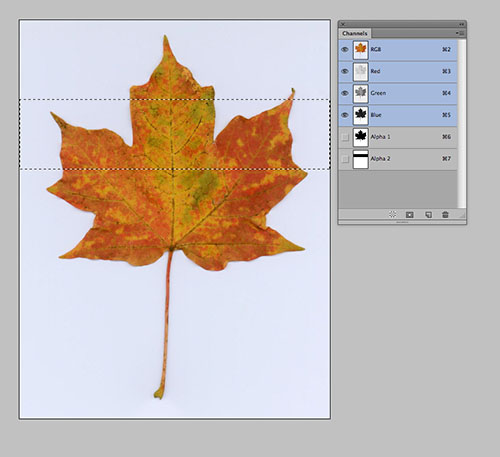
Drag a vertical rectangular selection marquee from top to bottom about one third from the right edge. In this small picture, make it about one inche wide.
Save this selection as a Channel.
Deselect.
Drag another rectangular selection marquee strip from the left edge to the right edge about one-third the way down from the picture's top. Make it about an inch wide.
Save this selection as a Channel. It should show in the Channels palette as Alpha 2.
Add the two previous channels together to make a combined selection by holding Shift and dragging the vertical selection channel to the dashed icon located at the bottom of the channels palette.
Invert the tones by choosing Image>Adjustments>Invert (Cmd-I) from the menu. The colors within the intersecting rectangular selections should look inverted in tone.
Deselect.
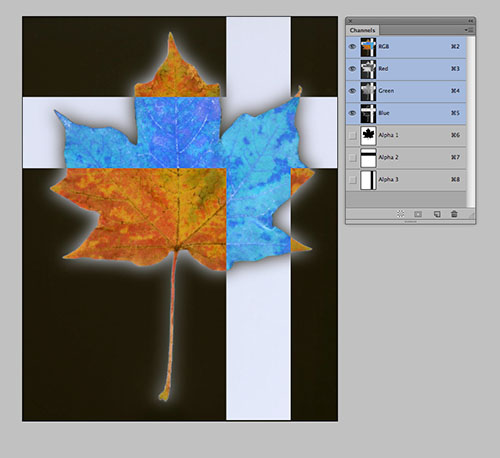
Drag the Alpha 1 channel (the leaf shape) onto the dashed icon at the bottom of the channels palette to turn it into a selection.
Select>Inverse to select the background, not the leaf shape.
Feather the selection 20 pixels (Select>Modify>Feather, enter 20 pixels)
This feather will overlap the leaf as well as the background. We'd prefer a clean edge on the leaf, but eventuall produce a feathered effect around the outside of the leaf. This means that we have to subtract the original leaf selection, currently saved as a channel, from the feathered selection.
While holding the Option key on the keyboard, drag down the Alpha 1 channel which is the leaf selection. Holding Option subtracts the contents of the Alpha channel from the current selection.
Now type Cmd-I or choose Image>Adjustments>Invert to invert the tones of the selected outside pixels.
Adjustment Layers in Photoshop
Adjustment Layers provide a powerful way to edit picture using Levels, Curves, Hue and Saturation, Threshold, and much more. They behave like additional layers in an image, and do not become a permanent part of the picture unless the layers are flattened. Adjustment Layers have substantial advantages over traditional ways of modifying picture tones and colors. They do result in larger files though.
Open Musicians.tif (Exercises 1).
First, use Image>Adjustments>Levels to make a severe change in the picture tones. Then choose Image> Adjustments>Levels again to show how the original tones cannot be restored to the photograph after the initial editing.
File>Revert to reopen the original file for a demonstration using Adjustment Layers.
Click on the black and white circular icon (new adjustment layer) at the bottom of the Layers Palette. Select Levels from the list that displays to create a Levels Adjustment Layer.
The Properties palette appears showing the picture's histogram. Tones can be adjusted to improve the picture in the same manner as Levels. The layer with the adjustment in it is highlighted in blue in the Layers palette.
Experiment with turning the Adjustment Layer visibility on and off by clicking its eye icon in the Layers palette.
Also, readjust the Levels Adjustment Layer using the Properties palette for further editing with a double click on the histogram icon in the Layers Palette. Other adjustments will have other icons, but they all can be double-clicked to edit them if the Properties palette has been closed.
Adjustment layers can affect color too. Toning a picture entirely in Adjustment Layers is possible, and it is always reversible. In that way, it's like toning a RAW file even though the original is RGB.
You may select a small part of a picture and create a new Adjustment Layer for toning only the selected area. Adjustment Layers may be stacked on top of each other.
Some experiments with color:
Convert Musicians to RGB color mode.
Select the singer's head in the picture using the Lasso tool.
Add a Hue/Saturation adjustment layer. Click the Colorize check box, and move the hue slider to make his head green.
IMPORTANT DISTINCTION: Editing an Adjustment Layer does not change the original picture information as does editing tones using the Image>Adjustments>Levels or Curves method. Generally, re-editing levels using Image>Adjustments>Levels several times makes the photograph deteriorate enough to be unsuitable for accurate reproduction. However, using an Adjustment Layer is much more flexible because it does not permanently affect the pixel values in the underlying image.
If an Adjustment Layer proves to be unwanted, it may be discarded by dragging it into the small trash can icon in the lower right corner of the Layers Palette. If you are happy with the changes made to an image by an adjustment layer, you can flatten the image to permanently apply the changes made by the layer (use the Layers Palette, click on the upper right arrow in the little circle, choose Flatten Image).
Here's another trick using Adjustment Layers -- you may have multiple adjustment layers to color-correct an image for two or more printers that have different color/tonal rendering. For example, with two printers - one that prints a bit greenish and another that prints a bit dark -- you may have the color corrections included as different adjustment layers, and have only the applicable adjustment layer active (visible) when printing to one of the printers. For the printer that prints too green, you can make the green-corrected Adjustment Layer visible and the other Adjustment Layer not visible when you print to have good color results when printing to that particular printer. Adjustment Layers may be dragged from one open file to another. That way multiple pictures can have the same correction.
BIG TIP: If you wish to make an Adjustment Layer affect the pixels on only one layer in a collage and not universally change the whole image, create the adjustment immediately above the layer you want to change. Then Option-click between the two layers to tie it to just the layer to which you wish to adjust. The Adjustment Layer will now affect only the layer directly underneath it in the Layers Palette.
Technical or Special Purpose Illustrations with Adjustment
Layers
Sometimes toning a picture quickly with Adjustment Layers, then adding a quick
dark spot on the layer's Layer Mask with a brush is a quick expedient for
technical illustrations were something of importance needs to be emphasized.
This effect is also used to point to a face in a crowd. Later when we edit some
video in Photoshop, you will find that this method can even be used on moving
subjects.
Open a browser, and copy the picture at this link to your desktop: https://www.afterness.com/images/abners_start_line_84_1200px.jpg
Add a Layer Mask and use adjustments similar to those shown in the Properties palette shown below. (Pay attention to the bottom grayscale slider!) The entire picture will darken.
Make Black the foreground color.
Choose a large, round brush, make its opacity 100%, and click a round dot in the picture. If done correctly, this should place a round, black dot on the Layer Mask which removes the heavy toning from the area. The indicated area in the picture shows the configuration of the Layer Mask in this example.
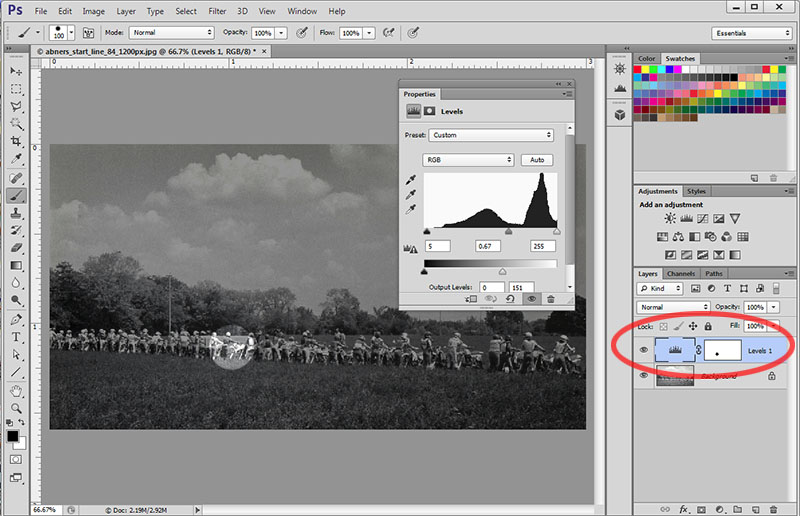
Highlighting a part of a picture this way allows for flexibility later in case the area needs to be moved, enlarged, or reduced. It's also easy to change the toning of the remaining part of the picture too.
To move the mask, merely select the Move tool, make sure the mask thumbnail on the adjustment layer is chosen (picture frame corners showing), and drag in the picture. (Uncheck Auto Select in the Option Bar to make this easier.)
More Tricks with Adjustment Layers - Using Luminosity mode
Adjustment layers can have different modes that are available to any layer
in the Layers palette. These modes are found in the drop-down menu just under
the tab for the Layers palette.
These modes can be useful when toning pictures. For example, increasing contrast in Levels can often over-saturate color in an RGB file. To prevent saturation from increasing when increasing contrast in levels, use a Levels Adjustment Layer, and choose the Luminance mode in the Layers palette before you start adjusting the sliders in the Levels dialog box.
Open Manvioli.tif from Exercises 5 and adjust the black and gray points with a Levels Adjustment Layer to see how this behaves.
A levels change made the old way (Image>Adjustments>Levels) can still be set to Luminosity mode to cancel the excess saturation. After a levels toning change, immediately choose Edit>Fade and set the mode to Luminosity without changing anything else. Of course the limitation is that you can't edit the toning changes made to the picture if the results you see using Luminosity aren't optimum.
Another trick using Adjustment Layers - Custom Grayscale Conversions
Open file bw_cupids_chapel edit.psd from Exercises 3 for this exercise. It takes
two Hue/Saturation adjustment layers to convert color to b/w in a way that
mimics the use of colored lens filters with b/w film.
The first Hue/Saturation adjustment layer above the Background will be in Color mode, not Normal and this is selected from the drop-down list in the Layers pallete. Let's call this the filter layer.
The second Hue/Saturation adjustment layer at the top of the stack is the desaturate layer. Showing in the Properties palette, the Saturation slider will be positioned all the way to the left to remove hue from the picture making it look like a grayscale picture.
Once these layers are positioned, click the left icon in the filter layer just above the picture, and slide the hue left and right in the Properties dialog to see the effect on your picture tones. There are combinations that mimic the use of red filters with b/w film, and a host of others too.
TIP: You can drag an adjustment layer from the Layers palette of one photo to another. When dragging, drop it on the target photo, and it will appear as an adjustment layer in the Layers palette.
Intro to Tracing Software - Translation Utility that converts Raster art to Vector art.
In the recent past, Adobe Streamline was a stand-alone program
that converted raster artwork (a grid of pixels) into vector artwork (vector
outlines). Adobe has not updated Streamline software because the trace
capability is now part of Adobe Illustrator.
Tracing programs were used as an aid to move bitmap images into Freehand,
Illustrator or CorelDraw for further editing as vector shapes. A good use of a
tracing utility is
to trace a scanned logo for further editing in Freehand, Illustrator, or
CorelDraw. These are vector editing programs that create artwork in a
very different way than Photoshop.
It is also possible to move Freehand, Illustrator, or CorelDraw images into Photoshop for applying bitmap effects like Gaussian blur. (To get these files into Photoshop, they must be exported from Freehand or CorelDraw as bitmaps, or as AI or EPS vector files. AI and EPS files usually import OK but they get rasterized (converted to bitmaps) by Photoshop upon import.)
Working with scanned bitmaps:
Launch Adobe Illustrator.Create a new document with a Print document profile for this exercise (web settings work also, but will provide a default 800x600 pixel RGB picture space.
File>Place globe.tif (Exercises 3).
Choose Object>Image Trace>Make (or you can choose the Image Trace button from the Control Palette (located at the top of the Adobe Illustrator window similar to where the Options Bar is located in Photoshop - see below)
This will trace the original raster artwork and convert it to vector art. One substantial benefit is that it will reduce the jaggies present in small originals like the globe.tif picture.
There is a small arrow icon beside the Image Trace button, and this drops down a list of different tracing presets that provide different looks to the traced artwork.
After the image is traced, you will see the choices on the top bar change to include an Expand button. To be able to edit the traced image in Illustrator (using primarily the Direct Selection tool - the white arrow icon), click the Expand button (or Object>Expand) after you trace it. Once expanded, the usual tools of Illustrator may be used to edit the vector curves to improve the image, if needed. Remember that once traced, you are working with vector art and tools native to Illustrator. The image may be saved as a native Illustrator AI or EPS file, or exported back to a bitmap format (i.e. TIF, JPG, PNG, etc) if you wish.
Working with scanned photos:
File>NewPlace JUSTMAN.TIF (Exercises 3)
On the Control Palette (called Options bar in Photoshop), click the drop-down arrow beside the Image Trace button, and choose Low Fidelity Photo.
Note how it posterizes the grayscale image into a limited number of colors/tones.
Experiment with other presets in the Tracing Options dialog box. This experimentation must be done before the artwork is Expanded (using the Expand button on Control Palette at the top). Be sure that you check the Preview button before you experiment.
The posterized image can be converted to a drawing comprised of outlines of the traced shapes by first Expanding the picture (Control Palette), selecting all, then choosing no fill and a 0.5 to 1.5 point outline in the Control Palette.
![]()