Meeting 16
Fidarsi e' bene, non fidarsi e' meglio
Topics: Printer Technologies, Printing in the Lab, Dot Gain on Printing Presses, Rasterizing EPS images, Auto-toning settings, Shadows-Highlights adjustments
| Exercise Folder | Filename |
| #6 | deardrf2.eps |
| #5 | enlarger6.jpg |
| #4 | tree-lined big.jpg |
Stump the Chump
Toning challenge picture of the day.
Printer technologies and capabilities
Refer to the printer summary chart (DESK_PRN.WB2) which is
distributed in class and is also available as an
Acrobat PDF file called VisCom Desktop Printers in my Handouts
section of the Digital Imaging web. In addition, see illustration of printer halftone
process -- also available in Handouts section.)
Various printers employ different underlying technologies to putting color on the page (dye sub, ink jet, laser). This is explained in class.
Also given explained are acceptable resolutions for the various printers for printing photos. Generally the picture resolutions that provide acceptable results are 200 pixels/inch laser printers, and 200-300 pixels/inch for Epson ink jet printers. There aren't many printers that can exploit resolutions higher than 300 dpi, although you may need the resolution "head room" if you plan to enlarge your image.
Print head maintenance (i.e. head cleaning and nozzle checks) is important for inkjet printers. They need to be used in order to keep nozzles free from dried ink.
If they have been sitting for a while, you will certainly find trouble with clogged nozzles. A symptom is fine white lines in the print. To solve this, find and use either the software utilities that are included in the printer driver software, or use front panel buttons (depending upon make and model). To find the utilities for an Epson printer, start the Print Center utility in Mac OSX. Click on the Epson printer icon from the list, then click the Configure button near the top of the dialog box. This brings up a list of tools for the Epson such as the nozzle cleaning utility, print head check utility, and ink supply information. Note: If you are using our lab computers, these tools will not be available to you. The lab monitor must do this on the printer's front panel.
Sometimes cleaning won't work. If an inkjet printer has been sitting idle for a very long time, it might not be able to work without mechanical repair.
Many inexpensive inkjet printers use dyes that have a short display life. If you can, use inkjet printers that employ long-lived pigments (i.e. the lab's Epson R800, etc.) instead of dyes to maximize print life. If you are interested in additional print longevity issues, go to the Wilhelm Research web site at http://www.wilhelm-research.com/
Printing to the VisCom Lab's Epson Printers
Online Printing Services
If you wish to have longer lasting prints than dye-based
printers can provide and can't afford a printer that employs pigments, try a service that offers Fuji Crystal Archive photographic paper
like Shutterfly at www.shutterfly.com or find
advanced inkjet printers that use pigment inks like
West Coast Imaging.
Online printing service Shutterfly has an easy to use online interface for uploading pictures and ordering prints from your picture files. It takes about a week to get prints delivered here in Ohio. The majority of Shutterfly's business is selling photographic print products to everyday consumers.
Shutterfly also has options for professional photographers who wish to set up professional galleries of work for sale over the web. For example, a wedding photographer could upload photographs and provide the wedding party with a link to a gallery made specifically for the event. The photographer sets their own prices for the work, chooses what print sizes are offered online, and Shutterfly handles all the business transactions (credit card billing, mailing, etc.). Profits accrue to the photographer depending on how many pictures are sold and the pricing set by the photographer. There are various fees for Shutterfly's professional service depending upon how much online storage you need for your pictures.
While the majority of Shutterfly's business is photographic prints, they also offer picture mugs, puzzles, keepsake boxes, mouse pads and photo books. For a pro account holder, you can make these available to your customers.
Setting up a Shutterfly Pro Account:
First, set up a
normal consumer Shutterfly account - it costs nothing to do. Go to
www.shutterfly.com to do that.
After you have created a standard consumer account, then contact Jonathan Levers jlevers@shutterfly.com using your OU email account to request the Pro account options.
Among the advantages of using Shutterfly over using an Epson printer is that you never have to worry about clogged nozzles again!
Dot Gain
Dot gain is the tendency of ink halftone dots to grow in size when printed on a printing
press. It's an undesirable side effect when printing on absorbent papers with
wet inks.
Dot gain is caused by wicking of the ink into the paper fibers combined with the pressures applied by squeezing rollers to the paper. Coated papers, not being as porous as uncoated papers, have a smaller dot gain than uncoated papers.
Dot gain also limits the size of the dots that can be applied to paper. Because newsprint wicks ink more readily than coated papers, tiny halftone dots would grow enough to fill the small white spaces between dots. This destroys image reproduction. As a result, screen frequencies (which determines the dot size) are lower for newsprint.
The following chart lists some typical dot gain percentages when printing (data from Real World Photoshop 3, Blatner & Fraser, Peachpit Press 1996):
| Printing Press and Paper Stock | Typical Dot Gain | |
| Web press, coated paper | 17-22% | |
| Sheetfed press, coated paper | 12-15% | |
| Sheetfed press, uncoated paper | 18-22% | |
| Newsprint | 30-35% | |
| Positive Plates | 10-12% | |
Dot Gain and Press Dot PERCENTAGES
Some printing services may not have a modern color-managed system in place,
and ask that images be toned in a different way to accommodate dot gain on their
presses. Older printing services often dealt with dot gain and dropouts indirectly by
specifying the min and the max percentage of black that their presses could
handle. Total black is 100%, pure white (no dots) is 0% in this system. I have
elaborated about printing press dot gain and press dot percentages
on another page for those faced with the
older system.
Rasterizing EPS or AI Graphics into Bitmaps for Printing to Non-PostScript
Printers
Freehand and Adobe Illustrator create vector art that, by nature, does not have resolution
associated with the picture. They always print at the resolution of the printer - meaning
that if you use a very high resolution imagesetter, you will benefit by having the image
rendered at thousands of dots per inch. Vector artwork is not comprised of a grid of
pixels, but rather a mathematical description of curves, fills, etc. that are independent
of resolution concerns.
Freehand and Illustrator users commonly export their files in the EPS (Encapsulated PostScript) format for use in page design programs like QuarkXPress, InDesign, or others. Unfortunately EPS files embedded in the documents for of these programs require a PostScript printer to satisfactorily render the graphic. If you are using an Epson printer (not PostScript capable), the image will likely print with the "jaggies" showing because it is printing just the low-res screen preview that is attached to the file.
There are several possible workarounds for printing documents that have embedded EPS or AI graphics to Epson printers. One method is to use the PostScript rasterizer that is built into Adobe Acrobat (rasterize = change from vector art to a picture made of pixels). The procedure is to print the file containing the EPS graphics to Acrobat Distiller (the PostScript interpreting engine part of Acrobat) and create an Acrobat file with the graphics rasterized. This requires several steps, and is fraught with possible errors like poor selections in Acrobat's preferences, etc.
Another way to permit EPS graphics to print well to non-PostScript printers is to use Photoshop to rasterize the vector artwork. After rasterization, the file can be saved as an ordinary TIF file for placement in the page design program. Photoshop permits any reasonable choice of resolutions to be chosen for the task.
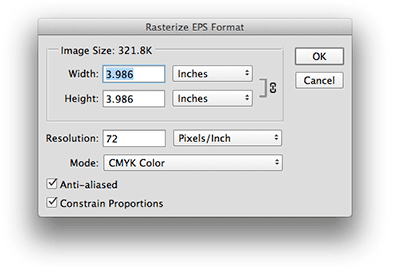
Another hurdle is that often EPS files from vector art programs like Freehand is that they are in CMYK color format. If you opt to bring it in as an RGB or Grayscale file, it uses the inverse of the RGB>CMYK or Gray>CMYK conversion and the CMYK dot gain and/or undercolor removal settings cause the file not to have a true black where there should be one. The following steps show how to choose a proper resolution for the graphic and to overcome the tendency to open without having a true black.
Open the file called deardrf2.eps in Exercises 6. You should get a dialog box that asks what size and resolution you wish to use to open the file as shown below.
Choose whatever size you need (one advantage of an EPS graphic is that you can resize it with no loss of resolution), and choose an appropriate resolution (for a b/w line-art graphic, it should be 600 pixels/inch, but remember the file size could be huge when it opens in CMYK format). If you have b/w line art, uncheck Anti-aliased. When printed, an anti-aliased line art graphic may appear to have a fuzzy edge which is undesirable.
When you click OK, the graphic will open in Photoshop, become comprised of pixels, and cease to be a vector graphic. That's called Rasterizing the file.
You will notice that the graphic will open possibly with transparent areas around it, indicating that the Layers palette doesn't have a true Background Layer. Flatten the image to view it normally. (In the Layers Palette, click the arrow on the upper right to display the drop down list of choices, and choose Flatten Image).
Save the file as a plain TIF file for placement in Quark, Word, InDesign or other program, and it should now print easily to non-PostScript printers like an Epson.
Colors or tones may not exactly match when rasterizing a CMYK Graphic into RGB or grayscale. I put optional notes on another page for the curious.
Setting Levels and Curves Options for Best Results when using Auto
Toning
Open the file named tree-lined big.jpg from Exercises 4
Since the steps below are for a "semi-automated" way to correct color, the border of this picture must be cropped away. It represents tones that are not in the photograph itself, and the presence of these artificial tones will defeat the process.
The versions of Photoshop prior to CS3 had a rather poor set of options for automatically correcting tone and color in photographs. There are additional options in newer versions that make Auto toning viable. The defaults for Auto need to be changed to realize the advantages.
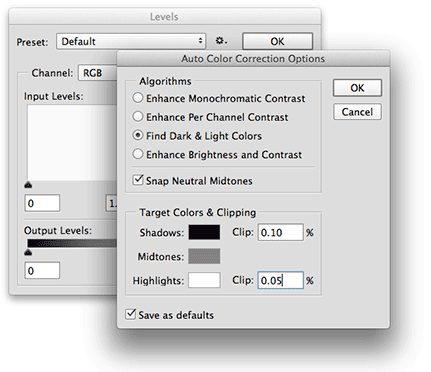
Open either Image>Adjustments>Levels (or Curves) and click the Options button. You should see a dialog box like the one shown below. Change the settings to those shown below.
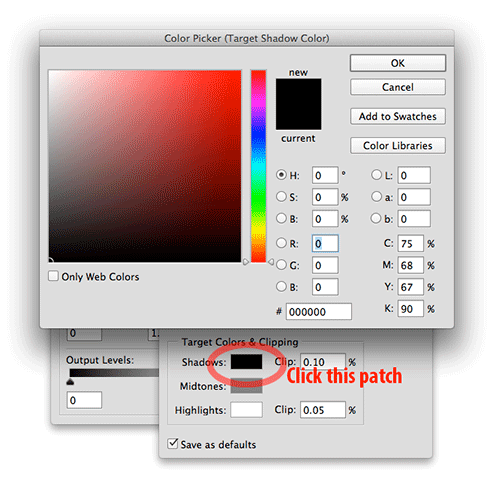
Next, click on the Shadows swatch in this dialog box (see location in illustration below). The Select target shadow color dialog box appears, and set the values in RGB to 0,0,0 as shown below. Click OK.
After setting the shadow target, then click the Highlights color patch and set RGB values to 249,249,249 in a similar way you did for the shadows. Click OK to return to the Auto Color Corrections dialog box.
Click the Save as Defaults box at the bottom. Click OK.
After the defaults have been changed to the settings shown above, Auto color should work better than in past versions of Photoshop.
Shadow/Highlight
Found in Image>Adjustments is the Shadow/Highlight dialog box. Experiment
with enlarger6.jpg from Exercises 5. It is an advanced
dodging and burning tool that can easily lighten the seriously dark parts of a
photograph, or bring out all possible tone in a very light area of a photograph
(snow, white shirt, etc.) that may be on the verge of blowing out. Some
photographers affectionately call this the "fill flash" tool because of its
effectiveness when lightening shadows in underexposed photographs.
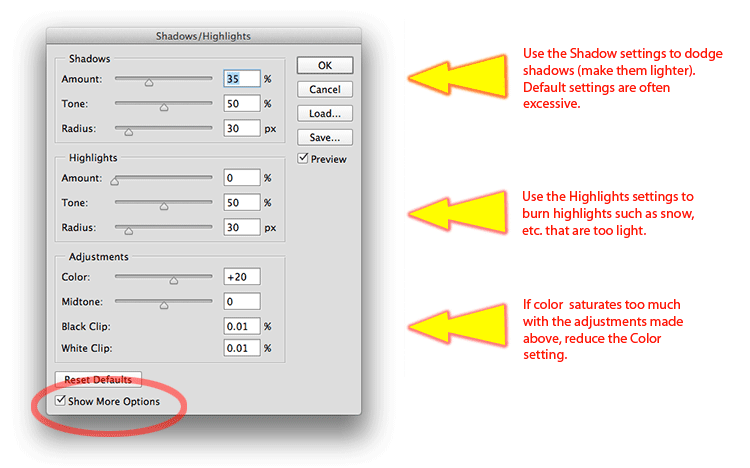
The defaults are often excessive, so use good judgment when viewing the results of this control. Too-strong settings can often produce a halo around darker objects - be careful not to do that.
The Amount setting controls the amount of lightening (in the Shadows section) or darkening (in the Highlights section).
Tonal Width controls how many dark tones are affected by the Amount setting. A low setting in the Shadows section works on only the darkest tones, leaving the rest unaffected. A higher setting in Tonal Width includes additional tones that are somewhat lighter than the darkest shadows.
The Radius setting is used to control the area being lightened (in Shadows) or darkened (in Highlights) It is essentially a mask that selects the shadow tones or highlight tones. If the Radius is set too high, a larger halo around objects can be seen.
As mentioned before, this tool can easily be overdone and the picture starts to look artificial. Use this tool wisely.
| Tech Exercise 7: | Submit print, not file - Due by March 24 |
|
Make a quality print of the file PDI Target small.tif (found in
Exercises 4) on the Epson R800/Colorburst Rip printer. Follow the printing instructions
given at the beginning of this lecture. Please do NOT resize the picture in the
print dialog box using "Scale to Fit Media" (it cuts off part of the
picture!), and do NOT print this portrait orientation picture to landscape
paper. Also note that print quality from outside places (Kinkos, library) may
not be suitable, so plan your time. Prints can be delivered to the VisCom office (250 Schoonover) if I am not personally available. Be sure your name is on the back of the print. |
|
![]()