Method 1. Using Photoshop's Convert to Profile Command.
Advantages: Works with both Macs and PCs. Permits the user a choice of Black Point Compensation settings (on/off) for special needs. Absolutely, positively applies the profile for both ColorSync and non-Colorsync printers. It is the only way to apply printer color profiles when using non-standard printing systems like the export plug-in for the Fuji Pictography PG4000. This method uses Photoshop's own internal color management engine.
Disadvantages: The Convert to Profile step modifies the file's data - the converted file should not be saved afterwards! Applying the profile is a series of manual steps and is non-automatic.
Usage:
Below are steps for printing to the Epson 1270 and 870 printers in the VisCom labs. I have
created a color profile called 1270PQIJP.icm for use with Epson's Photo Quality Ink Jet
Paper and it is loaded in the Colorsync folder of the attached Macintoshes. Other profiles are available for several different Epson
papers and printers. They all require that the built-in color management software of
the Epson printers be switched off.
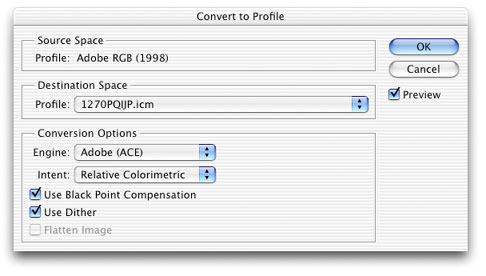
With your grayscale or RGB image open in Photoshop and toned to satisfaction, choose Edit>Convert to Profile.
In this dialog box the Source Space should show the curent working space used for the document. In the Destination field choose the profile made for the paper type currently in the printer. In the screen example shown is a Profiler RGB-created profile for the Epson 1270 printer using Photo Quality Inkjet Paper (1270PQIJP.icm). Because the Epson 870 is a short-carriage version of a 1270, the profile will work for these printers too.
If you are using a different paper from the example here, check the list of available profiles for which file to use. In addition, be sure to change the paper type in the Epson print dialog box to match the paper you wish to use.
This converts the image data and retags the file with the new profile, but this often reduces the colors available in the file. if later you print it to a printer having a wider gamut, the colors lost during the profile conversion will not reappear. YOU SHOULD NOT SAVE A CONVERTED FILE after printing!!!
Next, select File>Print with Preview. Just under the Show More Options check box, choose Color Management and set the Print Space to Same as Source.

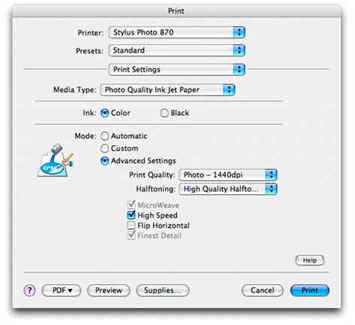
Next click the Print button to gain access to the Epson printer driver settings. Turn off the Epson printer driver's internal color management by clicking the Copies and Pages drop-down list and choosing the Print Settings.

In Print Settings, choose the media (paper) you wish to use, and set advanced settings to match those used to make the custom printer profile. In the case of Photo Quality Inkjet Paper, they should be set to those shown below.
Next, click the drop down list showing Print Settings and choose Color Management. The Color Management settings dialog box should look like the following.
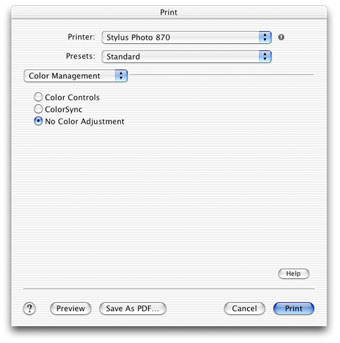
Choose No Color Management. This turns off the printer's internal color management so that the profile applied from within Photoshop is the only one used. It's important to use just one profile - double profile application will shift colors.
Choose Print.
Check to be sure that the Media Type matches the suggestion in the list of available profiles. Space is set to RGB color, Printer Color Management is unchecked.
Print the picture. DO NOT SAVE THE CONVERTED FILE! Close the picture file without saving.