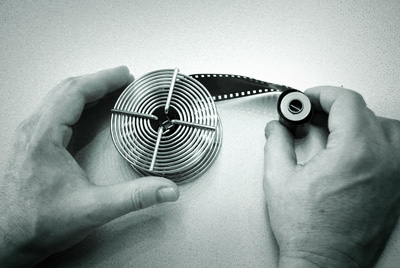
Using the can opener, pry off the flat side of the film can. Push up on the plastic film spool hub, and remove the spool with film from the film can.
Meeting 2
Examples of work from master printers will be shown. Discuss what makes an attractive b/w print. A good black and white print should exhibit luminous shadows (and not have large areas of jet black with no detail) and textured highlights (no "blown-out", bald-white areas). The tonal range should be from nearly maximum black that the paper is capable of producing, to delicate highlights. In some pictures, you may have pure paper white when a specular light source (street light, reflection of the sun on jewelry, reflective chrome, etc.) is included within the frame. The tonal range should also be appropriate to the subject matter depicted.
Brief discussion about inkjet b/w prints vs. silver prints in terms of appearance and marketability, and what the future may hold.
Quality begins with the negative.
If the negative doesn't have quality, the print never will.
Overview of darkroom work. Overview of what film developing does to the film
chemically and the film developing process.
In-class practice rolling film onto reels. Sheet film developing options are
presented at the end of these notes, if
needed.
Illustrated steps for loading 35mm film:
|
|
|
|
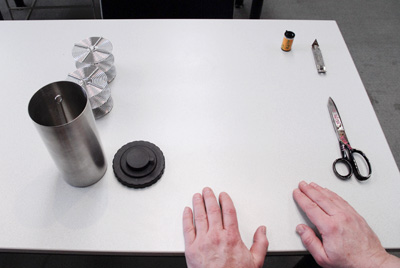
| 1. Lay out the things you need so you can find them when the lights are off. Also make sure your hands are clean and dry. You'll need scissors, a can opener, your film, and a film developing tank and reels. |
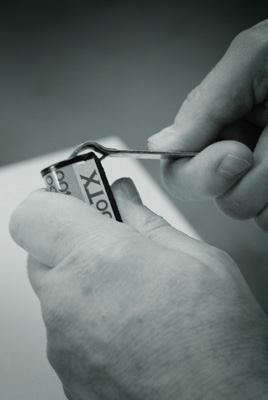
2. Lights off. The following steps are
performed in total darkness. Using the can opener, pry off the flat side of the film can. Push up on the plastic film spool hub, and remove the spool with film from the film can. |
|
|
|
|
|
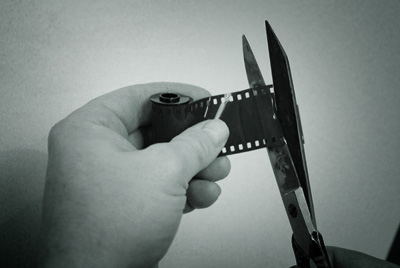
| 3. Using scissors, cut the leader strip from the film. Try to get a straight-across cut on the film. | 4. With a slight pinch of the film strip, start the cut end of the film onto the reel. This Hewes reel has metal fingers to catch the sprocket holes. It's much easier to start than the spring clip reels. | |
|
|
|
|
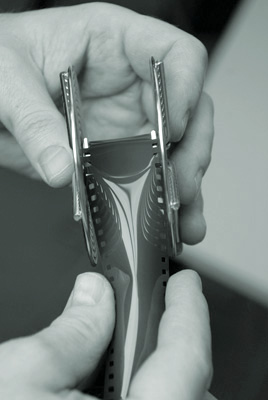
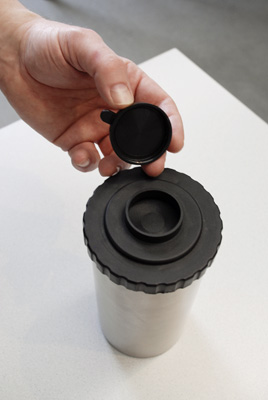
| 5. This shows the orientation of the film to the reel when loading. My left fingers mimic the curve of the last spiral in the reel (i.e. pointing clockwise). Unlike this demonstration picture, I prefer to wrap with the reel upright and resting on the table. Don't let the spool of film get away and drop onto the ground. | 6. Cap the tank, and turn on the lights. The small upper lid may be removed to reveal the light-tight pouring opening. When pouring liquids into the tank, be sure to tilt the tank to permit air to escape properly. |
Note that darkness is needed only for loading the film into the developing tank. If you wish to work at home, find a dark closet for loading film. Stuff a towel at the bottom of the door to stop light leaks. After loading the film, you can then develop it in a bathroom or a kitchen using normal room light.
Below is an illustration of a cross-section of silver-halide film (greatly simplified, of course!)
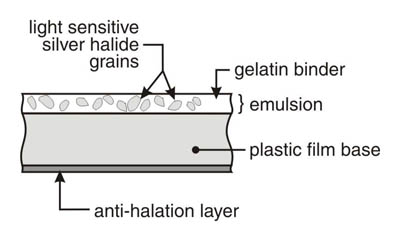
The film emulsion is comprised of a thin gelatin binder in which grains of light sensitive silver halide crystals are embedded. The thickest component in film is an acetate or polyester film base that forms a strong, dimensionally stable substrate for the emulsion.
Tidbit: Before 1920, the film base was made of a nitrocellulose compound that was flammable (in fact, nitrocellulose is a prime ingredient in gunpowder!). Decaying nitrocellulose smells acrid, and is dangerously unstable.
The anti-halation layer is made of a dyed gelatin to prevent light rays from passing completely through the film and reflecting back into the emulsion. If allowed to happen, reflected light rays will expose additional silver halide grains some distance away from where they first struck the film surface. This makes a halo or glow around bright areas in the picture and is how the effect got its name. The dye in the anti-halation layer absorbs light and reduces halation. The dye is meant to wash out during film processing so that the negative can be printed. A slight tint may remain after processing, but it causes no harm.
The Developing Process Step by Step
LOADING FILM: You need total darkness (closet with towels stuffed under the door
to block light, etc) for only the time it takes to roll your film onto the reel.
You'll need a can opener to remove the top of the film can in the dark.
You'll also need scissors trim off the leader, and to detach the film from the
film's plastic
take-up spool. Well-built Hewes brand reels roll film the easiest, but cost the
most.
WHY THREE ROLLS: I use a four-reel tank and four reels, but put film on just the lower three reels. When I process the film, I use just enough liquid to sufficiently cover the third reel with a little to spare. The top reel remains empty, and provides a large enough space that agitation is vigorous and turbulent. (See George Post, "Shake it Up", p 20, Darkroom Photography magazine, March/April 1986 about how full tanks will provide marginal to poor developing evenness.) If you are doing only one roll, you could use a two-reel tank in the same way - leave the top reel empty, and enough solution to comfortably cover the bottom reel while providing a large enough air space to get good agitation.
Typically, 8 oz. is just barely enough to cover one reel in a stainless tank. Plastic tanks require more solution.
For my purposes, I have settled on developing 3-rolls in a 4-reel tank using 26 oz of solution. This provides a little extra solution in case the tank is not sitting level, or a little solution misses the tank when I pour it in. I still have plenty of air space at the top to provide even agitation.
After you load the film and cap the developing tank, lights may be turned on for the remainder of the process. I have developed film in hotels and apartments in Europe, in bathrooms, and in kitchen sinks - all illuminated with indirect daylight. I'd avoid direct sunlight however.
TEMPERATURES: It is fairly important to maintain all processing chemicals and wash water near the same temperature. The MOST important is developer temperature - keep it within one degree of your target. The others can vary a few degrees and it won't matter much. You don't want wild temperature swings though, or you could suffer film reticulation which causes permanent "goose-bumps" on the emulsion.
OPTIONAL WATER PRE-SOAK: I use a pre-soak because of occasional problems with air bells - small air bubbles that cling to newly wetted film. The emulsion under the air bell isn't wetted immediately, so it develops at a rate behind the rest of the film. Undeveloped spots on your negative will print dark. I pre-soak my 35mm film in water at processing temperature for a few minutes while I'm preparing my developer.
DEVELOPING: If you've pre-soaked, pour out the water. Be sure your developer is within one degree of the temperature you want to use. Set your timer to the developing time you will use (depends on developer chosen, dilution used, film type, developer temperature, etc.). Tip the developing tank so air can flow out as liquid flows in, and quickly pour in the developer. Start the timer as soon as you've capped the tank. Bump the tank against the sink once or twice to dislodge air bells, and begin agitating by inverting the developing tank. Don't shake it like a martini, or your developer will foam up causing all sorts of issues.
I agitate continuously for the first 30 seconds (simple inversions of the tank). Afterwards I agitate about 5-7 seconds (usually 5 inversion cycles) per minute throughout the remaining developing time. Kodak recommends twice per minute. Choose one method and stick with it.
When the timer indicates that you're done, remove the cap and dump the developer. It doesn't get reused.
The developer converts light-struck silver halide into metallic silver bits. Unexposed silver halidegrains still remain in the emulsion after developing and the film is still light sensitive.
STOP BATH: You may use properly diluted stop bath or you may just use running water. Watch temperatures though.
FIX: Fixing dissolves away undeveloped silver halides - the light sensitive part of the film. After this step, the film is no longer sensitive to light. It would be safe to open the developing tank after fixing, although there are a couple more steps that are easier to do with the film still in the tank.
I recommend using rapid fixer (Kodak Rapid Fixer, or Ilford's equivalent) for film. I mix Ilford Rapid Fix 6 ounces to 24 ounces water to get film strength. That's nearly one quart total and a convenient amount to store in a quart/liter jug.
Agitation is the same as for the developer. Continuously for 30 seconds, then one or two agitation cycles per minute afterwards. Five minutes should be sufficient for most films, but remember that tabular grain films (TMax and Ilford Delta) require longer times, especially if the fixer is partially used up.
Pour fixer back in the bottle - it gets reused a few times before it is depleted. I toss the fixer after processing 20 rolls of 35mm film, or 20-8x10 prints. Depleted fixer will cause major print stains if you keep using it! The stains may take hours or days to appear and the damage is permanent. Better safe than sorry - keep fixer fresh.
FIRST RINSE: Fill and dump with fresh water for 2 minutes to remove most of the fixer.
PERMA WASH: Two minutes in diluted Perma Wash, continuous agitation. This removes stubborn fixer that is absorbed in the film's emulsion.
FINAL WASH: 5-10 minutes in running water. I remove the big lid and let water run continuously, with an occasional dump of the contents to ensure fresh water.
PHOTO FLO: This solution softens the water so that it resists drying in big drops that can show in prints.
TIP: When hanging your processed film to dry, use a sponge to remove excess water. Keep the sponge very clean and store in a Baggie. I buy "Ocello" brand sponges from the grocery store, and rinse them well before use. I cut them in half and lightly pull the two halves down each side of the hanging film.
Developing Sheet Film
To develop 4x5 film, you may elect to use film hangars, or to tray develop in
8x10 trays filled with processing chemicals. Use 11x14 trays for 8x10 sheet
film.
Avoid daylight tanks for sheet film - I've found them to be worthless, leaky, miserable things. However JOBO makes a rotary developing system (daylight proof) that is highly regarded by large format photographers. I've never used it though.
Here's a picture of a 4x5 sheet film developing hangar:

When processing sheet film in hangars, you can do about 6 sheets at a time using 6 hangars. I used 1/2 gallon Kodak hard rubber developing tanks to hold the processing chemicals. The first tank has a plain water pre-soak, second tank contains developer, third has stop bath, fourth has fixer. After the films have been in the fixer for a few minutes, I turn on the lights and dump/rinse the developer tank for the Perma Wash. Final washing is done in the pre-soak tank by running water into it for 5-10 minutes.
When loading 4x5 film, I load the emulsion side toward me (notches in the upper right corner when held in portrait orientation). Agitation of film on hangars can be done by lifting them out of the liquid, then putting them back in the solution.
TIP: When I lift a stack of hangars out of the tank, I immediately tip them back away from me so that the film drops to the back of the hangar frame. This prevents the emulsion side from contacting the metal. It reduces edge effects on the developed film that are caused by liquid flow patterns at the frame edge. Once in a while I still have some minor edge effects though.
If you tray develop, be prepared to sacrifice a few sheets while you get the hang of it. I tray develop 8x10 sheets, and can to about 6 sheets at a time in an 11x14 developing tray. You have to be careful while agitating - the sharp corners of sheet film will tend to scratch away the emulsion of an adjacent sheet.
Another problem with sheet film is that you must individually place the sheets into the solution one at a time. Merely dropping a stack of dry film into liquid will cause them to "weld" together. I trim my fingernails well, and press each sheet into the solution separately before I begin to interleave them during agitation. I agitate by bringing the bottom sheet to the top, pressing it into the solution (they tend to float), and then repeating with the next one on the bottom.
Extremely short developing times may cause problems because one sheet may receive more developing than another, and that's why I greatly dilute developer for sheet film. The fact that diluted developer costs less is a plus too.
To squeegee excess water from sheet film, I use a motorized set of rubber rolls (surgical rubber tubing stretched over aluminum tubes, to be precise). They were once Patterson hand-cranked rolls made for 8x10 RC paper, but the assembly was cut in the middle, and extra long tubes added with the surgical rubber pulled over the length. The picture below shows the unit mounted on the side of a "bridge" that runs the length of the sink. Film and paper prints are fed into the bottom and pulled upward when the unit is on. Water drops away.
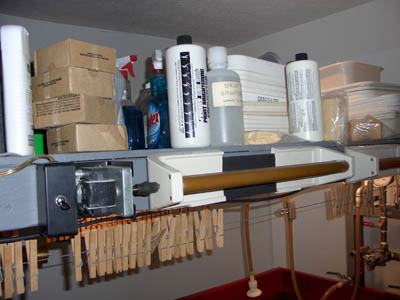 |
Rube Goldberg would have been pleased
with my makeshift sheet film squeegee rollers. The motor on the left is
attached through a rubber coupling to prevent binding. The motor turns
fast enough to do one sheet of 8x10 in about 4 or 5 seconds. (Sorry about the flash-on-camera picture. I really do know better.) |
To dry sheet film after removing excess water, I hang the sheets individually on small stainless clips that have sharp points. They attach at the corner of the film in the border and don't affect the picture.
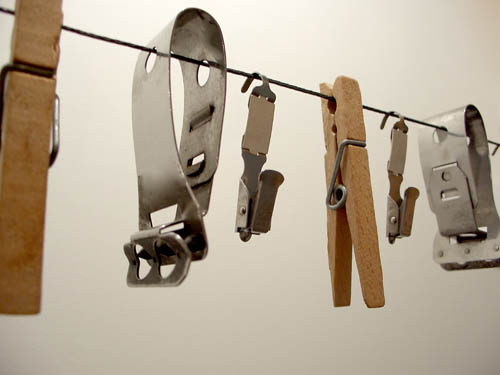 |
Clips, Clips! I have clips for any
situation that arises. The wooden clothes pins are used to weight strips
of 35mm film, the larger stainless clips hold the film strip at the top.
The small clips are for sheet film and attach to the corner of each
sheet. Sheet film just hangs down to dry - no weight is needed because it's sufficiently stiff to resist curl. |
For further reading about developing sheet film, see Ansel Adams' book The Negative.
TO DO: Film developing will take place in the darkroom in the next meeting, so have your film exposed, and supplies gathered. Mix powdered chemicals into their stock solutions before the next class so that the liquid temperatures have cooled. Having liquid Rapid Fix mixed into film-strength stock (6:24) will help too.
Handy Links:
Data sheet for Kodak D-76 -
http://www.kodak.com/global/en/professional/support/techPubs/j78/j78.pdf
Data sheet for Kodak XTOL - http://www.kodak.com/global/en/professional/support/techPubs/j109/j109.pdf
Data sheet for Koday HC110 - http://www.kodak.com/global/en/professional/support/techPubs/j24/j24.pdf
![]()