Meeting 4
Make first prints on RC paper in lab. We'll meet in the darkroom for this. Bring negatives, printing paper and print processing chemicals to the lab. Also bring a roll of paper towels to sop up spills.
The chemicals you will need for printing on RC paper include Dektol stock solution (please have the stock solution mixed from the powdered chemicals done before class), stop bath, and fixer.
An abbreviated list of RC printing procedures can be found in my printing handout. This will be covered in more detail during the class. Making both contact sheets and enlargements will included in the lab session.
Making Contact Prints:
A contact print of your negatives (sometimes called a "proof sheet" or "contact sheet") is a sheet of photo paper having numerous small
pictures exposed onto the paper. In the case of larger negatives, fewer are able
to fit onto one sheet. When shooting an 8 inch x 10 inch view camera for
example, the negative is as big as the contact sheet itself so only one picture will
fit - but it will be big and should look great.
Contact sheets are useful for evaluating and selecting which pictures you wish to enlarge later. They are made by placing the negatives in tight contact with a sheet of printing paper and the resulting "sandwich" is exposed to light. An enlarger is generally used as a light source so exposure can be controlled easily.
When using 35mm film, I expose the negatives through the plastic page that holds them. Some people insist on taking the negatives out of the plastic page, but herding loose scraps of film into position becomes troublesome.
Some negative pages hold pictures in vertical strips, with the advantage of holding 36 frames. Unfortunately, these pages are slightly too big to fit a common 8x10 sheet of paper, so some of your pictures will be cut off. I prefer negative pages that hold 35 frames (7 rows of 5 exposures).
When making a contact sheet, the negatives are positioned emulsion side down onto the paper's light-sensitive surface. I use a sheet of heavy plate glass on top of the page to hold the negatives flat against the printing paper. I use a large sheet of sponge foam as a base for everything. This isn't necessary if your easel surface is very flat.
From the cage, you can check out a piece of glass to make your contact sheets, but the cage examples are often scratched. The plate glass used for making contact sheets can be purchased inexpensively from a glass and window shop, but be sure to specify ground edges for safety reasons. If you commonly contact print onto 8x10 paper (and who doesn't?), buy an 11x14 sheet of plate glass to use. It leaves room for your fingers to press the negatives into good contact with the paper. Store your scratch-free glass carefully.
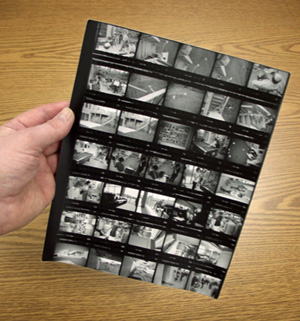
TIP: I bind contact sheets in three-ring binders next to the page of negatives that produced them. To accommodate room for the punched holes, shift the pictures to one side. That reduces the tendency to punch through the pictures themselves. In the photo above, you can see the frames are shifted to the right, and the blank space for punching holes is on the left edge.
Printing Enlargements:
To make a print from one of your negatives, you will need to use an
enlarger. Most enlargers are capable of printing popular 35mm negatives. Fewer
enlargers are capable of handling larger negatives like 120 film, or 4x5 sheet film, but
these aren't too rare. You won't find many enlargers capable of enlarging 8x10 inch
negatives though. They are rare.
Enlargers contain a light that shines through the negative, and an enlarging lens captures the light to focus it onto the baseboard of the enlarger. The projected image can be made lighter or dimmer by opening or closing the enlarging lens' aperture. This is one control you have over the exposure that a sheet of printing paper receives. The other exposure control is of course the time the projected image shines on the photo paper. A timer is employed to power on the enlarger and to shut it off after the exposure is made. Each of the enlargers in the lab has a timer attached to it.
Enlargers are usually on the DRY SIDE of a darkroom - and wet chemicals are kept on another side. This prevents accidentally ruining photo paper and sheets of negatives from chemical spills. If you're short of space in a makeshift home darkroom, you may have no choice but to be very careful. If you're planning a good darkroom though, be sure to separate the two areas.
Negative Carrier: Negatives are held into position using a negative carrier. Each enlarger brand/model has it's own system, and Omega negative carriers don't fit Bessler enlargers, etc. In a pinch, you can cobble together some pieces of cardboard to make a negative carrier and get fine results. If you make one, make sure that the opening is centered under the illumination.
The negative is positioned emulsion side down in the negative carrier for enlarging. The emulsion side is usually the dull side, and if looking down through the negative, the frame lettering should be right reading.
Some negative carriers have glass tops and bottoms to help flatten curly film. Others don't. Glass negative carriers work well, but are troublesome to keep clean and dust-free.
The cage at Ohio University has negative carriers for the enlargers in the lab. You need to check one out for the kind of enlarger you plan to use.
Easel: An easel is used to hold the photo paper flat and in position under the enlarger. They come in various sizes, and a four-bladed easel can make cropped pictures that are centered in the middle of the photo paper. An inexpensive two bladed-easel cannot center a picture except at one size (i.e. an 8x10 picture with 1/4 inch borders on an 8x10 easel). This isn't usually too much of a liability if you window mat your pictures later. The cage has a supply of 2-bladed easels for check out. You need to check out one to make enlargements. Again, simple one-size easels can be cobbled together from commonly available materials like a piece of Masonite, some mat board with the appropriate opening cut into it, and a tape hinge.
Grain Magnifier: A grain magnifier is used to check the focus of the projected image at the photo paper surface. In dim light, correct focus is difficult to determine with the unaided eye. When using a grain magnifier, it's important to place it in the center of the projected negative, and to avoid shading the light with your head. A properly focused enlarger will allow the grain to be seen in the grain magnifier, and that's as sharp as you can make your picture. Any remaining unsharpness is likely caused by sloppy camera technique or poor lenses. Check out a grain magnifier if you plan to make enlargements.
You will also need to check out wet-side equipment to make contact sheets or to enlarge photos. You should get 5 trays and a measuring graduate capable of holding a quart (32 oz). Generally 8x10 inch trays are used unless you want to make larger prints.
Arrange the trays in the sink near your chosen enlarger in this order:
The 5th tray remains dry and will be used to shuttle wet prints from the darkroom area to the well-lit room outside the darkroom. Keep the bottom of this one dry! You can store it on the shelf under the enlarger, but not in the sink.
![]()