Meeting 15
One print due at the beginning of class. Critique of work.
Overview of color printing in the darkroom in the past (by student request)
Cutting Window Mats
For fine exhibition prints, window mats are the preferred standard. The
vulnerable print surface is recessed below the mat to prevent the photo
from sticking to framing glass. I also have a plain uncut sheet of 4-ply mat
board under the print + board to provide additional protection to the rear. This
mat sandwich for the print + board is hinged at the top using water-activated
linen tape. The print + board is held to the back mat board by clear mounting
corners reinforced by linen tape. I've found that the weight of the print +
board will overcome pressure sensitive adhesive in time, and the print will
slip down in the frame. I've not had a problem once I started reinforcing the
plastic mounting corners with the linen tape.
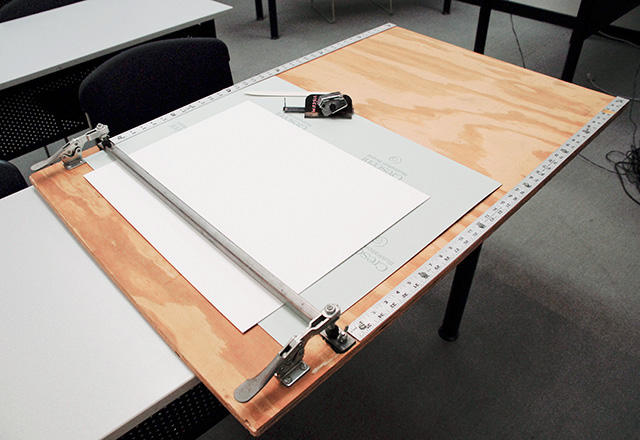
I use a Logan handheld mat cutter. The unit I purchased cost about $30 back in the early '80s. The more modern replacement is the Logan #4000 for about $35. This unit has a built-in ruler with a pencil lead to easily mark the mat opening.
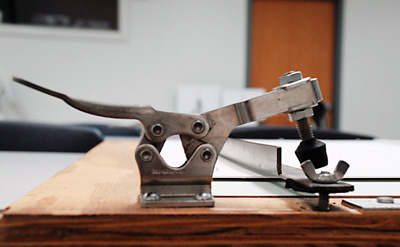
It is meant to be used with a straight edge, but I found that holding a hardware-store straight edge securely proved to be challenging. Instead, I made a straightedge that locks down against the mat board using relatively easy-to-find items. I used a pair of De-Sta-Co toggle clamps (model 225-U) to lock the straightedge down. The straightedge is a piece of bent steel angle, although any sufficiently stiff straightedge will work.
As an alternative, thick aluminum straightedges with cork bottoms sold by Light Impressions would also serve as a non-slip guide for the Logan mat cutter.
I like to display the mounted photograph in an opening that provides a 1/4 inch extra opening on the left, right, and top of the print, and a 3/8 inch extra opening on the bottom to view the signature and any caption information. The viewer sees the entire print as the photographer intended it, with no overlap of the mat into the picture.
I calculate the border sizes for the mat opening, and use the ruler/pencil on the mat cutter to mark the lines for cutting. Because I do so many mats, I've created a spreadsheet that automatically calculates the borders once I type in the mat dimensions, print dimensions, and whether the picture is a vertical or horizontal.
To begin a cut, first make a light scoring pass on the back of the mat board that goes well beyond the extent of your cut. It should not go completely through the board. Then make the final cut paying attention to stop and start lines. The light scoring cut provides a "track" for the blade in the final cut and it reduces the tendency of the mat cutter blade to "hook" the corner of the mat. Since I've done the initial scoring pass, I've not had any trouble with crooked corners. They are all perfectly square. This scoring procedure was independently discovered by my friend Jack Brickman using a top-of-the-line C+H mat cutter. Even the expensive equipment is affected by hooked corners if proper technique is not employed.
Once the window is cut, use a bone tool (polished bone) to smooth the cut edges. It reduces the visibility of minor overcuts too.
After I double check the mat opening with the actual print, I start assembling the mat. The top edges are hinged together with a couple 2-3 inch long strips of moistened linen tape. I use a sponge saturated with water to wet the linen tape. Fold the window mat over the back mat, and crease flat the linen tape hinge.
Position the print by eye in the opening cut into the front mat board. Place a cushioned, heavy object on the center of the print (or press down on it with a cotton -gloved hand so it doesn't shift position), lift the window mat board away from the print, and slip on self-adhesive corners. After all corners have been attached, double check the position of the print in the window one last time. If the position is still OK, reinforce the self-adhesive corners with moistened strips of linen tape. If you don't, the weight of the print mounted to its 2-ply board will cause the pressure-sensitive adhesive to creep down over time, and the picture will slowly slip down in the mat opening. Over the years, I've also seen the plastic corners become brittle and fail.
I use 14x18 polyethylene storage bags to hold the matted prints. The polyethylene material is archival, inexpensive, and protects the prints. The polyethylene storage bags are available from Light Impressions in various sizes.
Jerry Uelsmann printing techniques (by student request)
Portfolio of platinum/palladium prints.
My
notes for printing with platinum and palladium materials are found here.
Color print portfolio, MFA series of nested prints.
![]()