Meeting 6
Quando il gioco diventa duro, i duri cominciano a
giocare
Topics: Halftones, Scanning, Sharpening, Dust Removal, Advanced Dodging and Burning, Quick
Mask Mode.
Halftone screens
When printing on most commercial printing presses, intermediate tones between
the white of the printing paper and the ink colors must be "faked" by using various sized dots of ink.
For example, consider the case of a grayscale picture printed on a press using
black ink. There is no gray ink, so the gray tones are made up of small black
ink dots surrounded by white paper areas. Our eyes can't resolve the individual
dots at normal viewing distances, so the small black dots and surrounding white
areas merge together create the perception of a gray tone.
While it is desirable to create a very small halftone screen (measured in Lines Per Inch - LPI), the real-world constraints of the paper used and press capabilities limit how fine the screen can be.
How much resolution?
Questions often arise from students about how much resolution should be used
for printing or for web usage. The answer is "it depends". The usage of the
picture (and the picture type) determines how much resolution is needed to do a
good job.
Commercial Printing
The goal when printing halftones on a printing press is to provide a final sized digital file that has a resolution of 2x the halftone screen used for printing. For example, if a picture will be published in a newspaper printed with an 85 lines per inch halftone screen, then it must be 2x85=170 pixels/inch AT THE PRINTED SIZE. The equations in the handout include a term to adjust for enlargement or reduction of the original art. Remember though that at final size, the resolution of the picture must be double the halftone screen used when printing. Different papers and printing presses will employ different halftone screens, so a freelancer must ask questions of the printer to determine what screen will be used on a job.The goal when printing line art is to provide a final sized digital file that has a resolution of 600 pixels/inch (or possibly more for reproducing very fine lines).
The handout equations consider how much an original is scaled to reach the desired printing size.
Because laser printers use a variant of the common halftone screen found in commercial printing, the same formulas can be used. Most laser printers have a fairly coarse halftone screen of around 85 to 100 lines/inch though, so 2x100=200 pixels/inch is about all they can use at the printed size. Increasing the size of the picture file beyond that will not increase quality because of the mechanical limitations of the printer.
Inkjet Printers
Desktop inkjet printers (Epson, Hewlett-Packard, Canon, etc.) don't use a traditional halftone screen, so we can't use the traditional formulas for them. These printers use a random dot halftone pattern. Because of that, the calculations in the scanning handout won't work. However, we have found quality color or grayscale photos require 200 pixels/inch at the final size. Some users report small gains in quality by going up to 300 pixels/inch, but anything above that won't make much of a difference because of mechanical limitations of the printer.Again, line art requires more resolution than photos. Try for the same 600 pixels/inch specification given for commercial printing.
The Web and Email
Resolutions are generally much lower for screen usage (i.e. web, email) than for commercial or inkjet printing. The old web standard (but still often quoted) is 72 pixels per inch at the size you want it to be on screen. However modern computer displays have increased resolution compared to early monitors, and that permits an increases in the picture resolution. I now assume around 100 pixels/inch for my own web work because most modern screens have very close to that resolution. Remember though that the number of pixels (height and width) is the most important aspect of pictures for the web, and that the web generally ignores resolution tags. The quoted resolutions are a way to keep beginning web designers out of trouble, and to make a viewable-sized print if a user chooses to print it. The quality though will be insufficient for commercial work, but perhaps serviceable for refrigerator-bound snapshots.To summarize for pictures that don't need any resizing:
Printing process Color/grayscale photo Line Art Commercial printing press line-screen (lpi) x 2 600 pixels/inch Inkjet or laser printers 200-300 pixels/inch 600 pixels/inch Web or email 72-100 pixels/inch (but think pixels) 72-100 pixels/inch (but think pixels)
Note that the resolution goals mentioned above qualify for digital camera pictures as well as scans of film, prints, or other artwork. In that regard, digital camera pictures and scanned film require the same treatment.
Resizing pictures to fit a layout
If you have to resize a scan or digital camera picture to fit a layout, the size
ratio can be used in a formula to modify the values in the table above. I have
two formulas for commercial printing in the Scanning Resolutions and Scanning Tips
handout (Available in Acrobat PDF
format in the Handouts section of this site.)
The size ratio multiplier in the handout can be expressed as reproduction width
÷ original width, and can be applied to any of the
printing or electronic processes.
Scanning
Scanning using flatbed and film scanners. Scanning
is a way of digitizing pictures for display on the computer and for printing. Nikon LS-4000 and Epson
4990 scanners demonstrated in class. Nikon's web site has instructions in Acrobat PDF format for
using Nikon Scan 4 (which is similar to 3). I have also located a copy of the Nikon
LS-4000 instructions on my web site at:
NS4_man.pdf
Instructions for the Epson 4990 can be found at Epson's web site at http://www.epson.com
The scanning handout provides formulas to use when preparing digital pictures for publication. The underlying goal of these formulas is to provide enough pixels when scanning to print well.
Note that the resolution goals mentioned above qualify for digital camera pictures as well as scans of film, prints, or other artwork. In that regard, digital camera pictures and scanned film require the same treatment.
Thinking About Buying a Scanner?
The Tony Sleep Photography web site at http://www.cix.co.uk/~tsphoto
has extensive reviews of film scanners for professional use. Be sure to check it out
before you buy a film scanner.
Another site that reviews both scanners and digital cameras is Digital Eyes at http://www.image-acquire.com.
AP Guidelines for Scanned Pictures Transmitted Over the Wire
According to Cindi Christie (Knight Fellow 2000-2001) scans transmitted over the
AP wire should be 10 inches in the maximum dimension and should be 200 dpi.
Have an Obsolete Scanner or Problem Negatives?
If you have a dense negative or have continual problems with excessive contrast in your
scans, try using different scanning software. VueScan software has saved many a problem
negative for me using my older Nikon LS-1000 and even a newer LS-4000.
http://www.hamrick.com
Exercises 6 contains some comparison examples of difficult scans made using stock Nikon software and with VueScan. These scans were from b/w negatives made in contrasty stage lighting which often blows out highlights in any scan made with the original Nikon software. [Note that photographs made with digital cameras often have a short exposure range between highlights and shadows ("dynamic range") and can also blow out highlights easily.]
Another great benefit of VueScan is that it lends life to old scanners that are no longer supported by the manufacturer. Changes in operating systems and applications too often leave a two or three year old scanner an orphan. VueScan works with most modern OSes and provides a way to continue using an expensive scanner. A trial version of VueScan is a free download to experiment with.
Sharpening a Scan
Open 70s skating.jpg from Exercies 4 for experimentation.
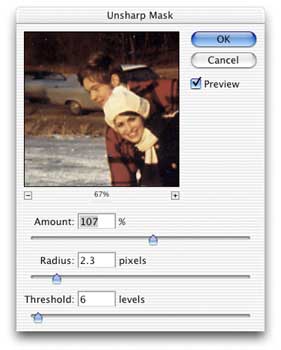
Most scans require a wisely applied Unsharp Mask (Filter>Sharpen>Unsharp Mask) to
look their best. There are three controls to manipulate - Amount (percent), Radius
(pixels), and Threshold (levels).
As a rule of thumb, larger pictures will require larger Radius values than small files. Threshold determines how different in tone a pixel has to be from its neighbor pixel before sharpening takes place. Usually a 5-10 Threshold amount works best. Small values of Threshold (<5) permit blemishes and grain to be sharpened as well as other edges in the picture - and this may be undesirable. Values larger than 10 tend to suppress the overall sharpening effect of the filter.
Many workplaces will have guidelines for sharpening settings that work well with their equipment. For example, the Columbus Dispatch suggests the following values as a starting point for their 200 dpi scans for newspaper reproduction:
| Amount - 100% |
| Pixel Radius - 1.5 |
| Threshold - 5-10 |
Always use the preview to judge results of the settings. Very soft focus pictures will require a larger Pixel Radius. If the picture starts to have a strong halo around objects in the picture, you have too much sharpening.
Using the High Pass filter as sharpening filter
One advantage of using the High Pass filter as a means to sharpen photos is
that it is non-destructive to the underlying photograph. However, as noted
below, there may be a disadvantage as well. Use aubrey_spiral_small.tif
(Exercises 4) for the following steps.
Steps:
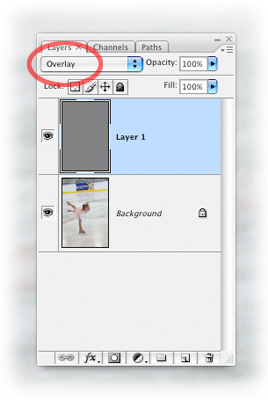
Make a copy of your background layer (Layer>New>Layer via Copy or type Command-J).
In the Layers Palette, choose Overlay in the drop-down list of layer modes. Contrast will look exceedingly high at this point in the sharpening process.
Run Filter>Other>High Pass on the copied picture layer (Layer 1). Adjust the Radius setting 2-3 pixels for most pictures, more for noticeably unsharp pictures. You should be able to judge the sharpening effect as you slide the Radius setting left and right.
Afterward, you can adjust opacity to suite, or completely delete the layer if you no longer desire it. This process is non-destructive to the picture.
In a future lecture, we will discuss layer masks. These combined with a high-pass sharpening layer will permit selective sharpening of parts of a picture while leaving other parts of the picture untouched.
One disadvantage to this method is that it appears to sharpen noise in pixels that are a few levels apart. There is no threshold control as there is in the Unsharp Mask filter to suppress sharpening of minor noise.
Eliminating Dust from a Scan
Dust spots can often be reduced or eliminated quickly. This method has minimal impact on
picture sharpness.
Open Joe w dust.tif in Exercises 4.
1. Duplicate the layer that contains the picture and dust spots
2. Turn the ways the layers interact to "Darken" in the Layers palette. It can
be found in the drop-down list usually occupied by "Normal".
3. Choose the Move tool (V), and nudge the top layer over a pixel or two using the
keyboard arrow keys.
When the Darken mode is chosen, the darker pixels on the top layer darken the white dust
spots underneath, but white areas above do not affect the lower layer. This minimizes
unsharpness that often results from the Filter>Noise>Despeckle filter or the Dust and Scratches filter.
If your picture was shot with a digital camera, dust spots are usually black. In that case, try using Lighten mode in the Layers palette instead of darken.
If you choose to use the Dust and Scratches filter for dust and picture noise, try raising considerably the Threshold setting while using a small Radius setting. Beginning with CS2, the Filter>Noise>Reduce Noise filter is superior to the Despeckle and the Dust and Scratches filters. The Reduce Noise filter was covered earlier.
Optimizing Scans of Line Art
Most flatbed scanners have a black-and-white only (bitmap mode) setting that is meant for
scanning line art. This often suffices for quick scans, or for artwork without much
detail, but better results can be obtained using the following steps (use the
file capital_gray.tif (Exercises 3):
1. Scan the black and white artwork in grayscale mode.
2. Sharpen the grayscale scan using Unsharp Mask (Filter>Sharpen>Unsharp mask)
3. Use Threshold (Image>Adjustments>Threshold) to convert it to black and white only.
4. Convert to Bitmap mode (Image>Mode>Bitmap) using the 50% threshold conversion setting.
Compare the results to capital_bw.tif which was scanned directly into bitmap mode using the scanner software only.
 |
 |
|
| Scanner's default line-art setting. | Scanned as grayscale, sharpened, and thresholded in Photoshop. |
Advanced Dodging and Burning
Dodging and burning tricks using feathered selections.
Method 1 - Feathered Lasso Selections
Open Joe.tif (in Exercises 4) for this demonstration
Select an area that needs dodged or burned with the lasso tool.
Feather the edges of the selection (Select>Modify>Feather) a fair number of pixels - probably 10 or higher will be necessary to minimize visible edges.
Image>Adjustments>Levels to lighten or darken the selected area.
Deselect when done.Method 2 - Using Quick Mask Mode
Demonstrate with FRESCO.TIF (Exercises 5) how to gradually dodge the whole lower right area of this photo using the Gradient Fill tool in Quick Mask mode.
To set up the Quick Mask tool to work intuitively, double click on the Quick Mask mode icon near the bottom of the Toolbox to open Quick Mask Options dialog box. Choose Color indicates Selected Areas. This will change the appearance of the mask when you are working in Quick Mask mode. The Quick Mask color will now indicate the selected parts of the image, not the unselected parts.
Enter Quick Mask mode if you aren't already in it. (Click once on the Quick Mask icon near the bottom of toolbar.) Note: "Q" is the keyboard shortcut for Quick Mask mode. When Quick Mask mode is selected, the round button in its icon on the toolbar will show a fill. When inactive, it looks as it does in the adjacent picture showing no fill in the icon.
Choose the foreground to transparent option for the Gradient fill tool (selected in the Options bar in the gradient preview drop-down list).
Select default Black/White colors (or type d on the keyboard).
Drag a gradient fill from an area where you want a strong change to where you want no change in image tone.
Switch back to Standard Mode (exit Quick Mask mode). You should see marching ants instead of a red overlay.
Adjust levels to lighten or darken the selected area. (Image>Adjustments>Levels).
Select>Deselect (or type Command-D)
Done.
More work with Quick Masks
A gradient-created mask can permit subtracting color from selected parts of a photo.
Try a standard linear gradient fill first. Then try a radial gradient to select a part of
the image for manipulation.
Open redtomat.tif (Exercises 5)
Ensure you have default Black/White colors (type "d" on the keyboard).
Ensure that Quick Mask mode has Color indicates Selected Areas chosen. (Double click on the Quick Mask tool to check this.)
Enter Quick Mask mode using a single click to the Quick Mask Tool or by typing the keyboard shortcut "Q".
Drag a gradient across image using the default Foreground to Background option for the Gradient Fill tool.
Exit Quick Mask mode by clicking on the Standard mode icon (or press "Q"). Marching ants replace the colored areas created in Quick Mask mode.
Image>Adjustments>Hue & Saturation and lower saturation completely. Part of the picture will be still in color, and the remaining part is b/w with a gentle transition between the two.
Try another approach
Undo.Select>Deselect.
Enter Quick Mask mode. (After you have deselected (Select>Deselect), there should be no mask color if you return to Quick Mask mode.)
Choose Radial Gradient option for Gradient fill tool (Options bar).
Invert standard colors to White/ Black
Drag radial gradient from center.
Exit Quick Mask mode by choosing Standard Mode (or press "Q").
Image>Adjustments>Hue & Saturation and lower saturation completely.
Reducing saturation is just one of many things that can be done to the selected area. Try changing the area within the selection using another tool, control, or filter.
Creative Assignment One - The Editorial Illustration
Checklist of Specifications for the Assignment: Number of pictures: 1 picture Picture size: 5x7 inch minimum Resolution: 200 pixels per inch minimum Color space: n/a for this assignment Text OK?: NO, unless it's part of a scan you are using (book page, etc.) Content: Editorial illustration. See possible topics below Identification: Put YOUR LAST NAME as the first word of the filename. File format: JPEG, quality 7 or higher Print Required? No Assets Folder: Required - see note below chart. Destination: Creative_01 folder Notes: All digitized content (scans, digital photos, etc.) used in the making of your creative assignment must be submitted in a separate "assets" folder named "lastname_assets" (substituting your own name, of course.) This folder is due on the day that the assignment is due. Please don't copy your completed assignment into the folder though.
Some tips for a better grade...
Choose one of the following topics and create one editorial illustration:
---------"The Problem of Light Pollution
Today, people who live in or near cities have lost much of their view of the universe. The view is substantially diminished even for people who live in smaller towns and rural areas. The spectacular view of the night sky that our ancestors once had on clear dark nights no longer exists. The great increase in the number of people living in urban areas has resulted in a rapid increase in urban sky glow due to poorly designed outdoor lighting, brightening the heavens to such an extent that the only view most people have of the Milky Way or most stars is when they are well away from the cities. This excess light in the sky has an adverse impact on the environment and seriously threatens to remove forever one of humanity's natural wonders -- our view of the universe..."
excerpt taken from the Darksky.org web siteFor more research, go to the following sites for information:
http://www.darksky.org/resources/library.html
http://www.inquinamentoluminoso.it/dmsp/index.htmlHere's a map of light pollution in the USA that I've archived on my web site:
light_pollut_map.html
If you wish to use pictures of outer space, NASA makes copyright-free pictures available at http://nix.nasa.gov. The Hubble Telescope has also provided some space pictures for copyright-free usage at http://heritage.stsci.edu. Feel free to use them.
------or------
Identity Theft
A magazine is going to run an article about identity theft, a growing problem today. They want an opening illustration to run full-page opposite the first page of the story. The article isn't written yet, but it is to be an information piece mostly describing the problem and steps people can take to reduce their exposure to it.------or------
How Cities Boost Creativity
Most of humanity now lives in a metropolis. That simple fact helps to fuel our continued success as a species.Crime, congestion, and pollution mar all cities, from Los Angeles to Mumbai. But another force trumps the drawbacks of urban living: cities bring opportunities for wealth and for the creative inspiration that can result only from face-face contact with others. In fact, the crush of people living in close quarters fosters the kind of collaborative creativity that has produced some of humanity's best ideas...
------or------
Running Out of Water
As demand for freshwater soars, global supplies are becoming unpredictable. Existing technologies could avert a water crisis but must be implemented soon.A magazine is planning a cover story about how demand for freshwater is increasing, and how governments and policymakers must set in place infrastructure to water conservation.
This illustration is to run on the cover of the magazine as well as full-page opposite the story's opening page. The illustrations editor had mandated that it MUST be designed with a white background!
---------or----------When Will House Prices Stop Falling?
The mortgage mess has impacted the sales of both existing and new homes. Attractive real estate that would previously sell in a month, now lingers on the market with few potential buyers. Easy credit and ARMs (adjustable rate mortgages tied to the federal interest rate) were pushed onto home buyers with less-than-stellar credit ratings. That's now a problem for both the lenders and the buyers. Foreclosures and quick sales at low prices are pushing down the price of houses nearly everywhere in the US....Dig in for more information just about anywhere, including http://www.msnbc.msn.com/id/20461630/
------or------
What to do about the bully in your life
Whether the victim is you or your child, help is out there.We now know that whether it is online, in the hallway at school or even at the office, bullies are everywhere. We see heart-wrenching stories of children and teenagers who have committed suicide after cruel bullying by peers. The painful truth is that 15% to 25% of students in the USA are bullied with some frequency... (Victims) often don't seek help or even speak up. ...So what exactly can you do?... [advice to be given in the remaining part of the story].
------or------
Do high heels empower or oppress women?
Some say elevated look leads to success at work; others say lower is better
By Laura T. Coffey
TODAYShow.com contributor
Sept . 23, 2009
OK, ladies, think fast: Do high heels empower women in the workplace, or do they oppress us and ultimately harm us?
If your gut is giving you conflicting responses to that question, don’t worry — that’s normal. Depending on whom you consult, you could hear that towering footwear:
*can boost your career by transforming you into a confident, strident force to be reckoned with;
*can hamper your career by putting too much emphasis on your sex appeal rather than your brains;
*can wreak permanent damage on your feet and ankles, including — but not limited to — bunions, corns, calluses, shortening of the Achilles tendon, ankle fractures and nerve damage, and ...
more at MSNBC.com
------or------
Why Migranes Strike
Biologists finally are unraveling the medical mysteries of migraine, from aura to pain.A widely-read scientific magazine has a feature story on migraine headaches scheduled for their August issue, and needs an accompanying picture that conveys the feeling of pain felt by migraine sufferers. Photo realism is NOT wanted by the illustrations editor. She wants something more painterly, or more graphic.
It will run full-page opposite the story's opening.
-----or-----
Merging Man with Machine
Science has enabled remarkable longevity for modern humans, and part of the reason is the invention of mechanical replacements for aging or failed parts. Soldiers who have lost limbs from IEDs are able to recover part of their former function, and elderly patients live longer because of synthetic heart valves. From hearing aids to synthetic lenses for damaged eyes, the miracles of medicine and science are expected to continue at an accelerated pace.Create a futuristic magazine cover illustration (just the picture, not the design!) that will attract reader attention. This is for a National Geographic magazine. Pay attention to the interests and tastes of the target audience. Part of your work is to determine who they are!
-----------
Create an editorial illustration to accompany one of the topics above. The illustration must be at least 5" x 7", either vertical or horizontal, with a minimum resolution of 200 dpi. Do not resample resolution upward if you start with a low resolution scan or it will have inferior quality. If pictures do not meet the minimum size/resolution requirement or have been obviously "upsized", they will be given a failing grade!
Do not incorporate Photoshop-created text into your illustration unless there is a good reason to do so. Remember that you are to illustrate, not design. InDesign and QuarkXPress are far better tools for type and design than Photoshop.
Submit the file in JPEG format (Quality 7 or higher) to save server space, but be sure to also save the original layered Photoshop file for your own future needs.
-----or----
The Case Against College Athletic Recruiting
U.S. universities are misappropriating resources on sports—including some obscure ones.http://education.newsweek.com/2010/09/22/the-case-against-college-athletic-recruiting.html
----or----
One Hundred Year Data Preservation
A 350 year old copy of Shakespeare is about as readable as a new one. But a 35 year old floppy? Preserving data is essential to digital civilization, but how?
Massive data loss can threaten civilization. The burning of the ancient Library of Alexandria, destroying hundreds of thousands of handwritten books, contributed to Europe’s Dark Ages as knowledge of ancient art, science and math were lost. The little recovered through Muslim scholars helped create the Enlightenment, but how much more was lost?
But the threat of digital data loss is far larger. Data is fragile. Threats include:
•Media/hardware obsolescence - even if you have an 8 inch floppy drive, there may not be hardware capable running the software required to read it, let alone the application to open the files on the floppy.
•Software/format obsolescence. Remember WordStar?
•Lost context/metadata. A document’s contents may appear mundane, but if it is from the President to the Secretary of State, its context makes it important.
•Disaster
•Human error
•Media fault
•Attack
We will lose information moving from physical to digital. And we can’t know what future generations will consider valuable. For example, scientists collect old hollow metal buttons because they contain air samples from when the buttons were made. Who dreamed 150 years ago that would be valuable?...[story continues]------------
Due Dates:
April 26 TTh Class
May 2 MW ClassDue at the beginning of class. We will critique all pictures during class time. See comments about participation in the syllabus.
Place the picture and the folder of your digitized content into the Creative_01 folder before the critique.
![]()