Meeting 18
This class will be a critique of Creative #3
for the MW 371 class.
Some of the material below may be included into
the Meeting 17 lecture.
Volere e' potere
Topics:
Images created by Photoshop professionals.
Defining and using Patterns
Embossing a Graphic into a Background
Cropping to a set resolution
More about channels.
Placing AI (Adobe Illustrator)
vector artwork files and using them to create an embossed look.
Smoothing Skin in Portraits and Beauty Photos
Editing Video in Photoshop
Stump the Chump
The final picture in the series toned before your eyes.
Inspirational artwork - show Jai Vora's thesis work on Sanjay Kothari.
NOTE: The disk I have will no longer play in modern software less than ten years
after it was made. The disk data is OK, but the software has evolved and will no
longer open older files.
Instead, go to Sanjay Kothari's
website to view some of his work.
More inspirational artwork can be found on my Other
Digital Information and News page.
Patterns
How to make a repeating pattern from a file:
Create a new document about 3"x3" x72 dpi.
Make some marks on the new document with a paintbrush tool, etc.
Select>All
Edit>Define Pattern
Close the document.
Now create a new document larger than the first, say about 8"x10"x72dpi.
Edit>Fill and choose Pattern for the contents of the fill, and then choose the newly
created pattern in the Custom Pattern drop-down list.
The larger document will be filled with the pattern as it repeats enough times to
occupy the frame.
Seamless Tiling Patterns:
Open Oakwood.tif (Exercises 6). Because it is a PC tif file, you must do a
File>Open from within Photoshop or drag the file's icon to the Photoshop icon on the
Dock bar. Double clicking will not open the file in Photoshop.
Another option is to hold the Control key when clicking on the icon to display a list
of programs from which you can select Photoshop to open it.
Select>All
Edit>Define pattern.
Close Oakwood.tif
New 640x480 file with Pattern background.
New file 8x10 72dpi
Edit>Fill, choose Pattern for Contents.
Crop to a specific size:
Set crop tool to a Fixed Target Size of 640x480 pixels in the Cropping Tool Options.
(You may need to type the letters "px" after the number to make Photoshop
understand that you want pixels, not inches.)
Drag a crop box in the wood pattern, rotate the crop selection by moving cursor outside
the crop area and dragging.
Move the crop selection around until it looks good.
Double click inside the crop area to crop.
Set up channels:
(NOTE: Turn Anti-Aliasing in the Magic Wand tool OFF in the Options dialogue box before
you begin.)
Create ORIGINAL Channel:
Create a new channel by clicking the Create New Channel icon in the Channels palette.
The icon looks like a small page with a turned corner.
Name the new Channel ORIGINAL (Double-click the channel in the Channels palette to
rename it)
Image>Adjustments>Invert to make the new channel white.
Now click on the Layers tab to return to Layers
File>Place TERRY.EPS in the layer. (Note: Be sure that you don't OPEN, but PLACE
instead.)
Resize the artwork in the channel using handles (the shift key constrains proportions),
and double click in the center to accept the resize.
Deselect
Layer>Rasterize to change the layer to pixels instead of a linked object.
Check with the eyedropper tool to see if the artwork is comprised of 100% black.
Because the incoming image is CMYK and the already opened file is RGB, black sometimes
gets mapped to a lighter color.
If dark parts of the artwork are not 100% black, run Image>Adjustments>Threshold
or Image>Adjustments>Levels on the channel to change the artwork to become pure
black on a white background.
Select ALL of the artwork on the new layer.
Click the Channels tab
Click on the newly created Original channel.
Edit>Paste the image into the empty channel.
Image>Adjustments>Invert. (Command-I). This should be a negative image. The white
areas of the image will get "scooped out" of the background.)
Create STROKED Channel:
Duplicate channel and name it STROKED. (Drag "Original" channel to the Create
New Channel icon in the Channels palette.)
Make white the foreground color.
Make sure that Anti-Aliased is OFF for the Magic Wand tool in the Options bar.
Magic Wand select the white parts of the artwork.
Select>Similar to select all white areas.
Edit>Stroke with white (foreground color) about 6 pixels, location Outside. (This is
still a negative image of the original.)
Deselect (Command-D)
NOTE: If you have a light gray outline that shows the location of the original artwork,
you probably had anti-aliased checked for the Magic Wand tool. Undo, then uncheck
anti-aliased, and repeat the selection and stroking steps above.
BLURRED & EMBOSSED Channel:
Duplicate Stroked channel and name it BLURRED AND EMBOSSED. (Duplicate by dragging to
the little page icon at the bottom of the Channels palette.)
Gaussian blur about 5 pixels.
NOTE: If Blur is grayed out (along with all the other filters), it means
you are on a hidden Layer. Go back to the Layers palette, and click on the
Background layer.
Filter>Stylize>Emboss. (I used 124 degrees, 6, 100%)
(The 3D effect - highlight and shadow - should roughly indicate how the final will
look. It should be mostly gray)
Modify the soft edges of the embossed image to give it a hard edge --
Click on the Blurred and Embossed channel to make it the active channel.
Drag the "Stroked" channel to the Make Selection icon to make it a selection
on top of the Blurred and Embossed channel.
Select>Inverse to choose the area outside of the letters.
Sample the background gray with the eyedropper tool.
Edit>Fill with the foreground gray color. This sharpens the blurred edge of the
embossed picture.
Deselect (Command-D).
Sharpen the other edge --
Load the Original channel as a selection onto Blurred and Embossed (Drag channel name
onto the make selection icon)
Fill with foreground color (gray).
Deselect.
EDGE HIGHLIGHTS Channel:
Duplicate the Blurred and Embossed Channel and name it Edge Highlights.
Make the Edge Highlight channel the active channel (click on the channel in the
palette), and use Image>Adjustments> Curves (or Levels) to change the background
gray as black. Use the black point eyedropper to quickly change the gray to black. Only
the lighter parts of the image remain against a black background.
EDGE SHADOWS Channel:
Duplicate the Blurred and Embossed channel again and call it Edge Shadows.
Make the Edge Shadows channel the active channel, and use
Image>Adjustments>Curves (or Levels) to change the background gray to white. The
white point eyedropper will do a good job. Only the darker parts of the image remain
against a light background.
Place Highlights on wood:
Select All of the Edge Highlight channel and copy.
Deselect (Command-D).
Choose the RGB channel to make the wood visible and editable.
Edit>Paste to place the Edge Highlights channel image above the Background layer.
Choose Screen as the layer mode in the drop-down list to lighten the background in the
appropriate areas.
Place Shadows on wood:
Go to Channels and choose the Edge Shadow channel.
Select>All (Command-A).
Copy (Command-C).
Deselect (Command-D).
Choose the RGB channel to make the background visible and editable.
Click on the Layers tab, and Edit>Paste (or Command-V) to place Edge Shadows on its
own layer.
Choose Multiply as the layer mode to darken the background in the appropriate areas.
Darken background in logo areas:
Go to channels.
Drag Original onto the selection area icon to make a selection (marching ants).
Click on the Layers tab.
IMPORTANT: Click on Background layer (wood) to make it the active layer.
Create a new Adjustment Layer, using Hue and Saturation as the type.
Click the Colorize box.
Change color of the wood approx. as follows:
Hue 22
Saturation 36
Lightness -37
This gives a darker appearance to the "recessed" parts of the image as if it
were branded onto the wood, and restores the original detail of the artwork.
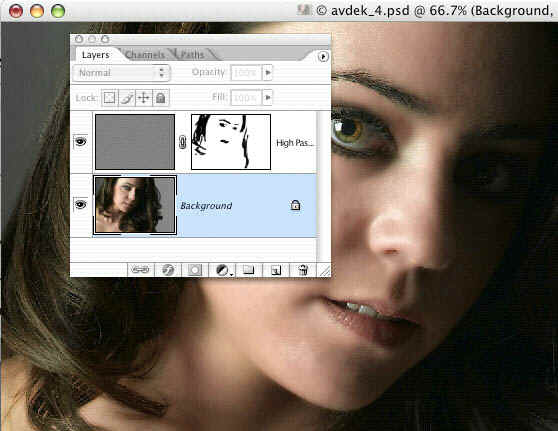
Smoothing Skin in Portraits and Beauty Photos
Often a photographer faces a challenge when smoothing skin texture while retaining
important details in pictures of people (eyes, hair, etc.). This may also work with
certain product shots.
One way to tackle this is to duplicate the layer containing the image,
run a High Pass filter in the duplicated layer, desaturate it, invert the tones and run
Overlay mode in the Layers palette. Then add a Layer Mask to hide the overly-soft parts of
the picture where desired (eyes, etc.). The exercise below utilizes a photo made by Talour
Avdek to show how this process works:
Open the picture Avdek_4.psd from Exercises 6.
Duplicate the background layer by dragging the background layer to the
upturned page icon at the bottom of the layers palette.
Desaturate the new layer by choosing
Image>Adjustments>Desaturate (or press Shift-Command-U)
Invert the tones of the new layer by choosing Image>Invert
(Command-I).
In the Layers Palette, choose Overlay in the drop-down list of modes
listed near the top of the palette.
Run Filter>Other>High Pass and adjust the pixel radius for the
picture's skin texture desired. Do this by eye so that the skin imperfections
are minimized without costing too much large-scale detail. For this picture, a 4-pixel High Pass filter is a reasonable
compromise between the original and too-soft. High-res pictures may require choosing more
pixels in the filter to achieve the same effect.
Add a layer mask choosing Reveal All, then IN THE LAYER MASK paint black
over areas in which you wish to restore sharpness (eyes, teeth, hair, eyebrows, ...).
Done.
If you still have stubborn areas that show prominent pores, etc., try
selecting just the troublesome part and redo the steps above. You may want to flatten the
image before proceeding to subsequent steps to simplify.
Another Method to Retouch Skin Blemishes
This method, using the Healing Brush tool in pattern mode, works like
digital airbrushing of skin. Don't overdo it or your model/portrait will look
almost plastic!
Open blemish-1.psd from Exercises 6
Create a new 64x64 pixel square file and fill it with 50% gray
(Edit>Fill, Contents ->50%gray). If the picture you wish to retouch has some
film grain or if you wish to suggest realistic skin pores, run the
Filter>Noise>Add Noise filter to match the picture.
Select all of the 64-pixel square picture (Command-a) and choose
Edit>Define Pattern.
Choose the Healing Brush tool. On the Options bar at the top, click on
Pattern as the source, and choose the gray square pattern that you just made
from the available patterns.
Now switch to the picture to be retouched. Merely brush the tool
over skin imperfections and they will be smoothed substantially. Be careful
when retouching next to dark hair, etc. or the the tool will blend in some
color sampled from these areas.
To provide varying degrees of retouching strength, paint on a copy of the
original picture above the Background layer. You can then turn down opacity if
needed to reduce the strength of this retouching. Layer masks on the retouched
layers provide even more flexibility.
Another option is to use Screen mode for the Healing Brush tool in the
Options bar. This appeared to be more subtle than Normal mode in my experiments,
but that could be due to other factors..
This method will eliminate all pores and imperfections from the face and make
skin look like that commonly seen on supermodels (guess why they look so perfect
in the ads!).
Stand Alone Retouching Software
One retouching package that has caught my eye is
Portrait Professional
software. It comes in two levels, one at $70 for the Portrait Professional
standard edition, and $100 for the Portrait Professional Studio edition. A short
video is available online to showcase it's capabilities at
http://www.portraitprofessional.com/photo_editing_software/video_demo
Editing Video in Photoshop Extended Versions
Photoshop EXTENDED will open many video formats, and you can tone
them with adjustment layers, and render them to web-ready GIF files or export
them to other video formats (Flash, Quicktime, AVI, etc). Note that the standard
version of Photoshop will not work with video files.
An excellent book for those wanting to pursue video editing in Photoshop CS3
Extended is
Adobe Photoshop CS3 Extended: Retouching Motion Pictures by Gary David Bouton,
Course Technology, Boston, MA.
 |
An animated GIF file in black and white. This file is only 40 kb. A
256-color version of it was a whopping 1.3 MB for this short video, so I
decided not to use it.
Remember that an animated GIF can have 256 colors max, while other
video formats can have millions of colors and still produce smaller
files.
So why didn't I place another kind of video here? Because I don't
know if a viewer has appropriate plug-ins installed in their browser to
view them. |
This posterized GIF animation version was initially shot with a Casio digital camera
in video mode. The original footage used for this video is waltz_jump-edit.avi
(Exercises 7). The file was opened in Photoshop (File>Open), and
I added a threshold adjustment layer to it in the Layers palette as shown below.
This produced the black and white, posterized effect. I also trimmed the beginning and ending footage to show
just the interesting (middle) part of the video using the Animation palette timeline.
Finished videos can be saved to an animated GIF file (which can play easily
in a browser window - but adding more color makes BIG files), or exported
(File>Export>Render Video) as one of many different video formats including
Quicktime, AVI, iPhone, iPod, MPEG-4, etc. These other formats may require a
plug-in for browser viewing, or can be uploaded to online video services like
YouTube.

To trim footage, merely move in the endpoints of the timeline to keep just
the part you want. (See big arrows in illustration above.)
You can tone for color or add special effects to your video by merely adding
an adjustment layer in the layers palette. The adjustment layer will show as
another timeline in the Animation palette. Because the adjustment has a
timeline, the timeline endpoints can be moved to affect only a part of the
footage if that is desired.

To slowly blend in adjustment layers, additional video footage, or even a
simple fade-to-black layer, click the arrow in the Animation palette positioned
to the left of the layer name to display the controls beneath, and find the
Opacity control (see screen capture below). In this example, a black layer will
be faded into the end of the video.
In the Layers palette, change the opacity of the black layer to 0%
(transparent). Then click the Opacity button to put in a key frame marker (
indicated by a yellow shape). Move the time marker to a new position where you
want the opacity to reach 100%, go to the Layers palette, and change the opacity
to 100%. This will automatically put in another key frame at the end point of
the transition to black.
Play the video, or manually move the time marker through the desired area to
see the effect.
This technique can be used to splice together two different video scenes with
a cross-fade between them.
TIP: To hear audio, hold the Option button down when you press the video
"play" button, or press the little speaker icon in the animation
palette.
Fading color adjustments in or out:
It's fairly common for video cameras to continually adjust for lighting color
and intensity while recording. This can sometimes present a problem because on
half of the video may be properly toned, but it changes in the other half. Open
the file spin_w_camera.psd and play it. Pay attention to the yellow-green
color in the beginning, and how the camera corrects for this color part way
through. That means that the first half of the video must be corrected, and this
correction should fade away as the video progresses.
Enable the Curves adjustment layer for a second playing, and watch how the
color is fairly consistent throughout the video. Check the key frames in the
Animation palette to see where it begins to fade away, and the second key frame
that indicates that the color adjustment is no longer active. This was done
merely by selecting key frame locations and changing the Opacity of the Curves
adjustment layer.
Making moving masks:
You can also blend between two positions of a layer mask to make a "spotlight"
on a part of the video scene. Open waltz_jump-editmoving mask.psd to see
an example. Check out the layers palette to find the Levels 2 layer with layer
mask, and the "Layer Mask Position" keyframes in the Animation palette.
These are simple examples, and they only hint at what you can do with video footage
in Photoshop Extended.
Smart Objects
Smart objects in Photoshop provide flexibility in editing. For example, a smart
object on a layer can be scaled down to a very small size, but when sized back
up lose no resolution. Another common use of Smart Objects is to be able to
replace one smart object with others in a template for a card, etc. Smart
objects can be either raster objects, or vector objects from Illustrator. One
common use of Illustrator smart objects is to create simple graphic elements to
serve as navigation buttons, etc. for web sites. Employing these smart objects
makes it easy to experiment with the shape and color of them.
Getting started
In Exercises 6 you will find a sub-folder named Smart Objects. Drag the
contents to your desktop (there are some RAW files there, and only one
person at a time can have a RAW file open in Camera Raw over a server).
Open the file BWRingAround.psd. Note that there are a number of different
adjustment layers that convert a color picture to grayscale and produce a
different "look" for each of the examples.
In the Layers palette, click the down arrow next to the group named Row
1. At the bottom of the stack, you will find the master smart object named
"Original photo". Right click on the Original Photo layer (and
click on the layer name, NOT the thumbnail!), and choose
"Replace Contents..."
[NOTE: If your Mac won't work with a right-click, then Control-click
the layer name instead.]
Use the file Neon2.psd, and notice how all the former variations of the
flower are now replaced with variations of the sign.
Repeat using the portrait picture Retouch.psd, and see how this works for
flesh tones.
To determine which layer affects which variation, merely click the eye
icon in the Layers palette to see which variation gets hidden.
The steps for creating a smart object file begin with File>Open as Smart
Object. Then create layers and adjustments as adjustment layers.
Note that you can edit the contents of a smart object stored in a layer.
Right click the smart object layer in the Layers palette (again, click on the
layer name, not the thumbnail), and choose Edit Contents.
This will open the copied smart object in a new Photoshop window where you can
change it. You may be asked to flatten a changed smart object if you had added
new layers. Save it, and return to the original document where the changes
should be reflected.
Another exercise
In yet another sub folder called Card_PSD, open the file named "CardTemplate.psd".
Currently it's a blank card awaiting placement of a photo.
Click on the Background layer in the Layers Palette, then add a new layer
above it by clicking the upturned page button in the Layers Palette.
Choose File>Place and place the raw file DSC_010.NEF (Note: in class only
one person at a time can have this file open in Camera RAW on the network.
Be patient and take turns, or just watch the instructor's demo.) The file
will open with resize handles and an X connecting the diagonals. If it is
about the right size, merely double click to accept the current size.
Note that this creates a smart object layer in the layers palette, and
the contents can be edited or replaced by right-clicking on the layer name.
With a RAW file, editing opens it once again in Camera RAW for further
toning. With a TIF, JPG, PSD, etc, it will open the file in another
Photoshop window for editing. After editing, click Save to accept the
changes, and to update the smart object with the changes.
Let's replace the contents of the card template with a studio photo, so
right click the smart object layer in the Layers palette, and choose Replace
Contents. Navigate to SMITH_1327.psd, and Place it.
Resizing without fear
One of the problems faced in making collages is that while experimenting,
you might use Edit>Transform> Scale to reduce the size of an element. This
throws away pixels when reduced, and if you change your mind, resizing
upwards later gives a fuzzy, pixilated image.
If you place objects on layers as smart objects, then you can size
downward, then back up without losing the sharpness of the original picture.
