Method 2. Use the Print Space drop-down list in the Photoshop Print with Preview dialog box.
This page has recently been updated for Mac OSX and Photoshop 7. Please inform me of any mistakes.
Advantages: Works with both Macs and PCs. Applies the profile for both ColorSync and non-Colorsync printers. Uses a simpler set of steps than the dangerous Method 1 - Convert to Profile. Doesn't corrupt the file to be printed. Uses Photoshop's own internal color management engine to apply color profiles to a picture on the way to the printer.
Disadvantages: Turning off the Epson own color management in the printer driver may confuse subsequent users who wish to print and who may expect automatic correction.
Usage:
The example given here is for printing to the Epson Stylus Photo 1270 or 870
printers using Epson Premium Glossy Photo Paper. Other printers and papers will require
different settings. See my list of available profiles
for other printer models and papers. For example, when printing to the Epson 890 printer
(still using Epson Premium Glossy Photo Paper), substitute the 890 profile named
"Epson_890_Prem_Glossy.icc" instead of the Print Space Profile shown in the
illustration below.
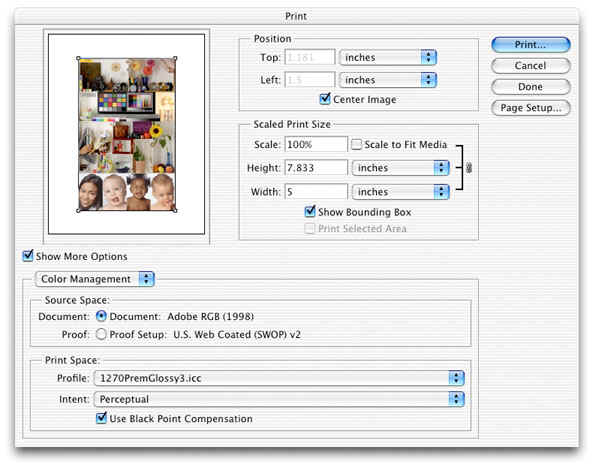
In Photoshop, choose "File>Print with Preview". This dialog box should look like the one shown below:
In this dialog box, click the Show More Options check box and choose Color Management in the drop down list beneath the preview picture.
The Print Space is where you choose which color profile you wish to use. For this example, the settings are shown for Epson Premium Glossy Photo Paper when using the 1270 or 870 printers. Intent should be Perceptual, and Use Black Point Compensation should be checked.
(Note: If the profiles don't show in the list on your computer, it is likely that the profiles haven't been copied to your hard drive. Go here for steps to copy the files to your machine.)
Next, hit the "Print..." button on the top left of the Photoshop dialog box.
This shows another series of dialog boxes that control different printer options. Be sure that the printer you wish to use is shown. Otherwise, the print job will go to another printer instead.
If you want more than one copy, change the number in this dialog box.

Next, click on the list that contains Copies & Pages. Choose Print Settings from the list. The Print Settings screen should look like the one below:
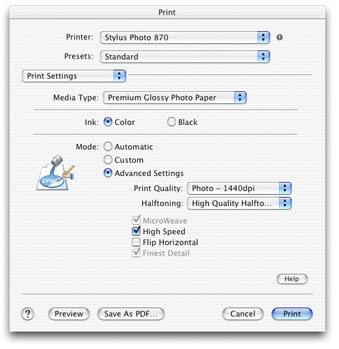
Change Media Type in the Print Settings dialog box to match the paper you wish to use (Note: Premium SemiGloss may require using the Premium Glossy media type setting. See the list of available profiles for the setting to use.)
If you wish to use the profile for Premium Glossy Photo Paper, choose Premium Glossy Photo Paper as the Media Type. Click the Advanced Settings button, and choose Photo - 1440dpi in the Print Quality list, and choose High Quality Halftones in the box beneath it. High Speed should be checked to enable the printing in both directions of the print head. That will halve the time to make a print.
These were settings used when I created the color profile for the printer using Premium Glossy Photo Paper and for best results, they should always be selected when using my profile.
If you are using a different paper, check the list of available profiles for which profile to use and what resolution settings to choose.
Finally, you need to turn color management off in the Epson driver and set the proper resolution for your paper. Choose Color Management in the list (see below). Click on the No Color Adjustment button.

This step ensured that the Epson driver's own internal color management system does not apply a second color profile. The profile you selected in the Print Space dialog box in Photohop is the one that will be used. With No Color Adjustment selected, the standard Epson color profile will be bypassed. Double profile usage will ruin the printed output.
NOTE: you might go back and double-check the Print settings to make sure that they didn't change before printing. I've seen the software switch the settings back to a incorrect value when an item in another screen was changed. I suspect this is the cause of the dreaded magenta prints.
You are now ready to print the file from this dialog box.