(Click to enlarge)
Fixing a Leica M Front Focus Problem
(NOTE: This page is applicable to only Leica
M film cameras)
June 27, 2005
I've had my Leica MP for a couple of weeks now, and it's been a rocky start for this fine photographic instrument. A camera bag strap detached and the it fell about 2 feet to concrete. The bag wasn't padded, but there was not much visible damage to the camera inside. A little ding on the baseplate was the only apparent damage.
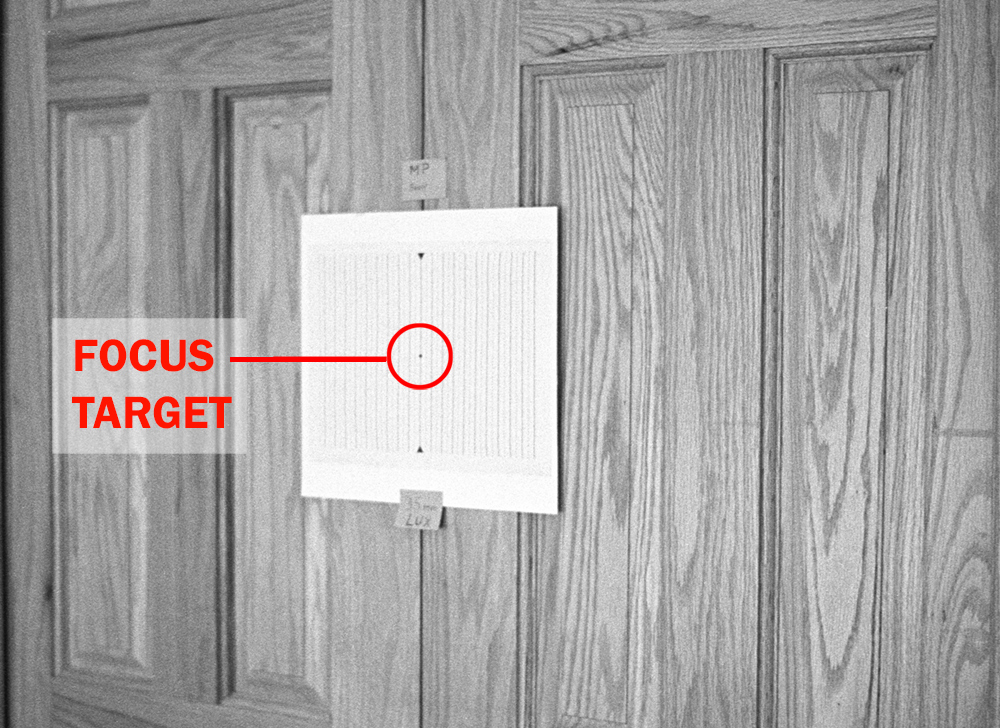
However noticed that it started "front focusing" - focusing not on the subject, but somewhere in front it. Further, I found this to be erratic. It didn't always happen, and it looked like it was more severe with shorter lenses. Below is a test image that shows the zone of sharp focus clearly off the entire target onto the nearby wood. (Shot on a tripod using the 1.25x eyepiece focusing magnifier for precision)
|
|
Here's a crop from the center of a test
frame. In the original, it's apparent that the plane of sharp focus is entirely
to the right of the chart.
The wood grain that is closer to the camera is sharper. The picture is front
focused - picture sharpness is in front of where it should be.
(Click to enlarge) |
The rangefinder mechanism checked out OK, so something else was causing front focus problems. I started
to wonder about the film location in the back of the camera. If the film wasn't seated
properly against the focal plane rails, that could cause the problem.
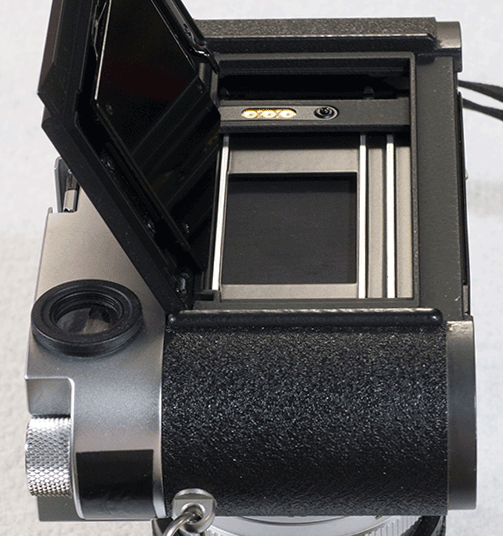 |
The film, if properly positioned in the
camera, should nestle between the outer rails (only the bottom
positioning rail is visible because of the hinge mechanism). These outer rails are machined slightly taller
than the inner rails to provide a channel for the film to move through. The two inner rails provide the surface against which the film is pressed to space it properly from the lens. If the film isn't pressed against them, focus will shift. |
I loaded a roll of film, advanced to about frame 5, and then carefully removed the bottom plate and lifted the hinged back. Here's what I saw - the film strip was positioned below where it should be and was overlapping the taller bottom rail (the one pictured at the right in this orientation). This positioned the film further away from the lens than it should be.
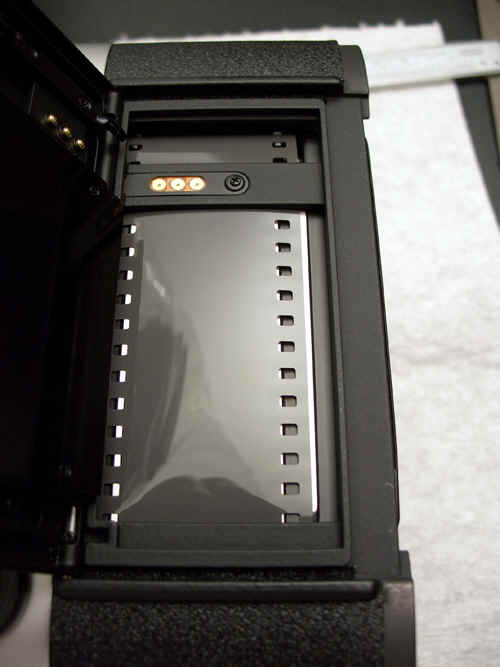 |
Telltale clue: note how the film rides over
the polished rail visible at the right of this picture instead of nestling
beside it. That rail is located above the film plane in order to provide a
channel for the film, and should guide the film when the back is closed.
When the film is over that rail, it moves the
film further away from the plane of sharp focus - essentially moving focus to favor closer
subjects. This camera didn't guide the film into its proper place when advancing to frame
#1 or beyond. In this picture, the film canister is located at the bottom of the frame, and the take-up spool is at the top. I needed a way to ensure the film canister seated a little deeper within the camera so that the film would easily center between the outside rails. |
I tried carefully loading and advancing the film several times, and the film NEVER ONCE properly
self-centered in the frame rails. I realized that if the film wasn't being aligned into
the proper "groove", the exposed negative would also be off-center on
the film strip. I looked at film shot after the camera was dropped, and saw that the exposed frames were indeed
positioned off-center
between the sprocket holes. See below:
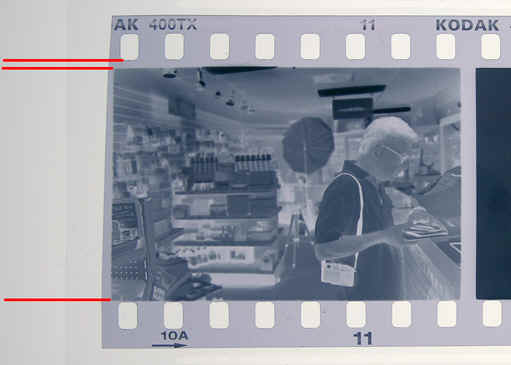 |
Smoking gun: Film that is loaded out of
position will show exposures
that are off-center between the rows of sprocket holes. This is convincing evidence that the film wasn't being guided properly into place. |
It became clear that the film cassette wasn't being positioned deep enough to let the film
self-align while advancing to frame #1. It was seated firmly when I loaded the film, but
drifted toward the bottom of the camera after I closed the back, turned the
camera upright, and advanced several frames. There was too much room for
the film canister to drift around inside the camera.
Time for a shim.
I used slippery Tyvek self-adhesive tape to fabricate a double-thickness shim for the bottom plate. Tyvek, a spun polyethylene material, is very strong and does not shed lint nor tear. Most people are familiar with Tyvek material in the form of strong envelopes for mailing heavy documents.
| I used slippery Tyvek to fabricate an
inexpensive shim for
the baseplate. This particular shim was made from self-adhesive Tyvek tape. Peel the backing and it sticks well. My roll of Tyvek tape was purchased from Light Impressions years ago. |
The shim is located where the film canister "nubbin" bears against the bottom
plate. It solved the problem completely by pushing the film cannister into the
camera body a small amount more. I used a Sharpie pen to blacken it after taking
this picture.
| The shim shown in position on the camera baseplate. (Note: the MP baseplate is different from my M6 baseplate. My M6 baseplate wouldn't fit the MP body for any of my experiments.) It took a stack of two shims for adequate thickness. Each one is 0.008" thick, for a total shim thickness of 0.016" in this camera. I used a Sharpie pen after I took this photo to blacken it. My problem was solved cheaply. This should last until it is time for a CLA in a few years. |
Past problem with another M camera
I also remembered back in 1999 when I photographed a lecturer in a large
auditorium using my M6 when a similar front-focus problem baffled me. I was
certain that I focused on the lecturer, but the front row of the audience was sharp instead. It continued to baffle me how I could miss focus so much
until I took out the negatives for another look. Guess what I found - off center
exposures! In this case the film also wasn't located properly in the "groove".
Apparently this can happen sometimes on even well-behaved Leica M cameras if
film loading is incorrect.
The lesson learned is that if you have mysterious front focus problems, take a close look
at the negatives to see if the exposures sit evenly between the sprocket holes. It could
be the problem isn't with your focusing technique or a rangefinder adjustment issue. It
could simply be that the film isn't where it should be inside the camera. A
simple shim can improve your chances for properly loaded film on some cameras.
Further Thoughts
I have heard of others that have the same problem with film alignment in their cameras.
These reports come from users who have not dropped their camera as I did. This indicates
that tolerances within the camera can stack up to prevent reliable film loading within the
guide rails. With these cameras, a careful film loading technique must be used to ensure
the film loads into the side guide rails before the camera is closed. Perhaps a commercial
product - a more elegant solution than mine - could be made to permit more rapid film
loading while retaining good film registration.
A shim such as mine will not compress much if a tall film can gets loaded. It also won't accommodate a wide range of tolerance mismatches in different cameras. A commercial product should adapt to a such variances.
A improved commercial solution would be a doughnut of compressible material faced on one side with a smooth bearing surface (for bearing against the plastic film canister nubbin). The compressible material could be a sponge polymer material. The sponge material should be capable of compressing to a fraction of its former thickness to accommodate cameras with only a slight gap between film and baseplate. A self-adhesive backing for applying the shim is fine because even a modest grip is made more substantial by the force of the film canister bearing against it. There are never any shear or tensile forces applied, only compressive forces which act to reseat the shim. Chances of the entire shim coming loose within the camera are low, but materials that do not decompose into smaller debris should be chosen.