Meeting 2
Chi ben comincia e' a meta' dell'opera
Topics: Lab basics, tools basics, and preliminary selection techniques.
Lab basics:
|
Logging onto a VisCom lab computer...
If a computer has just been started, or if the last user has logged out, log
onto any lab computer by typing:
student (in the login name field)
pass (in the password field)
|
|
Logging onto the VisCom server using a Mac on-campus (i.e.
our Lab)
Choose the Mac's Go menu item at the top, and type the server address and login
(vico_371) given in class.
Write it down. The password will also be given in class.
When you see a listing of classes on the server, choose VICO_371_571
|
|
Logging onto the server using a PC:
Won't work. Sorry, PC users.
|
|
Logging onto the server from Off Campus using a Mac:
You might try the afp address used for on-campus access. There
are no guarantees. If you need continuous access to the files, copy them to a
flash drive or CD. This will be wise in case of server outages, etc.
|
IMPORTANT NOTE: After you copy a file to the server, DO NOT
ATTEMPT TO REPLACE IT OR OVERWRITE IT. This may cause an empty file
containing no data. If you have an update to your file, change the name of the file
slightly, i.e. smith_keyassign.jpg -----> smith_keyassign2.jpg before you
attempt another upload.
Also, do not save a file from Photoshop directly onto the
server. Save it locally first, then copy it to the server.
Once you have chosen a network drive, the
network connection can be appended to a list (Macs only) in the Go>Favorites menu item.
Click the "+" button to add it to the list. This becomes a shortcut for
future network logons.
Flash Memory "keys": If you insert a removable
memory key, be careful not to physically remove it until you have done a software
"Eject". This is done by dragging the icon of the removable memory key to the
location of the Trash. The operating system will turn the Trash icon into an Eject icon
when it senses that you wish to dismount a removable drive.
Failure to "Eject" a removable drive/key before you physically
disconnect it may result in a loss of data or permanent damage to the unit!
External hard drives: If you are thinking about an
external hard drive to store your files, many students buy LaCie or Firelite brands. Make sure that you get one that is powered by the computer connection and
doesn't require a separate power block. Also be very sure that you follow the
manufacturer's instructions for un-mounting the drive after you are done copying files.
Generally that involves dragging the icon to the Trash/Eject icon on the computer desktop
just like for flash memory devices. If you just yank the cord without proper shutdown
procedure, you could lose all the data on the hard drive, or worse.
Recording on CD-R or DVD disks: If you wish to save your files
to a blank CD-R or DVD disk that you have inserted into the machine, first save the files to the
desktop where you can find them. Then drag the desired files onto the CD icon on the
desktop that appears after you insert a writeable disk. When all files you wish to save have been dragged onto the icon, make sure the
disk
icon is highlighted (click once on it if it isn't highlighted) and record the
disk by
choosing File>Burn Disk. Eject the disk when done by pressing the Eject button on the
keyboard or by dragging the disk to the Trash/Eject icon.
Photoshop basics:
Launch Photoshop by clicking on the Photoshop icon from the dock that appears when the
mouse cursor is moved to the bottom of the screen. Note that although VisCom computers are
configured to have the dock at the bottom by default, a previous user may have moved it to
another part of the screen (left side, etc.). If it doesn't appear on the dock,
then launch it from the hard drive>applications folder.
Previous users may have altered the standard locations and
behaviors of
tools and palettes within the Photoshop program. When starting fresh, it's a good idea to reset as much as you can to
the default to prevent confusing surprises.
To reset palette locations to default: Choose
Window>Workspace>Reset Essentials
To reset tools: Click on a tool in the vertical toolbox (i.e. the
Paintbrush tool), go to the left-most icon on the Options bar at the top, click the down
arrow, click the little round button with an arrow in it, choose "Reset All Tools", click
OK.
To reset tool presets: Click on a tool in the vertical
toolbox (i.e. the Paintbrush tool), go to the left-most icon on the Options
bar at the top, click the down arrow, click the little round button with an
arrow in it, choose "Reset Tool Presets...", click OK.
These steps will not reset everything to their defaults, but will take
care of a majority of potential problems.
TIP: Resetting nearly everything...
If you want to reset nearly all settings in case of
strange Photoshop behavior, close the program and
restart while holding down the Command-Option-Shift keys until a dialog box appears asking
if you want to delete the Photoshop settings file. Choosing "Yes" resets
everything except color settings. This could be very useful if your copy of Photoshop
"misbehaves" and you can't figure out what setting has caused the behavior.
TIP: Checking Color Settings...
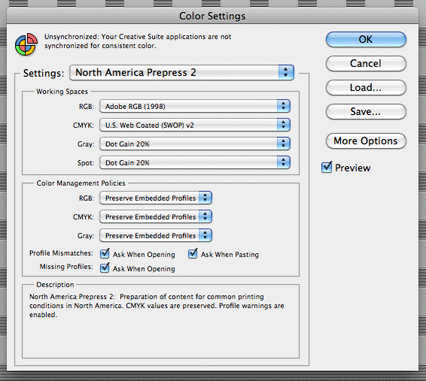
The lab's Epson printers expect to have RGB files in the AdobeRGB(1998)
color space. Reasons for this will be explained later in Meeting 12, but for
now, check to see if your copy of Photoshop is set correctly.
When Photoshop is running, choose Edit>Color Settings, and
select North America Prepress 2 in the Settings list.

Note that "resetting nearly everything in Photoshop" does
NOT affect the settings chosen here. They stick unless changed by the user.
Creating a new file from scratch - use File>New or type
Command-N on the keyboard. The resulting dialog box will have a number of settings where
you specify print size, resolution, color mode of the picture, and assign a file name if
desired.
Saving a file to different file types - use File>Save or Save
As. This dialog box will let you name the file, specify its location, and in which file
format you wish to save the file (JPG, TIF, etc.). Notice that you cannot save
to a camera RAW format file, not even to Adobe's own DNG file format. Consider
that a good thing so that original camera files aren't accidentally overwritten.
In the last meeting, different file types were compared. On the web, only a
handful of different file types will display properly across all browsers. For
other file formats (i.e. PICT, TGA, TIF, PSD, etc.), different web browsers behave differently. For
example, Safari on the Macintosh will display a Photoshop PSD picture, but
Internet Explorer on a Windows machine will not.
 |
Here's a test page that will show how various
graphic file formats (EPS, JPG, TIF, etc.) are displayed (or not displayed!) in
web browsers. File formats that are incompatible with your web browser won't
display properly. |
Tools Basics
Commonly used Photoshop tools will be introduced in class.
TIP: Before you begin, change preferences for tool
icons Photoshop>Preferences>Cursors) to show "Normal
Brush Tip" for Painting Cursors and "Precise" for Other Cursors.
This presents the best combination of cursors for the experienced user.
Painting
Make a new 5x7 inch x 200 dpi RGB picture (File>New...)
Make a second new document to see how additional documents
display in new tabs in CS5. It makes new tabs for each new picture added,
and doesn't put each picture in a separate window. Merely click on the
appropriate tab to see each picture. If this new behavior is not desired, choose
Window>Arrange>Float All in Windows to temporarily return the older way of displaying
multiple documents.
TIP: Use Preferences>Interface>Open Documents as Tabs to
choose whether to open new documents as tabs or not as the default behavior.
Use the paintbrush tool in standard mode and in airbrush mode
(click button on Options bar to toggle between regular paintbrush and airbrush).
Change brush options (mode, opacity, flow, etc.) on the Options bar at the top of the window.
To change a brush size, click the blue down arrow to the right of the brush tip
shape on the Options bar. There is a slider to allow brush size changes.
Select the pencil
tool (nested under the paintbrush icon in the tools palette), eraser, gradient fill tool,
etc. and notice how the options change depending
on which tool is selected.
Brush size changes can be done
using the Brush list on the Options Bar near the top of the screen. These options change depending on which
tool is currently selected.
TIP: Keyboard shortcut - if you want to quickly change the size of a brush
while working, simply press the keyboard bracket character ( [ ) to make it smaller and
the left-facing bracket ( ] ) to enlarge the brush.
TIP: To quickly change Opacity or Flow settings in the
Options bar, click on the words "Opacity" or "Flow" and drag the mouse left
or right. Watch the number settings change. These are called "scrubby
sliders" by the Adobe folks.
NOTE: CS5 has a new default brushes list with more artistic
brushes and fewer basic brushes. If you prefer the older one that shows many
different sized circles (both hard-edge and soft-edge), then change the
defaults. Click the round arrow at the top right of the open brushes list,
select Replace Brushes, and navigate to the Applications>Adobe Photoshop
CS5>Presets>Brushes folder. Choose Basic Brushes to get the selection of
basic round brushes.
Changing Colors - Using the Swatches palette is one option. You can
also click once on the Foreground Color in the Tools palette to bring up the Color Picker.
The Color palette is another place to select colors either by number or by manipulating
the sliders. Lastly, you can directly choose a color by clicking on the portion of the
rainbow palette at the bottom of the Color palette.
Switching foreground and background colors can be accomplished by clicking
the double-headed arrow near the tool box swatches or by pressing an "X" on the
keyboard.
TIP: Command-click (press and hold the keyboard Command key down and then
click) on a swatch in the Swatches palette to directly choose a new Background Color. NOTE: Older Pre-CS versions
of Photoshop used the
Option key instead.
Zooming Around
There are many ways to change your view of a picture in Photoshop.
Listed below are a few ways that you can do it...
Zoom Tool
There are numerous ways to zoom in and out in Photoshop. The most obvious way is to employ
the Zoom tool (it looks like a magnifying glass in the Tool palette). Clicking on the picture
magnifies your view of the picture incrementally. Option-clicking zooms back out to a
smaller view of the picture.
Keyboard Shortcut
Other keyboard shortcuts include Command "+" (hold
the Command key and press the plus sign key) to zoom in and pressing Command "-"
(hold the Command key and press the minus sign key) to zoom back out. You should
remember these two keyboard shortcuts for zooming because there are certain
situations where they are the ONLY method that works.
Navigator Palette
The Navigator palette is not displayed by default in CS5 (I suppose that few
people used it). If you want to use it, go to Window and choose Navigator.
It has a zoom slider which permits zooming in and out.
In addition, clicking on the little or big "mountain" icon in the Navigator
palette zooms out and in respectively.
Numerical zoom % changes
You can also swipe over the magnification percent
in the Navigator palette and change the zoom numerically. This also works on the zoom
percent shown on the lower left corner of the picture itself.
Double Click the "Grabber" Hand tool
There are ways to enter preset views quickly. Double-click the Hand tool
in the Toolbox to magnify the picture enough to just fit on screen. With some tools
selected, this option is also achieved by clicking on the "Fit On Screen" button
on the Options bar. The keyboard shortcut Command-0 (a zero character, not an O)
also makes a picture fit the screen.
Double Click the Zoom tool
Double-click the Zoom tool to quickly go to the 100% view - the view that
shows how big your image will be when viewed on a web page. (The 100% view is likely NOT
the size at which the picture will print! It means that each individual pixel in the image
is displayed on one screen pixel - it's a one-to-one mapping of the image pixels to the
screen. Note: This fact is a likely candidate for a final exam question.)
Option-mouse wheel to zoom in and out
On a Mac with a scroll wheel, hold Option and scroll the wheel to zoom in
and out.
Control-Click or Right Click in picture (if right
clicking is enabled on your computer)
When using the Zoom tool, you
can hold the Mac's Control key down and click in the picture (or use a
right-click without the Ctrl key) to show a
pop-up zoom menu with five choices -
Fit on Screen
Actual Pixels
Print Size
Zoom In
Zoom Out
The Actual Pixels choice is the 100% magnification view. It
shows the size of the picture as seen on the web.
Note: To enable right-clicking on a modern Macintosh computer,
go to System Preferences>Keyboard and Mouse and click on the Mouse tab. If your
computer and mouse support it, choose Secondary button in the menu pointing to
the right side of the mouse.
Note2: Introduced in CS4 and continued in CS5 is the Pixel Grid which becomes visible at
high magnification (>500%). To disable the pixel grid, go to the menu item
View>Show and uncheck Pixel Grid.
Note3: New in CS5 is "scrubby zoom" behavior which you may
either love or hate. To disable it, uncheck it on the Options bar when the Zoom
tool is selected.
Gradient filling a selected area
Open Golfer Silhouette.tif (found in the Exercises 1 folder).
Change the file's Mode to
Grayscale, then change it once more to RGB Color...
(Image> Mode> Grayscale, then
Image> Mode> RGB).
Select the background. We'll find that the venerable Magic Wand tool works
perfectly well with this picture. Photoshop CS3 introduced a useful Quick
Selection Tool that is grouped with the Magic Wand tool. The Refine Edge button
on the Options bar for this tool appears to give a fair amount of control over
the initial selection. However, we won't use it for this exercise.
Choose the Magic Wand tool (NOTE: don't confuse it with the
Quick Selection Tool added in CS3).
Turn anti-aliasing OFF in the Magic Wand tool's Options bar
(uncheck the box).
Anti-aliasing should be OFF when selecting black and white line-art like this
picture or you could get grayish edges on the artwork after subsequent
editing.
Select the white background around the golfer with the Magic Wand tool by clicking on it.
You should see an animated marquee - often called 'marching ants'.
Fill the selected background area with a gradient fill of your choice of
colors using the Gradient Fill tool and different background and foreground
colors.
After filling with a gradient, then try to select the
background gradient with the Magic Wand after filling to see how poorly the Magic Wand
works on objects comprised of varying colors. The workaround for this file is to first
select the golfer silhouette then choose Select>Inverse to select the background. That
works because the silhouette itself is all one color (black).
More tools using Clocks1.tif
Open clocks1.tif in the Exercises 1 folder. Use Zoom tool to see how the faces are
backwards. Then use Image> Image Rotation>Flip Canvas Horizontal to correct the
mistake.
Handy Tip: When you are zoomed in on a picture, you sometimes
need to get to another part quickly. To do that, hold the keyboard spacebar down to
change whatever tool you are
currently using into the Hand tool. This enables you to quickly pan around the zoomed
view. When you release the spacebar, the cursor switches back to the tool you were using
before. This saves a lot of mousing around between the picture and the toolbox.
TIP: Beginning in CS4, "Flick Panning" is enabled as a default.
This lets a panned picture "coast down" to an eventual stop. To disable Flick
Panning, go to Photoshop>Preferences>General and uncheck "Enable Flick Panning".
Practice using the Dodge/Burn, Sharpen/Blur tools and their options on the Options bar.
Rubber stamp tool -- select a source area by Option-clicking from where
pixels are to be copied, then move the mouse to a new location and begin painting. Notice
how the cross-hair cursor shows where pixels are being copied from, and the other cursor
shows where they are being copied to. A common problem for beginners is selecting a source
point too close to the destination point - odd repeating artifacts appear. Another problem
is trying to do all the retouching in just one extended click/drag of the mouse which will
also invite repeating artifacts.
Note: Beginning with CS4, Photoshop now shows the clone tool cursor with the content
carried inside. If you wish to return to the earlier way the rubber stamp tool
worked, choose Window>Clone Source to show the Clone Source palette, and uncheck
Show Overlay in the palette.
Selecting an area using the lasso tool
Use the Lasso selection tool to select the clocks then choose Select> Inverse to select
the background. Gradient fill the selected background.
Rotate command - first Select>All (or type Command-A), then choose either
Image>Image Rotation, or better yet, choose Edit>Transform>Rotate. (Helpful Tip:
drag non-printing guidelines from rulers if they are visible to ease the task of alignment
for either horizontal or vertical lines. To make rulers visible, choose View>Rulers or
type a Command-R).
Note: CS4 introduced a new Rotate View Tool which rotates the
view of the picture ONLY, but does not alter the picture itself. In other words,
it doesn't change the rotation of the picture when printed. In CS5, it's found
nested with the grabber hand tool.
It is meant to aid
illustrators working with a tablet creating sketches onscreen, working in a way
as if they rotated their art paper on the desk when working. For a short online
video on how this feature is meant to be used, go to:
http://www.vimeo.com/2218899
After selections have been made, they can be modified. Use the Option key with any
selection tool to subtract parts away from an existing selection, and use Shift with any selection
tool to add additional parts to an existing selection. In summary....
Shift adds,
Option subtracts!
turtle


