 |
 |
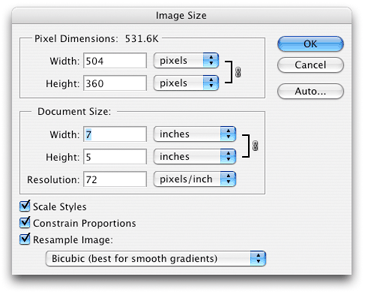
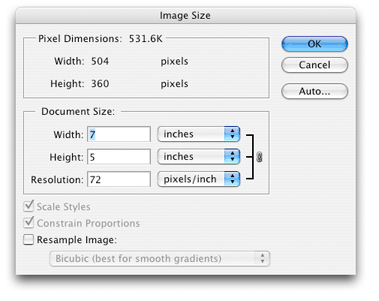
| Resample Image box checked - can add or reduce pixels | Resample Image box not checked - no pixels are changed |
Meeting 4
Batti il ferro finche' e' caldo
Topics: Pixel math and resolution, Image Size dialog box, introduction to Layers,
creating drop shadows using layers.
Things to take: Illustrations of very low resolution vs. a more normal resolution.
Pixel Math
Dpi/ppi (dots per inch and pixels per inch) are a measure of resolution. The terms are
often used interchangeably, although pixels per inch is more accurate. It is a linear
measure. For most pictures in Photoshop, the resolution is the same whether measured
vertically or horizontally. This is because the pixels in the image are square. Some video
applications however use non-square pixels and the vertical resolution may be different
from the horizontal.
Photoshop shows resolution in the Image>Image Size command. TIP: Hold the Option key and click on the information in the lower left corner of the window to display more image information without going to the Image>Image Size command.
Files can start out large, and can be resized down, but cannot be resized upward in resolution in an attempt to restore detail. Missing detail cannot be replaced by simply upsizing. Open Grayscale church (Exercises 1), resize to 12 dpi, then scale back up to 72 dpi to see the effect.
There are often questions about how dpi interacts with lpi (lines per inch). Lines per inch is a printing specification for a halftone screen, and not a characteristic of a picture file itself. When sizing pictures for printing, the rule of thumb is to double the lpi number to figure how many pixels per inch (dpi) you need for your digital picture. For example, a picture that will be printed in a magazine at 133 lines per inch (lpi) will need to be double that number in resolution (2x133 = 266 dpi). This assumes that you will not be enlarging or reducing the picture.
Short quiz on figuring different picture sizes and pixel sizes and resolutions. (Resolution quiz.wpd). Also handout resolution equations (res_equations.wpd).
One important thing to remember is that the 100% view in Photoshop is most likely NOT the size at which the picture will print. It is the size at which each pixel in the picture is displayed on one screen pixel. I have a series of pictures here that might help to explain why for the curious.
In another page, I've postulated that web browsers ignore resolution tags in the file. The page has two pictures, one at 300 pixels/inch and a second at 72 pixels/inch. The often quoted web standard is 72 pixels/inch, but you can see on the page that it really makes no difference. We'll continue to use 72 pixels/inch because it often keeps web designers out of trouble.
Changing Resolution in Photoshop
Keep one principle in mind when changing the size of an image - it's
potential for quality is determined solely by the number
of pixels (horizontally and vertically) of the image. Resolution or print
size (inches) specifications alone may be misleading!
To change resolution of an image, use the Image>Image Size dialog box. It lets
you change print-size, resolution, and the number of pixels in an image. It can be tricky
to use though if you don’t understand certain principles.
Pay special attention to the choices in the Image>Image Size dialog box when you change resolution or size of your image. In particular the Resample Image checkbox affects profoundly the way that Photoshop handles resizing or resolution changes.
- If Resample Image is checked, pixels are either thrown away or added to the picture. Remember that adding pixels does not add sharpness - they are artificially generated through interpolation.
- If Resample Image is unchecked, Photoshop keeps the same number of pixels in the picture even though the picture is resized. The same number of pixels means that the file size remains constant, and all you are doing is redistributing the pixels in space. The resolution changes because the same number of pixels must fit in a different sized space. Pixels packed in a smaller space mean a higher resolution, while the same pixels in a larger picture mean lower resolution. Remember that resolution is the number of pixels that fit in an inch.
Practice using this dialog box and learn what the different controls do. Notice when things are grayed out and understand why they do so when certain choices are made.
 |
 |
| Resample Image box checked - can add or reduce pixels | Resample Image box not checked - no pixels are changed |
Layers
Start the exercise by resetting all tools to their defaults. To reset tools and
their presets, click the tool's icon on the
upper left of the Options Bar, then click the little right-facing triangle arrow in the
circle, and finally choose "Reset All Tools". Then follow the steps again, and
this time choose "Reset Tool Presets..." This reinstates most default tool settings.
To begin, create a blank 3x3 inch drawing. Create marks of one color on the background, add a layer using either Layer>New>Layer menu command or by clicking the Create a New Layer icon (looks like a turned-up page) in the Layers Palette. On the new layer, make marks of a different color.
Use the Move tool (V) to move the upper layer around to see how layers are independent from each other and can be manipulated individually.
Change the order of individual layers by dragging them up or down in position in the Layers palette.
Hide the contents of a layer by clicking on the eye icon on the left of the layer in the Layers palette. Clicking the icon again returns the layer to visibility.
Lock two or more layers together to move them in "formation" by shift-clicking the additional layers and then clicking the little link icon at the bottom of the Layers palette.
Use Image>Adjustments>Levels (or Curves, or whatever...) to see how other
commands affect only one layer at a time. (Multi-layer document changes can be made using
Adjustment Layers to be discussed later.)
DROP SHADOWS
Create drop shadows that follow the internal contours of a line-art file:
Open eagle54.tif (Exercises 2).
Convert to grayscale (why this is necessary?)
Click the magic wand tool, select anti-aliased OFF in the Options Bar. Generally, anti-aliased is turned OFF when working with line-art images like eagle54.tif, and is turned ON for selecting parts of a photograph.
Select a black part of the image with the magic wand. (Click on something black)
Select>Similar to select the rest of the black image
Layer>New>Layer via Copy (or press Command+J)
Name new layer to identify it if desired -- double click on the layer name (it's probably named Layer 1 by default) in Layers Palette.
Hide the new top layer from view (clicking on the little eye icon beside the layer thumbnail)
Choose bottom layer in the Layers Palette by clicking on the layer name
If there are any selection marquees (marching ants) still active, choose Select>Deselect.
Image>Adjustments>Levels, and move the bottom black slider to a new position under light gray
Gaussian blur 3.2 pixels (Filter>Blur>Gaussian Blur)
Make the top layer visible again (click its eye icon)
Choose the top layer (Click on the name of the top layer in Layers Palette to make it the active layer)
Move top layer to offset shadows from image using the Move tool (or type a "V" as a shortcut to select the Move tool)
Flatten image (in Layers Palette, click the upper right arrow, choose Flatten Image
from list).
Overall drop shadows on rectangular pictures
Steps for a simple way to make custom drop shadows on pictures. This is the most common
type of drop shadow. It is seen on countless web sites and in numerous ads.
Open stella_and_sara.tif (in Exercises 4)
Select>All, or use the keyboard shortcut Command-A.
Layer>New>Layer Via Copy (or type Command-J).
Choose the background layer once again by clicking on the layer name in the Layers palette.
Make the top layer invisible by clicking on the eye icon for that layer in the Layers Palette.
Click on a light to medium gray color in the Swatches Palette and make it the foreground color.
Edit>Fill, and choose Foreground Color for contents.
Ensure that White is the background color before performing the next step (keyboard shortcut: type "d" to get the default colors).
Image>Canvas size, add ½ inch border all around by adding 1" to overall measurements (be sure bottom layer is the selected layer).
Make top layer visible again by clicking to display the eye icon in Layers palette.
Filter>Blur>Gaussian blur bottom layer. About 7 pixels blur works with this image.
Use the Move tool (v) to offset the upper picture to allow the shadow to show.
Note: When cropping pictures with a drop shadow, allow plenty of room past
the shadow to allow it to fade to pure white. It may look white to the eye, but
may still be fading out. Otherwise, it will have a sharp edge at the shadow when
placed against a web page background, or when printed on white paper. Avoid this
cut-edge look.
Overall drop shadow on irregular shape.
Open eagle54.tif in the Exercises 2 folder.
Convert to grayscale (Image>Mode>Grayscale)
Change background color to white (Hint: You can Command-click on a swatch color to choose a new background color. Also remember that typing a "d" selects the default colors - black foreground, white background.)
Image>Canvas Size -> add ½ inch all around (=1 inch overall added to both dimensions).
Turn anti-aliasing OFF in Magic Wand options (check setting in the Options bar).
Select the sky with the Magic Wand.
Inverse selection (Select>Inverse).
Layer>New>Layer Via Copy.
Name the new layer by double clicking on the layer name.
Click on the bottom layer to make it the active layer.
Choose an outside sky area with the Magic Wand tool.
Select>Inverse to choose the eagle outline.
Edit>Fill with 50% gray contents to fill the background's graphic with gray.
Select>Deselect (or type Command-D).
Gaussian blur about 7 pixels.
Choose the top layer by clicking on its name in the Layers Palette.
Select the Move tool (V).
Offset the top layer artwork using the Move tool.
If you move the background instead by accident, a checkerboard pattern appears to indicate that nothing (transparency) is there. You can Undo, or fill the transparent area with white, or Flatten Image in the Layers Palette with white as the background color to get rid of the transparency checker pattern. (Click the top-right arrow in the Layers palette to see the Flatten Image command).
Crop out unnecessary white space.