Meeting 2
Chi ben comincia e' a meta' dell'opera
Topics: Server and Lab basics, Picture modes and file formats
Handouts: Spreadsheet chart of different file formats and modes
(data types).
Lab basics:
You'll use the server to submit homework and creative assignment files. To access the server, I've prepared some instructions below:
|
Logging onto a VisCom lab computer
to use it... The syntax should look something like this, but with your own information used instead
If that fails, then try this combination - scc lab (in the login name field, or via the scc lab button on desktop) and use pass (in the password field) There are operational advantages (preferences, etc.) when using your usual university ID and password, so try it first. Be sure to logout when you are done with class! If you have trouble with a lab computer in Schoonover or
RTV, send a work request... |
|
Logging onto the VisCom
server using a Mac on-campus...
Write it down. Use you student login ID and password again to log into the server. If you see a listing of server volumes, first choose the 2017-Spring volume, and then inside that, choose the folder for this class. (Undergrads - VICO_2400_xxx, Graduate students - VICO_5400_xxx) Please DO NOT use the Keychain feature of the lab Macs for your password! That prevents access from the computer for other VisCom classes having different server volumes and logins. |
|
Logging onto the server using a Windows PC on-campus... Windows 10: In the space to the right of the start button, type: Pay attention to the direction of the slashes here! It might take a while while the machine searches for it, especially the first time you do it. Note: This may work with Windows 10 computers too, but I don't have one on campus to test. If someone can experiment with one, please let me know the results.
|
|
Logging onto the server from Off Campus using a Mac or Windows via a web browser... Open a web browser, and type in the address line:
You will be asked to enter your login ID and password. Navigate to the folder desired. Note that this method offers limited functionality and the interface is very cumbersome.
|
|
Logging onto the server from Off Campus using a Virtual Private Network (VPN)...
Before you can connect, you will need to install and connect to the OHIO SSLVPN.
See the video instructions below on how to download, install, and configure the
VPN for your first connection.
|
IMPORTANT NOTES: After you copy a file to the server, DO NOT ATTEMPT TO REPLACE IT OR OVERWRITE IT. This may cause an empty file containing no data. If you have an update to your file, change the name of the file slightly, i.e. smith_keyassign.jpg -----> smith_keyassign2.jpg before you attempt another upload.
Also, do NOT save a file from Photoshop directly onto the server. Save it locally first, then copy it to the server.
Once you have chosen a network drive, the network connection can be appended to a list (Macs only) in the Go>Favorites menu item. Click the "+" button to add it to the list. This becomes a shortcut for future network logons, but still doesn't memorize your name and password - a good thing.
Do NOT save a network connection on the Mac's keychain because people in other classes won't be able to reach their own class folders. (If it happens to you on a lab computer, HERE is the fix)
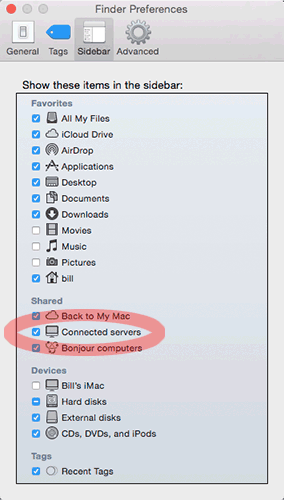
A Recent Problem
With an update to the Mac OS, you may be logged onto the school's server, but
it's icon does not display on the desktop. If that happens, go to Finder >
Preferences, and click the Sidebar tab. Make sure that connected serves is
checked. See below...
Class Exercise Files: If you need to guaranteed access the Exercise material off-site (and you might), bring a flash drive or hard drive to copy the folders and files to. Keep in mind that the lab is not open 24/7, and there will be times where you have no access to the lab computers, and the server may be having issues.
Flash Memory "keys": If you insert a removable memory key, be careful not to physically remove it until you have done a software "Eject". This is done by dragging the icon of the removable memory key to the location of the Trash. The operating system will turn the Trash icon into an Eject icon when it senses that you wish to dismount a removable drive.
Failure to "Eject" a removable drive/key before you physically disconnect it may result in a loss of data or permanent damage to the unit!
External hard drives: Be very sure that you follow the manufacturer's instructions for un-mounting the drive after you are done copying files. Generally that involves dragging the icon to the Trash/Eject icon on the computer desktop just like for flash memory devices. If you just yank the cord without proper shutdown procedure, you could lose all the data on the hard drive and render it completely unreadable.
Also note that USB 3.0 devices (often shows an "SS" logo for "Super Speed") will transfer files much faster than the older USB 2.0 drives or flash memory.
Obsolete but perhaps it's useful - Recording on CD-R or DVD disks: If you wish to save your files to a blank CD-R or DVD disk that you have inserted into the machine, first save the files to the desktop where you can find them. Then drag the desired files onto the CD icon on the desktop that appears after you insert a writeable disk. When all files you wish to save have been dragged onto the icon, make sure the disk icon is highlighted (click once on it if it isn't highlighted) and record the disk by choosing File>Burn Disk. Eject the disk when done by pressing the Eject button on the keyboard or by dragging the disk to the Trash/Eject icon.
Some computer models (especially laptops) don't have a way to read DVDs/CDs without buying an external drive, so be sure that reading disks is possible if you want to use them.
Saving Files and File Modes (Review handout)
File Modes: (Choices are found under Image>Mode in Photoshop) Discuss types of files (bitmap vs. vector) and how bitmaps are grids of pixels. Bit-depths (1- bit=b/w only, 8-bit grayscale = 256 shades of gray, 8-bit/channel (24-bit)=16 million colors, etc).
File Mode Examples:
 |
 |
 |
 |
 |
| Bitmap mode ("Line Art") | Grayscale | Indexed Color | RGB | CMYK for print (above is simulation) |
| two colors -> B or W | 256 shades of gray | 256 colors max, adaptable palette | 16.7 million colors | <16.7 million colors |
| [21 or 1-bit] | [28 or 8-bit grayscale] | [28 or 8-bits total color] | [in typical 8-bits/channel picture] | [limited by actual ink/paper properties] |
| Illustrations © 2012 William R Schneider - All Rights Reserved | ||||
Choosing Different File Formats When Saving:
Different file formats (EPS, TIF, JPEG, GIF, etc.) available in the Save As menu
item in Photoshop and their advantages and disadvantages. The
handout summarizes
advantages and disadvantages of each file format.
On the web, only a handful of different file types will display properly across all browsers. Web-safe formats are JPG, PNG, and GIF. For other file formats (i.e. PICT, TGA, TIF, PSD, etc.), different web browsers behave differently. For example, Safari on the Macintosh will display a Photoshop PSD picture (thumbnail only), but other browsers will not. If you are placing pictures on the web, play it safe by using only JPG, PNG, and GIF.
 |
Here's a test page that will show how various graphic file formats (EPS, JPG, TIF, etc.) are displayed (or not displayed!) in web browsers. File formats that are incompatible with your web browser won't display properly. |
Note that the file format handout doesn't include all the different file types possible when saving from Photoshop. It highlights just the major formats.
Photoshop basics:
Launch Photoshop by clicking on the Photoshop icon from the dock that appears when the
mouse cursor is moved to the bottom of the screen. Note that although VisCom computers are
configured to have the dock at the bottom by default, a previous user may have moved it to
another part of the screen (left side, etc.). If it doesn't appear on the dock,
then launch it from the hard drive>applications folder.
Previous users may have altered the standard locations and behaviors of tools and palettes within the Photoshop program. When starting fresh, it's a good idea to reset as much as you can to the default to prevent confusing surprises.
To reset palette locations to default: Choose Window>Workspace>Reset Essentials
To reset tools: Click on a tool in the vertical toolbox (i.e. the Paintbrush tool), go to the left-most icon on the Options bar at the top, click the down arrow. In the small palette that displays, click the little "gear" button, choose "Reset All Tools", click OK.
To reset tool presets: Click on a tool in the vertical toolbox (i.e. the Paintbrush tool), go to the left-most icon on the Options bar at the top, click the down arrow. Then click the little "gear" button, choose "Reset Tool Presets...", click OK.
These steps will not reset everything to their defaults, but will take care of a majority of potential problems.
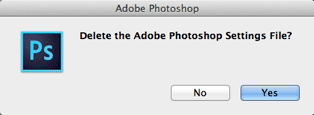
TIP: Resetting almost everything
in Photoshop to defaults...
If you want to reset nearly all settings in case of
strange Photoshop behavior, close the program and
restart while holding down the Command-Option-Shift keys until a dialog box appears asking
if you want to delete the Photoshop settings file. Choosing "Yes" resets
almost everything. This could be very useful if your copy of Photoshop
"misbehaves" and you can't figure out what setting has caused the behavior.
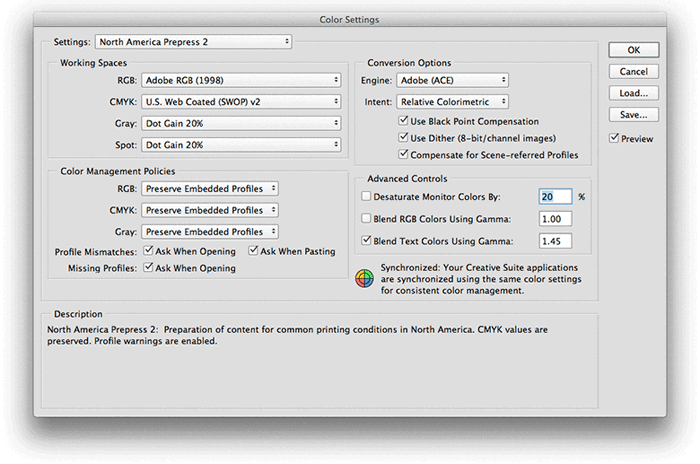
TIP: Checking Color Settings...
The lab's Epson printers expect to have RGB files in the AdobeRGB(1998)
color space. Reasons for this will be explained later, but for
now, check to see if your copy of Photoshop is set correctly.
When Photoshop is running, choose Edit>Color Settings, and select North America Prepress 2 in the Settings list. (Note that if you choose to do this in Bridge, the color settings are applied to all applications in the Creative Suite, including Photoshop.)
There are a couple of important choices automatically selected when choosing North America Prepress 2. The RGB color space is set to AdobeRGB (1998) as mentioned above. Also important are the warnings for mismatched and missing profiles that appear when you open a file in another color space like sRGB. This alerts you to conditions that may affect the color quality of the image.
Note that "resetting nearly everything in Photoshop" does NOT affect the settings chosen here. They stick unless changed by the user.
Exploring the Preferences menu
Significant changes can be made to the look and feel of the program in the
Preferences dialog box (Photoshop>Preferences). For example, if you liked the
previous version's look of dark icons against a light toolbox, go to the
Interface section of Preferences, and click a light gray patch for Color
Theme.
Precise Cursors: One useful change that I always use is to choose the Precise cursor in the Other Cursors part of the Cursors section. This will display a cross-hair for many tools like the Lasso tool, and it shows position better than the clunky standard cursors. It is now the default in Creative Cloud 2017.
Flick Panning: I also like to disable Flick Panning from the Tools category. I find it annoying and slow, but each person can customize the program to suite their own needs. I note that it is now disabled by default in Creative Cloud 2017.
Creating a new file from scratch - use File>New or type Command-N on the keyboard. The resulting dialog box will have a number of settings where you specify print size, resolution, color mode of the picture, and assign a file name if desired. Creative Cloud 2017 has a Welcome screen that enables you to create a new document.
Converting a file to other file types - use File>Save or Save As. This dialog box will let you rename the file, specify its location, and to choose which file format in which to save the file (JPG, TIF, etc.). Notice that you cannot save to a camera RAW format file, not even to Adobe's own DNG file format. Consider that a good thing so that the original camera files aren't accidentally overwritten.
Tools Basics
Commonly used Photoshop tools will be introduced in class.
TIP: Before you begin, change preferences for tool icons Photoshop>Preferences>Cursors) to show "Normal Brush Tip" for Painting Cursors and "Precise" for Other Cursors. This presents the best combination of cursors for the experienced user.
Getting Started
Make a new 5x7 inch x 300 dpi RGB picture (File>New...)
Tabbed Windows
Make a second new document to see how additional documents
display in tabs in Photoshop. It makes new tabs for each new picture added,
and doesn't put each picture in a separate window. Merely click on the
appropriate tab to see each picture. If this new behavior is not desired, choose
Window>Arrange>Float All in Windows to temporarily return the older way of displaying
multiple documents.
TIP: Use Preferences>Interface>Open Documents as Tabs to choose whether to open new documents as tabs or not as the default behavior.
TIP2: Photoshop CC sometimes "hides" files open in tabs, and they appear to have been closed. Check the open file list shown at the bottom of the Window menu list before you panic. This is also a tidy way to switch between open documents if they have descriptive file names.
Painting
Use the Brush tool (shortcut "B") in standard mode or in airbrush mode
(click button on Options bar to toggle between regular paintbrush and airbrush).
Change brush options (mode, opacity, flow, etc.) on the Options bar at the top of the window.
To change a brush size, click the blue down arrow to the right of the brush tip
shape on the Options bar. There is a slider to allow brush size changes.
TIP: Keyboard shortcut - if you want to quickly change the size of a brush while working, simply press the keyboard bracket character ( [ ) to make it smaller and the left-facing bracket ( ] ) to enlarge the brush.
Select the pencil tool (nested under the paintbrush icon in the tools palette), gradient fill tool, etc. and notice how the options change depending on which tool is selected.
Brush size changes can be done using the Brush list on the Options Bar near the top of the screen. These options change depending on which tool is currently selected.
TIP: To quickly change Opacity or Flow settings in the Options bar, click on the words "Opacity" or "Flow" and drag the mouse left or right. Watch the number settings change. These are called "scrubby sliders" by the Adobe folks.
NOTE: New versions of Photoshop have a default brushes list with more artistic brushes and fewer basic brushes. If you prefer the older one that shows many different sized circles (both hard-edge and soft-edge), then change the defaults. Click the gear icon at the top right of the open brushes list, select Replace Brushes, and navigate to the Applications>Adobe Photoshop CC 2015>Presets>Brushes folder. Choose Basic Brushes to get the selection of basic round brushes.
Changing Colors - Using the Swatches palette is one option. You can also click once on the Foreground Color in the Tools palette to bring up the Color Picker. The Color palette is another place to select colors either by number or by manipulating the sliders. Lastly, you can directly choose a color by clicking on the portion of the rainbow palette at the bottom of the Color palette.
Switching foreground and background colors can be accomplished by clicking the double-headed arrow near the tool box swatches or by pressing an "X" on the keyboard.
TIP: Command-click (press and hold the keyboard Command key down and then mouse-click) on a swatch in the Swatches palette to directly choose a new Background Color. NOTE: Older Pre-CS versions of Photoshop used the Option key instead.
Erasing
The Eraser tool (shortcut "E") isn't as straightforward as you may think. Using
default colors for a palette, it behaves as expected with a simple graphic with
one layer named "Background". However if you have a non-white background color,
then it behaves like a paintbrush that uses the current background color.
Eraser brush size can be changed just like the paintbrush tool's. Use the bracket keys "[" or "]" to increase or decrease the brush size.
If you have a multi-layer file open, then erasing on any upper layer will remove all pixels, and the area becomes transparent to layers beneath it.
Gradient Fills
The Gradient tool will (by default) create a gradient between the foreground and
the background colors. You drag out the distance you want to span between the
two colors, and that distance is filled with a blend of the two end colors. The
options bar lets you choose some present gradients like foreground to background
(the default), foreground to transparent, and others.
The gradient tool will fill the entire picture with a gradient unless you make selections beforehand. (Selections will be introduced later.)
Zooming Around
There are many ways to change your view of a picture in Photoshop.
Listed below are a few ways that you can do it...
Zoom Tool
There are numerous ways to zoom in and out in Photoshop. The most obvious way is to employ the Zoom tool (it looks like a magnifying glass in the Tool palette). Clicking on the picture magnifies your view of the picture incrementally. Option-clicking zooms back out to a smaller view of the picture.Keyboard Shortcut
Other keyboard shortcuts include Command "+" (hold the Command key and press the plus sign key) to zoom in and pressing Command "-" (hold the Command key and press the minus sign key) to zoom back out. You should remember these two keyboard shortcuts for zooming because there are certain situations where they are the ONLY method that works.Navigator Palette
The Navigator palette is not displayed by default in newer version of Photoshop (I suppose that few people ever used it). If you want to use it, go to Window and choose Navigator. It has a zoom slider which permits zooming in and out. In addition, clicking on the little or big "mountain" icon in the Navigator palette zooms out and in respectively.Numerical zoom % changes
You can also swipe over the magnification percent in the Navigator palette and change the zoom numerically. This also works on the zoom percent shown on the lower left corner of the picture itself.Double Click the "Grabber" Hand tool
There are ways to enter preset views quickly. Double-click the Hand tool in the Toolbox to magnify the picture enough to just fit on screen. With some tools selected, this option is also achieved by clicking on the "Fit On Screen" button on the Options bar. The keyboard shortcut Command-0 (a zero character, not an O) also makes a picture fit the screen.Double Click the Zoom tool
Double-click the Zoom tool to quickly go to the 100% view - the view that shows how big your image will be when viewed on a web page. (The 100% view is likely NOT the size at which the picture will print! It means that each individual pixel in the image is displayed on one screen pixel - it's a one-to-one mapping of the image pixels to the screen. Note: This fact is a likely candidate for a final exam question.)Option-mouse wheel to zoom in and out
On a Mac with a scroll wheel, hold Option and scroll the wheel to zoom in and out.Control-Click or Right Click in picture (if right clicking is enabled on your computer)
When using the Zoom tool, you can hold the Mac's Control key down and click in the picture (or use a right-click without the Ctrl key) to show a pop-up zoom menu with five choices -Fit on Screen
Actual Pixels
Print Size
Zoom In
Zoom OutThe Actual Pixels choice is the 100% magnification view. It shows the size of the picture as seen on the web.
Note: To enable right-clicking on a modern Macintosh computer, go to System Preferences>Keyboard and Mouse and click on the Mouse tab. If your computer and mouse support it, choose Secondary button in the menu pointing to the right side of the mouse.
Note2: Newly-incorporated starting in PhotoshopCS6 and continued in Creative Cloud is a Pixel Grid which becomes visible at high magnification (>500%). To enable/disable the pixel grid, go to the menu item View>Show and uncheck Pixel Grid.
Note3: Continued in CC is the "scrubby zoom" behavior which you may either love or hate. To disable it, uncheck it on the Options bar when the Zoom tool is selected.
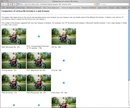
Some Photoshop retouching by
http://ChromaQueen.com
Examples of fine-tuning color, lighting, and other retouching steps.
Short in-class exercise if time remains:
Change an RGB color picture into a Bitmap mode picture and note both its
appearance and the file size during the steps.
Find any color photograph file on the server in any of the folders - your
choice. (Exercises 4 has a lot of color photos). Take note of the file-size
numbers at the bottom-left of the picture after it opens in Photoshop. This indicates how much space the
file occupies. The size should decrease as we remove color from the picture
making it Grayscale mode,
then make it into an even simpler Bitmap mode (black and white only) picture.
In the menu bar, choose Image>Mode and convert to grayscale. Even though the color palettes are still in color, choosing any color swatch displays a shade of gray in the swatches buttons at the bottom of the toolbar. Because we reduce the channels from 3 (in RGB) down to 1 (in Grayscale), the file size is reduced to be about 1/3 the original size.
Now choose Image>Threshold and slide the slider until you find a good balance between black and white. This is still a grayscale file, but it has only two colors in it - black and white. Note that this slider gives you control over blacks and whites, which is something you will not have if you just convert directly from Grayscale to Bitmap mode.
Finally choose Image>Mode and choose Bitmap. Compare this file size with the original file size that you noted earlier. It should be about 1/8 the size of a grayscale file, and about 1/24th the size of the color version. These ratios won't be exact because of file overhead data that remains mostly constant in each example.
Another Short exercise if time remains:
To the Desktop, save a color photo from the server as an uncompressed TIF file,
and also as a JPG format file, quality 7, with no changes to the image itself. Note
the sizes of each file by clicking on each of the new files, and typing Command-I
to get information. Is there a large difference?
Resource: Photoshop Keyboard shortcuts shown graphically - http://waldobronchart.github.io/ShortcutMapper/#AdobePhotoshop
9813ws
![]()