Meeting 27
Topics:
Images created by Photoshop professionals
Editing Video in Photoshop
Anti-aliasing
Stroking the edges of a selection
Actions and Batch Automation
Intro to digital archiving concerns
| Exercise Folder |
Filename |
| #1 |
anti-aliased.tif |
| #4 |
joe.tif |
| #7 |
waltz_jump-edit.avi |
| #7 |
spin_w_camera.avi |
| #7 |
spin_w_camera.psd |
| #7 |
waltz_jump-edit movingmask.psd |
Stump the Chump
The next picture in the series is toned before your eyes.
Inspirational artwork - show Jai Vora's thesis work on Sanjay Kothari.
NOTE: The disk I have will no longer play in modern software less than ten years
after it was made. The disk data is OK, but the software has evolved and will no
longer open older files.
Instead, go to Sanjay Kothari's
website to view some of his work. (Note: The website appears to be down.
Google didn't help much either, although there are some isolated examples show
here and there.)
More inspirational artwork can be found on my Other
Digital Information and News page.
Editing Video in Photoshop Extended Versions
Photoshop EXTENDED will open many video formats, and you can tone
them with adjustment layers, and render them to web-ready GIF files or export
them to other video formats (Flash, Quicktime, AVI, etc).
An excellent book for those wanting to pursue video compositing/editing in Photoshop is
Adobe Photoshop CS3 Extended: Retouching Motion Pictures by Gary David Bouton,
Course Technology, Boston, MA. While several versions have gone by, the
information presented in this older book is still useful.
 |
An animated GIF file in black and white. This file is only 40 kb. A
256-color version of it was a whopping 1.3 MB for this short video, so I
decided not to use it.
Remember that an animated GIF can have 256 colors max, while other
video formats can have millions of colors and still produce smaller
files.
So why didn't I place another kind of video here? Because I don't
know if a viewer has appropriate plug-ins installed in their browser to
view them. |
This posterized GIF animation version was initially shot with a Casio digital camera
in video mode. The original footage used for this video is waltz_jump-edit.avi
(Exercises 7). The file was opened in Photoshop (File>Open), and
I added a threshold adjustment layer to it in the Layers palette as shown below.
This produced the black and white, posterized effect. I also trimmed the beginning and ending footage to show
just the interesting (middle) part of the video using the Animation palette timeline.
Finished videos can be saved to an animated GIF file (File>Export>Save for Web(Legacy)) which can play easily
in a browser window - but adding much color makes BIG files. As a higher-quality
alternative, they may be exported (File>Export>Render Video) in one of different
video formats available. Choose carefully - some formats may require a
plug-in for browser viewing. They can be uploaded to online video services like
YouTube for widespread viewing by most browsers, but quality may suffer because
of YouTube's restrictions on bandwidth.
To trim footage, merely move in the endpoints of the timeline to keep just
the part you want. (See big arrows in illustration above.)
Toning the Original Footage
(NOTE: To make the following steps possible, click the Timeline dialog button
(upper right of the Timeline palette), and UNCHECK
"Enable Auto-Grouping of Clips".)
In the Layers Palette, add a Curves adjustment layer to the file to eliminate
the warm cast of the original footage. It was shot under mercury-vapor lighting,
and has a rather ugly appearance until toned.
You can tone for color or add special effects (i.e. Threshold, etc.) to your video by merely adding
an adjustment layer in the layers palette. The adjustment layer will show as
another timeline in the Animation palette. Because that adjustment has a
separate timeline, its timeline endpoints can be moved to affect only a part of the
footage if that is desired. This method has abrupt starts and stops, however.
Fade to Black
To slowly blend in adjustment layers, additional video footage, or even a
simple fade-to-black layer, click the arrow in the Timeline palette positioned
to the left of the layer name to display the controls beneath, and find the
Opacity control (see screen capture below). In this example, a black layer will
be faded into the end of the video.
To create the black layer, first click on the New Layer button in the Layers
palette. If necessary, move the new blank layer above the layer called Video
Group 1 if the palette shows a Video Group. Note that you may not be able to fill it using Edit>Fill until the next step.
In the Timeline palette, you should drag the new layer to occupy the duration
of the video. You may have to drag either to the left or to the right depending
upon the space it occupies when created. Once it has been
dragged to overlap the existing video footage in the timeline, you may fill it
with black and work with keyframes.
Be sure that the timeline marker is at the start of the video. In the Layers palette, change the opacity of the black layer to 0%
(transparent). Now move the timeline marker to where you want the fade-to-black
to begin, then click the Opacity button (stopwatch icon) to put in a key frame marker.
It's position will be indicated by a yellow shape.
Move the time marker further to the right to a new position where you
want the opacity to reach 100%. Go to the Layers palette, and change the opacity
to 100%. This will automatically put in another key frame at the end point of
the transition to black.
Play the video, or manually move the time marker through the desired area to
see the effect. The yellow keyframe markers can be moved individually to
fine-tune their position.
This technique can be used to splice together two different video scenes with
a cross-fade between them.
Fading color adjustments in or out:
It's fairly common for video cameras to continually adjust for lighting color
and intensity while recording. This can sometimes present a problem because one
half of the video may be properly toned, but it changes in the other half. Copy
the original footage file spin_w_camera.avi and the edited Photoshop file
spin_w_camera.psd to your desktop. Note that original footage is not
automatically included inside the PSD, but is merely linked to it. Both files
are needed.
Open
the file spin_w_camera.psd and play it. Pay attention to the yellow-green
color in the beginning, and how the camera auto-corrects for this color part-way
through. That means that the first half of the video must be corrected by you, and this
correction should fade away as the video progresses and the camera eventually
finds good color.
Enable the Curves adjustment layer for a second playing, and watch how the
color is fairly consistent throughout the video. Check the key frames in the
Animation palette to see where it begins to fade away, and the second key frame
that indicates that the color adjustment is no longer active. This was done
merely by selecting key frame locations, clicking the Opacity stopwatch icon in
the Timeline palette to initiate the fadeout, moving the time indicator to the
final position for the fade, and changing the Opacity of the Curves
adjustment layer in the Layers palette. Changing the opacity in the Layers
palette automatically places a keyframe marker in the Timeline palette.
Making moving masks:
You can also blend between two positions of a layer mask to make a "spotlight"
on a part of the video scene. Open waltz_jump-editmoving mask.psd to see
an example. [Remember that this PSD will need the original footage file
waltz_jump_edit.avi copied to the desktop too, but you may already have it there
from the earlier exercise.] Check out the layers palette to find the Levels 2 layer with layer
mask, and the "Layer Mask Position" keyframes in the Animation palette.
These are simple examples, and they only hint at what you can do with video footage
in Photoshop Extended.
Some editing tips and techniques from Josh Birnbaum (thanks, Josh!)
- Use the spacebar to start and stop the video playback.
- To make a cut, move the playhead to desired location, then press the
scissors icon.
- You may move a clip (independent section) on the timeline in any
direction, in any order
- To add a simple transition between clips, click on the square divided
into two triangles, choose a transition, and drag it to any cut point to
apply that transition.
- When done, click on arrow in bottom left corner of timeline to render
video.
- While I'm surprised Photoshop can edit video so well, the best piece of
advice I can give: If you plan on doing heavy video editing, use Apple's
Final Cut Pro, the AVID system, or Adobe's Premiere Pro. Photoshop is not as
well-equipped for handling video as these programs.
Exporting (Rendering) video when you're done editing (from Josh Birnbaum)
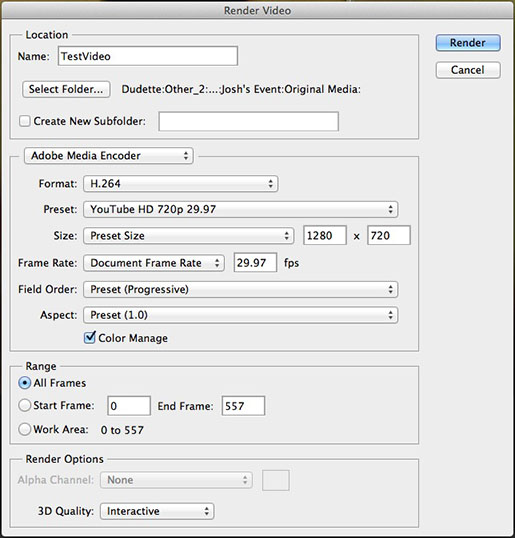
Export Settings: (These of course depend upon the output device, but the
following are
generally good settings for web)
- Location: Name the video, select where to save it, create a subfolder if
desired.
- Adobe Media Encoder: Choose H.264 because it is compatible with YouTube
and Vimeo. Any other choice will have iffy results with certain computers.
H.264 is a standard for video compression and is the most commonly used
codec (video instruction set) today.
- Preset: YouTube HD 720p 29.97 will work best for web video. There are
options for phones and tablets here that will work if that is your purpose.
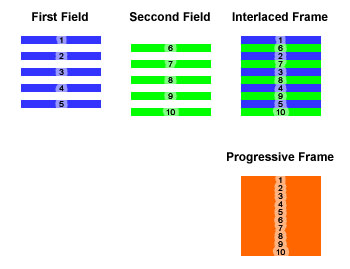
NTSC is North America's video format, PAL is used in other parts of the
world so avoid it for domestic use. The number 1080 or 720 refers to the vertical
resolution of the frame. The letter after it, a "p" or an "i", refers to
progressive video—which is comprised of fields sampled progressively—and
interlaced video, in which the fields are interlaced together. See example
illustration included below.
- Size: Web video max size is usually 1280x720 pixels. Smaller could be fine to
reduce file size, and some services now allow larger so viewers can watch
full-screen.
- Frame Rate: Default frame rate is 29.97 fps. Other frame rates give the
video a different aesthetic. Many old cinema cameras used to shoot at 24
fps. For best quality results, export with the frame rate at which you shot the
video.
- Field Order: Progressive by default (choose another option if you shot
interlaced video).
- Aspect: Typically, keep at one. You would only change this if you want
your video frame to be something other than the typical 16:9 aspect ratio.
- Range: This just tells the computer when and where to start and stop
encoding the timeline
- Render Options: Interactive. Don't fool with this. Not sure what it
means.
Anti-aliasing edges in Photoshop
Open the file called anti-aliased.tif in Exercises 1 and examine the edges of
the two words. One is anti-aliased and the other is not.
Rules of thumb about anti-alias:
anti-alias on: when selecting parts of photographs, when creating type
for the web,
etc.
anti-alias off: working with 1-bit bitmaps (aka "line art"), anytime no-fringe edges are
desired.
Anti-aliasing affects the Type tool and selection area tools (including
the Lasso tool, Magic Wand tool, and Marquees of various shapes).
TIP: If you see something on the screen and wish to know if it's anti-aliased
or not, take a screen capture (on the Mac, Command-Shift-3) and examine it at
higher magnification in Photoshop.
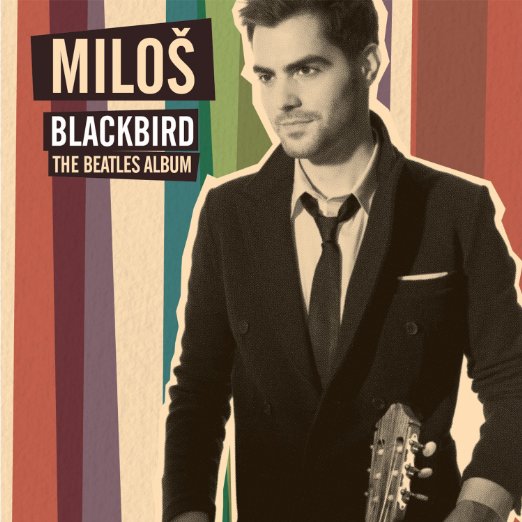
Stroking a Selection Outline
Sometimes you desire to stroke around a person or object in a photo for
effect. Here's an example of a musician's CD with a stroked outline around the
person for an artistic effect. Both hard-edged outlines and feathered outlines
(think "aura") can be done.
Any selection area (marching ants) can be stroked -- it will work with the Rectangular
Selection Tool, the Oval Selection Tool, the Lasso, or even an area selected by the Magic
Wand Tool.
In a previous exercise, we stroked a Path using an icon at the bottom of the
Paths palette. This has advantages over stroking selections - mostly because you
can use any brush available, with whatever settings the brush has available
(soft edges, different application modes, brush tip shapes, etc.) However, there
are times when only a simple, hard edge stroke is needed, and stroking a
selection outline is very quick and easy.
Open JOE.TIF (Exercises 4), and change color mode to RGB.
Draw a marquee just outside the head and upper body with the lasso tool.
Choose an appropriate foreground color for the stroke step. (Light Yellow works OK.)
Edit>Stroke, and choose about 12 pixels. For best results with this picture, choose
Outside in the Location part of the dialog box. If you choose Inside, then part of the
stroke will obscure Joe.
NOTE: A softer stroke can be created if the selected area is feathered first.
A More Useful Application of the Stroke function:
File>Revert or reopen JOE.TIF
Change color mode to RGB.
Use Lasso Tool to select Joe from the background.
Save the selection as a Channel by clicking on the Channels Tab, and clicking on the
Make Channel from Selection icon located at the lower edge of the palette.
Click on the Layers Tab in the Layers palette to leave Channels and to return to the
image itself.
Layer>New>Layer via Copy (or type Command-J)
Click on the Background Layer.
Click on the Channels Tab, and drag the newly created channel to the Load Channel as
Selection icon located at the bottom of the Channels palette. Marching ants should appear.
Click on the Layers Tab to leave channels.
Select an appropriate foreground color for the stroke.
Choose the menu item Edit, then Stroke. Try 10 or so pixels using a pale foreground
color.
Deselect to drop any selections.
Gaussian Blur the background containing the stroke, leaving the top layer untouched.
There should be a "glow" around the figure of Joe.
Done
This technique works best on non-descript backgrounds like that found in the JOE.TIF
photo. If there is a pattern or important background, the stroke and blur should be made
on a new, blank layer and have its opacity adjusted to blend in with the background
texture.
Horizontal or vertical stripes can be made in a picture by stroking selections made
using the single row or column selection tools. Using the shift key, you can make multiple
horizontal of vertical lines to stroke all at once.
Photoshop Actions
The Actions Palette
The purpose of the Actions Palette is to speed up repetitive tasks. It memorizes
a series of steps done by the operator, and can play them back on other images.
You will need to have the Actions palette visible. Choose it from the
Window menu. You should see a folder called Default Actions in the Actions
palette. This folder contains a number of different actions that are played
individually.
Making Actions Work:
- To run an action on a single file, open a file, choose
the desired action in the Actions palette, and click on the Play
button in the Actions palette.
- To batch process multiple files in a folder, choose File>Automate>Batch.
- To batch process multiple files from a window in Bridge, highlight the
file thumbnails you want, then choose Tools>Photoshop>Batch.
Single play
Open Musicians.tif, convert to RGB mode, and run the action named Sepia
Toning (Layer) to see how an actions works. Running an action is accomplished by pressing
the Play arrow at the bottom of the Actions palette.
Another In-Class Exercise: In the Actions Palette, Load the action
called Bills In-Class Actions.atn from Exercises 8. (Please copy it to
your desktop first to prevent problems!). To load additional
actions, click on the Actions
tab, click the small arrow with lines on the upper right part of the Actions palette, and choose
"Load Actions..." from the list. The additional action or set of actions
(in a folder) is then appended
to the current list in the actions palette.
You may rename this new set of actions by double clicking on the folder icon in the
Actions Palette and typing a new name. You may also drag an action from one folder to put
it into another folder if you wish.
Batch Actions
For this exercise, we will batch process all the files found in the
Actions Files folder (Exercises 8). We don't want to run the action over the
network though because of bandwidth limitations and the increased possibility of
errors and file corruption. So...
Copy the folder called "Actions Files" to your desktop. It
contains a number of TIF files.
Create a new empty folder called "Actions After" on your
desktop.
Let's also disable the Photoshop Camera RAW preference that opens TIF and JPG
files in Camera RAW. If Camera RAW files are opened in Camera RAW, the action
will slow down by repeatedly displaying a Save As dialog box after each file is
processed. (Photoshop>Preferences>Camera RAW, and choose Disable TIF and JPG
support at the bottom.)
Choose File>Automate> Batch.

In the Set field, choose the Bills In-Class Actions set of actions.
In the Action field, choose Bill's Drop Shadow.
In the Source field, select Folder, then click the "Choose..."
button and select the "Actions Files" folder by finding it and clicking on the
Choose button at the bottom of the dialog box.
In the Destination field, choose Folder, then Choose and select the
newly created "Actions After" folder.
You may elect to rename the processed files so that you don't mix them with
the originals later.
Click OK to begin the batch processing of all the files. If done
correctly, you should have the files saved in the Actions After folder with drop shadows
added.
Notes:
1) When opening files that aren't in the current working space (i.e. sRGB
instead of Adobe RGB), and you do not want be bothered with Color Profile
warnings when each file opens, it would be smart to
re-configure your Edit>Color
settings dialog to automatically convert the files upon opening, and check
the Suppress Color Profile Warnings button in the Batch dialog. This can be
custom tailored for whatever color space you need.
2) If you want to save TIF files as JPG files (for example), include a Save
As step in your action. You can indicate whatever file format you desire in the
recorded Save As step.
3) If you have Camera RAW set to open TIF and/or JPG files, you will trigger
a Save As dialog box for each file processed. This can really slow down the
workflow. You can set Photoshop>Preferences>Camera RAW to disable support for
TIFs and JPGs temporarily. Alternatively, you can include a Save As step in your
action.
4) Don't record an Open step in your action. Odd things will happen. If you
do accidentally record an Open step, be sure to check the box in the Source
section to Override Action "Open" Commands. Alternatively, you can throw
away the unwanted Open step in the Actions Palette, just like you can with any
step in the Action.
Recording a New Action
Creating a new action is as simple as letting the program watch the steps you make when
you do something to a sample file. Open one of the files in the Actions Files folder to
use as a sample file. To record a new action, click the upper right arrow in the Actions
palette and choose New Action. Give it a name that describes the action, select the folder
or "Set" of actions in which this new action will be stored. NOTE: If you wish
to have a new Set of actions, create it first using the same upper right arrow button and
choose New Set).
For purposes of demonstration, let's assume that you need 50 pixel-wide
thumbnails of each picture in the Actions Files for a web page. Name the new action
"Resize to 50 Pixels Wide".
Click the Record button. Photoshop now watches the steps you take and
records them in the new action.
After the desired effect has been achieved, choose Stop Recording
from the Actions menu list, or you can click the square
"tape player stop button" icon located at the bottom of the Actions palette.
Remember -- don't forget to "Stop" your action once you are done
recording!
To check on how it works, perform a File>Automate>Batch on the
files contained in the Actions Files folder, and save them to a different destination
folder.
A Useful Action for a Working Photographer
If you have a stock business and prepare scans for clients, make a series of actions that
applies appropriate copyright information to the image. This eliminates the need to go to
File>File Info and clicking on the Copyright & URL settings, then finally entering
the information.
While each occurrence doesn't require significant time, the action is
very handy when large numbers of files are being prepared.
I have visited Italy about 5 times and have about 600 illustrations
prepared for a textbook about Italian renaissance art. I created 5 separate actions - one
for each year that I visited Italy to photograph - and run the appropriate action once the
scan is completed. It eliminates the possibility for spelling errors, and eases the
annoying task of entering the copyright information repeatedly.
Other useful actions may include:
-applying file information to metadata fields (replicating a feature
found in Bridge or Lightroom, but still useful)
-applying watermarks to images
-resizing for different outputs
-mass toning adjustments (like B+W conversion)
-color profile changes
If you have Actions loaded in Photoshop's Actions palette, they become
available for use in Bridge too (Tools> Photoshop> Batch...).
Long-term Storage of Information on CD ROM Disks, DVDs, and Other Media
CD-ROM disks are not as permanent as you may think. I've lost information stored
on them after only a year or two. Here are some tips for handling
them to prolong the life of information stored on them.
Here's one man's account of trying to retrieve digital files that were only a few years
old:
Jonathan Eastland's blog entry
for September 10, 2006
Mike Johnston (editor of The Online Photographer) wrote a short article on finding the best CDs for storage. I've archived
it at
johnston_on_cds.html
Here's another report on CD and DVD reliability that suggests DVD+R is better
than DVD-R.
http://adterrasperaspera.com/blog/2006/10/30/how-to-choose-cddvd-archival-media/
This link, newer than the one above, claims gold disks are no longer needed with
advances in surface sealing technology with premium disks.
A very clever interactive web production from the National Film Board in Canada about
lost phones and the images contained in them. Could be converted into an
animation easily.
http://pleasecall.nfb.ca/#/pleasecall
Most photographers today archive to external hard drives that are turned on
only when used, and to the "cloud" - which is storage space hosted over the
internet. Generally there is a monthly or yearly fee for internet (cloud)
storage services, but even they aren't immune to technical or financial issues.
One popular file storage site (Digital
Railroad) went bankrupt, and photographers had only 24 hours to remove all
materials before the site closed. The traffic generated by the announcement
overwhelmed the web site. Many photographers lost thousands of stored photos.
Here is a story about some of the weaknesses of online (cloud) storage. The
story highlights how mismanaged Megaupload was shut down by the feds, and how
files stored there have a very small chance of being made available. It also
mentions other web storage sites that have had problems.
A currently popular online storage site for photographers is
Photoshelter. They offer more than just file storage, and include web site
hosting where photographs can be sold.
Whatever backup method you choose, it is wise to have multiple backups in
multiple locations.
In-Class
Technical Exercise
12: |
Demonstrated
to the instructor by April 26 |
Create an action that puts a visible 2-pixel Black
outline around the files contained in the Actions Files folder, and
writes them to the Actions After folder. After you create the action,
show its operation to the instructor during class.It must be completed
and shown to the instructor by the last day of classes for the quarter
to get any credit.
Note that the "last day of classes" is BEFORE the last day of the quarter.
No file needs to be provided - just a demonstration of the action
working.
Plan ahead because I will not be continuously available and office hours
become quickly filled during the end of the quarter.
|
