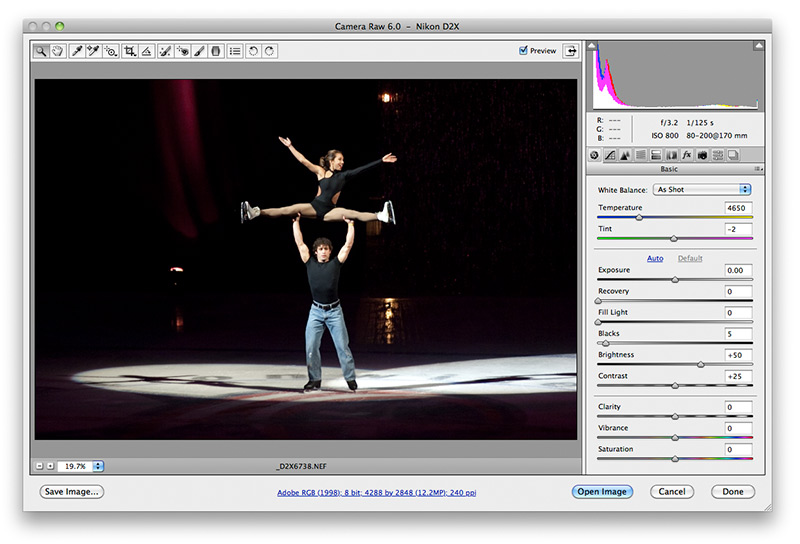
The main window shows basic toning controls that affect the whole picture - color, brightness, contrast, saturation, etc.
Temperature and Tint - Basic color balance is adjusted using the Temperature and Tint controls at the top. This enables you to shoot in odd-colored light (flourescent, tungsten, etc.) and correct for it without having first set a color balance in your camera. If you had shot JPGs, for example, the color balance would be "baked" into the file at only one setting.
Exposure - Exposure changes will shift the entire histogram left (darkening) or right (lightening) the picture - within limits. Its action is very much like changing aperture or shutter speed in camera to control light. Use this control with moderation because other controls may be more useful than exposure alone.
Recovery - If you have highlights that are slightly blown out, this control may bring them back into the picture when the slider is moved to the right. Unlike JPGs or TIF files, blown highlight detail in RAW files may be still there, and made visible with this adjustment. This is a huge advantage over TIFs or JPGs.
Fill Light - This control acts much like a fill-flash on camera - it lightens the deep shadows. If there are some deep shadows in your picture, slide this control to the right to bring some shadow detail back.
Blacks - If you shot on a flat, overcast day, and your picture lacks a solid black anywhere, use this control to force the darkest pixels to become black. This is the opposite of the Fill Light control. You should use one or the other depending upon picture tones, but not both on the same picture.
Brightness - Brightness is a very useful control for lightening mid-tones in the picture. It is less prone to blow out highlights than the Exposure control, and I find it more useful overall for somewhat dark pictures.
Contrast - Will increase or decrease contrast in the picture. Other controls above it also affect contrast (Blacks, Fill Light, etc.) so use this carefully. It might undo some of the changes you made in the controls above it.
Clarity - Consider this tool as a sharpening tool for your picture.
Vibrance - This is a smart Saturation tool that reduces the over-saturated, orange faces, look. Because it applies saturation in an intelligent way, it is more forgiving than the Saturation tool underneath.
Saturation - Will increase or decrease overall saturation of the picture hues. Use wisely and don't oversaturate pictures.
All these controls are reversible. No change is ever made to the original RAW file. Instead, these changes are saved as separate sidecar XMP files that carry the toning information to be overlayed onto the original file. If you wish to return to the original picture as-shot, it is easy to do.
Hot Tip: The Save button in the bottom left of the dialog box will enable you to save your toned raw files as Adobe DNG files if you wish. Adobe DNG files are essentially camera raw files saved together with the toning information in an XMP file. The toning changes are still reversible at any time, so it shares the same advantages other camera raw files have. Additionally, the DNG files are open source code, and not a proprietary date file like the camera produces. This is a huge benefit for serious archivists that can't rely on camera manufacturers to continually update their own camera raw routines to run on new computer operating systems, etc. One final benefit is that the DNG file, because it contains the original raw information plus the toning file, is only one file to keep track of. It can't become separated from the XMP file, and lose the toning changes made by the user, unless they wish to in the camera raw dialog box.
Next - jump to:
Adjustment Brush
Graduated Filter
Spot Removal
Color Sampler
Workflow Options
[back to web notes]