>
Veneering with Paper Backed Veneer Stock
How to Veneer a Loudspeaker Cabinet
Quick Index
Preface
Buying Veneer
Planning the Job
Putting Glue on the Veneer and Enclosure
Adhering Veneer to the Enclosure
Rough Trimming
Flush Trimming
Trimming veneer from recesses
Finishing the Job
Preface
I learned to veneer out of necessity - a
botched
attempt at faux painting left me with no confidence in my artistic painting
abilities. My wife asserted (with gusto) that the paint was ugly, and
that I should consider an alternative instead. I suggested veneer, she agreed
and she even offered to pay for the veneer material. She's very pleased with the
results, but I'm still waiting for the money.
The following information about veneering was
accumulated through research on the internet and through the usual "newbie"
questions to the patient denizens of the Parts Express
Tech Talk discussion
board. The following methods worked for me, and involved some trial and error. This
information is meant to help someone else gather detailed information about
what worked in one case - mine. As usual, your methods and materials may be
different, so I cannot guarantee your own results. However, use the information
presented here and experiment to see how it fits your needs.
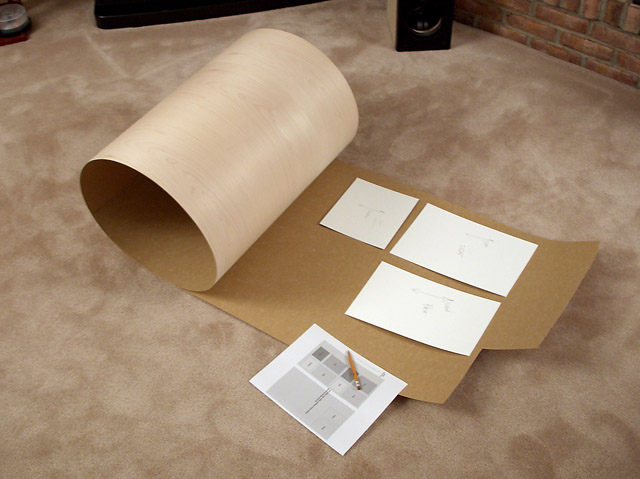
Buying Veneer
A plain-color paint job didn't appeal to me, so I
bought a roll of 24" x96" Maple paper-backed veneer from
Woodcraft in
Parkersburg, West Virginia. Each roll of veneer is different, and I selected one
in the store with a pleasing figure and color. Other sources of veneer include
Parts Express,
Homecraft Veneer,
Constantines,
Joe Woodworker.com,
Tape-Ease,
Oakwood Veneer, and others.
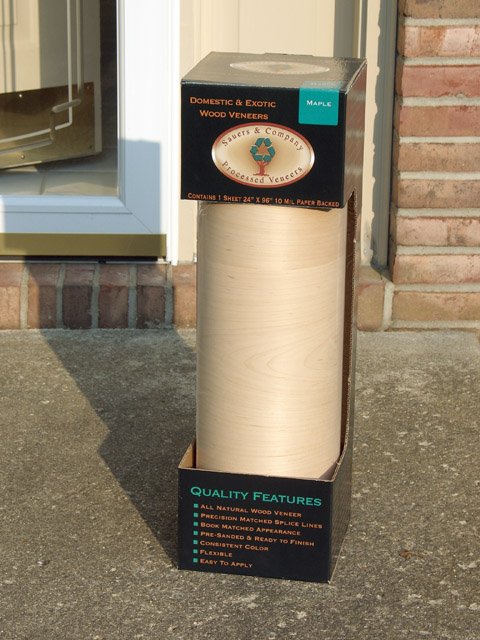
A package of Maple paper-backed veneer.
Cost was about $55 (in early 2007) for a 24" x 96" roll from
Woodcraft.
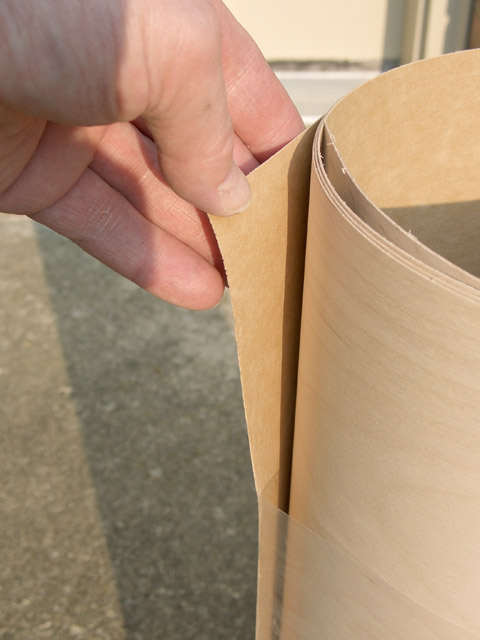
Flexible veneer feels like stiff cardboard.
The veneer has a 0.010" paper backing. I measured
the total thickness to be 0.025", so that leaves a thin 0.015" for the wood itself.
Not much room for sanding mistakes!
If you haven't used veneer before, cut a small 6"
square piece from the roll and practice the steps below on a piece of scrap MDF
or plywood. I actually made two test samples seeking a good way to trim excess
veneer. Later the samples came in handy for stain and finishing experiments. One
sample showed a smoothness problem with my new router's base. By doing a small
test sample before tackling the actual loudspeaker,
you'll learn little things to make the final job go better.
Planning the Job
Before you do anything, construct a cutting plan
to see how the parts will fit on the roll of veneer. I used a scale
drawing of the veneer roll (length divided in two to fit a computer screen) to get a feel for usage.
Pay attention to grain
direction and to the joint between adjacent lays of veneer. On some projects,
you want to use the joint (i.e. to make a symmetrical baffle grain pattern) and
on others you may wish to avoid it. You'll have to inspect your roll of veneer
to see the location of the book match joints.
I like to have grain direction going vertical on the sides
of the enclosure, sideways across the top and bottom, and grain vertical on the back,
so that was part of my planning.
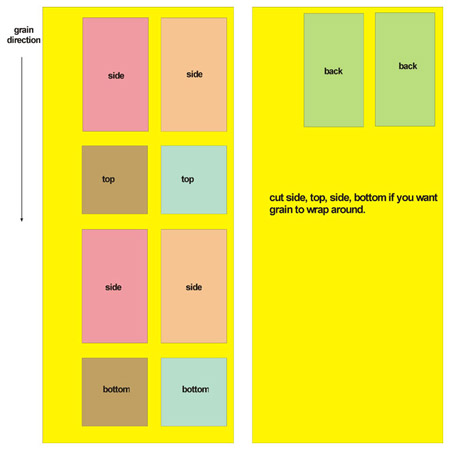
The cutting plan.
After sketching the cutting plan,
cut full-size
cardboard panels that represent each side of the loudspeakers to be veneered.
Mark the desired grain direction on each piece of cardboard so you won't make a
mistake. Then use a pencil to trace around the cardboard shapes onto the back of the veneer.
Leave about 1/4" to 1/2" space between each panel. (If it's your first
time, try for 1/2" between panels.) Excess will be
trimmed after the veneer is adhered to the enclosure.
Marking the cutting plan onto the back of the
veneer.
After tracing the panel shapes on the veneer, cut
them into several manageable sheets using
a sharp knife (Xacto, etc.), a veneer saw, or a pair of scissors (but be
careful - scissors can cause splitting of the veneer edges). I did NOT cut each individual panel from the stock at this
time. Gluing will be easier if they are grouped.
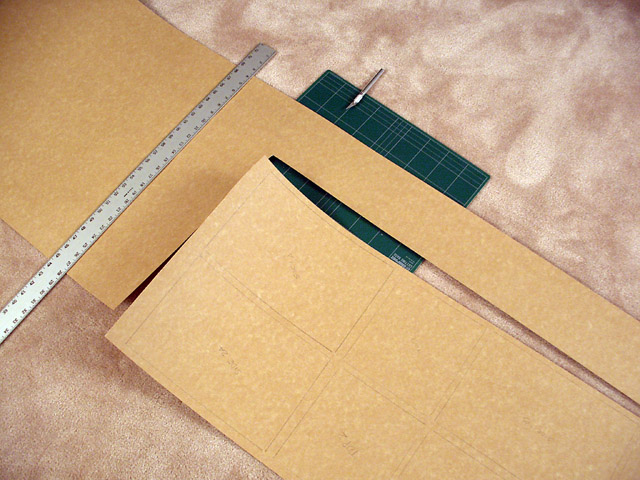
Roll is cut down into several manageable
sections.
Putting Glue on the
Veneer and the Enclosure
In a practice run on scrap material, I discovered
that a regular nap paint roller or paint brush applies glue somewhat unevenly, and that
translates to slight undulations on the finished veneer surface. Because there
isn't much veneer material to sand flat (and also because I hate unnecessary
sanding), I found that a smooth foam paint roller works best. It lays down glue
very evenly. (Tip o' the hat to the Parts Express Tech talk forum!) The glue I
used was
commonly available Titebond wood glue. I did NOT thin the glue with water as
suggested by some other web sites. Undiluted worked fine.
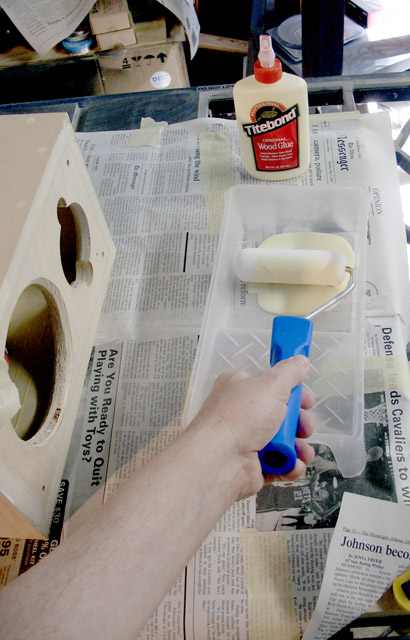
A smooth foam paint roller from Lowes will
apply
an even coat of undiluted Titebond.
TIP:
A new adhesive made specially for iron-on veneer has been introduced in late
2007 or early 2008. It's called "HeatLock". I haven't tried it myself, but
several users have posted favorably about it.
HeatLock FAQ
Tape down a section of veneer that has several
panels on it, and roll on the Titebond glue evenly. Apply glue about 3/8" beyond the
traced panel shapes. This will allow for slight positioning errors when the veneer is
placed on the enclosure. Be sure that you don't get glue on the front of the
veneer! It will not take a finishing stain if you do.
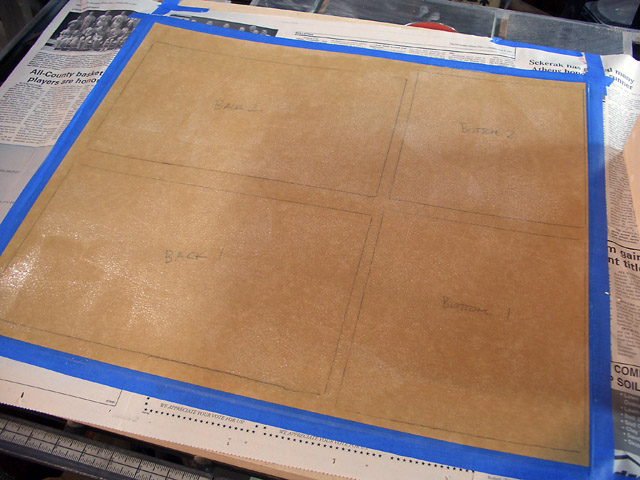
Glue is drying on the back of the veneer.
Don't get glue on the front! You can see why you need a little extra space around
the panels.
Roll glue onto the mating enclosure panel you
wish to veneer. Needless to say, it should be free of major imperfections like
screw holes, etc. They should be filled with wood filler or Bondo and sanded
flush.
I coat only one or two sides at a time for each box. Let the glue dry
completely on both veneer and enclosure. Unlike contact cement, Titebond wood
glue dries without
tack. One generous coat should work, but there's nothing wrong with applying two
coats. I've done it both ways.
Dried glue will have a slight texture. It looks
like "goosebumps" on chilly skin.
After the glue has dried on the back of the
veneer, cut apart the individual veneer panels using a sharp knife
on a backing board, a veneer saw, or a pair of scissors (a little risky because
of possible splits). Lately I've used my C+H mat cutter to do this, but
not many people have one of those. Be sure to leave a little extra material all the way around
each
panel to accommodate positioning errors. The excess veneer will be trimmed flush with the enclosure later.
If you've already done some panels on your
enclosures, you will want
to protect the already-applied veneer with low-tack masking tape or drafting
tape before applying glue to an
adjacent panel. A slip of the glue roller onto the adjacent veneer would be a
disaster when it's time to apply stain.
Top surface is ready for glue. Masking tape
around the edge protects the veneered sides from a glue accident.
With some adhesives, you can coat veneer well in advance
of use. Others require a quicker usage after coating.
Here is a table showing the time windows with
data* obtained from Franklin International (Titebond):
|
Type of glue |
Timeframe |
Temperature to reactivate |
Setting on iron (this will differ on
different irons) |
Titebond Product |
|
PVA (white
glue) |
Can be
reactivated indefinitely |
Approximately 180°F |
Delicate |
Titebond
White Glue, Titebond All purpose White
Glue |
|
Aliphatic
resin glue (yellow glues) |
Can be
reactivated for approximately 7 days |
Approximately 250°F |
Wool |
Titebond Original Wood Glue,
Titebond Dark |
|
PVAC
(catalyzed PVA) |
Can be
reactivated for 12 hours |
Approximately 350°F |
Cotton/linen |
Titebond
II Premium Wood Glue, Titebond III
Ultimate Wood Glue |
Even though the glue is completely dry, the heat of a
clothes iron melts it for good adhesion to the enclosure. The order in which I
normally
veneer the enclosures is:
- Back
- Bottom
- Sides
- Top
By doing the veneer panels in the order listed
above, you hide more of the glue joints from the listening position. The joints are very small anyway, so it isn't
critical. But still...
Adhering the Veneer to the Enclosure
Position the veneer with the dried glue on the enclosure.
The mating enclosure surface has dried glue too.
Note: Some users report success applying glue
just one surface, i.e. the enclosure only. However with paper-backed veneer, I used the
traditional method and applied glue on both mating surfaces.
Double-check grain direction!
Place a piece of clean cotton cloth (old t-shirt,
sheet, etc.) over the veneer, and use a clothes iron on the proper heat
setting. Don't use steam. My iron is dry to prevent an accidental steam
release.
I used the "cotton" setting on my iron with Titebond Original. It worked well.
So did "wool" in a later experiment.
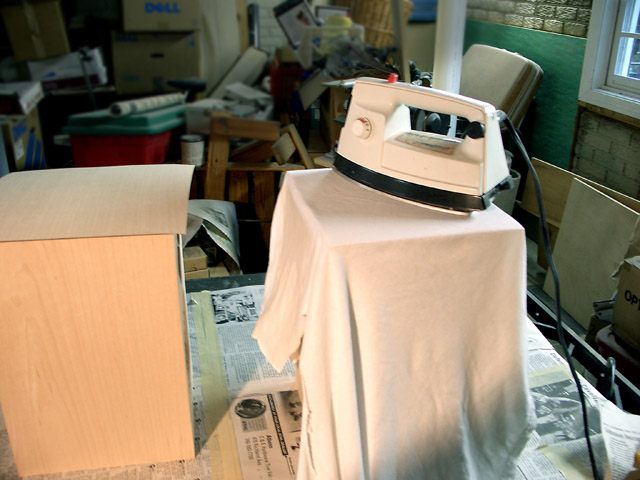
Simulated picture - couldn't photograph my hand ironing and
take the picture too!
Press the iron firmly and keep it moving very
slowly. Remember you have to transfer the heat through the cotton, the paper backing, and a
thickness of veneer before you melt the glue. That takes time to do.
If you hear a little crackling when you move the
iron,
that's the veneer lifting and it means that it hasn't
stuck completely yet. Keep pressing down and applying heat. It takes several minutes to do a small panel.
When you're done, set the iron aside and avoid
testing the glue joint for a few minutes while it cools. The glue must cool to
be strong. After waiting a minute or two, test
adhesion of the edges with light upward pressure. On occasion, I've had to go back over a panel, and I just
iron the spot again to fix it.
Unverified tips: If you have two irons, follow the hot iron with the cold
one to apply pressure and cool the veneer while the glue sets. Sounds reasonable to
me, but I haven't tried it. Another poster on the
HTGuide DIY forum employs a block of MDF
following the iron to achieve the same thing. However when I tried using a block
of MDF in late 2008, it clung to the cotton t-shirt material like Velcro and
wouldn't glide. It would have to be painted or finished smoothly to work.
John Marsh (HT Guide guru) suggests a roller
to follow the iron to apply pressure to the veneer/adhesive. That sounds
promising too.
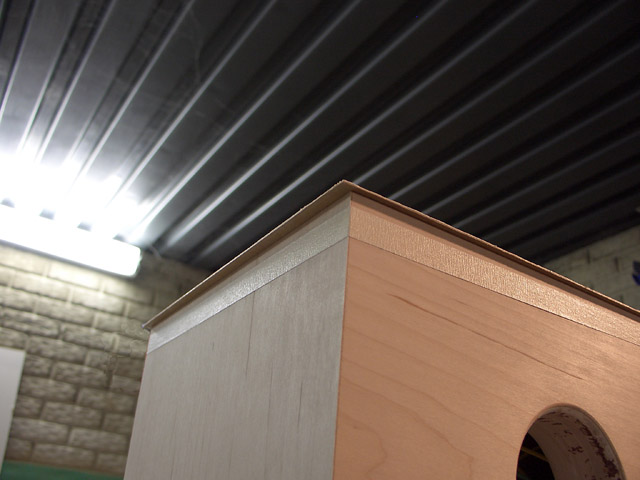
Rough Trimming
Once the panel has cooled and you are satisfied
that it has adhered sufficiently, it's time to trim it flush with the
loudspeaker enclosure. Several methods can be employed to rough trim the excess
flap of veneer that overlaps the enclosure's edges before flush trimming.
I now use my router with a flush-trim bit for both rough trimming and flush
trimming. I make several passes, each pass taking off less than 1/8" until I get
it flush.
Alternate #1
I once used an Exacto knife to trim within
1/8" of the enclosure's side, then routed flush. It's time consuming though,
and tends to splinter the veneer. My current router method is much faster and easier.
Alternate #2
A veneer saw could be used to rough trim, and even cut close enough to touch up
with sandpaper for a perfect trim.
Be sure to
sharpen the veneer saw before use. They often come unsharpened.
Flush Trimming
There was some discussion on the PE Tech Talk
board about the best method to use for final trimming the veneer close to the box. I tried
several methods - a spiral
down-cut trim bit, a straight flute trim bit, and an edge trimmer. (More
information on this page) The manual edge trimmer didn't work well for use with
veneer.
Neither router bit is perfect, but I
ended up using the straight flute bit. The spiral bit produced less chip-out of
the veneer,
but it must have produced more friction. The friction apparently heated the glue on the
excess material being trimmed. In places, the glued paper backing
was pushed down and against the side of the enclosure without being cleanly cut.
It stuck there with determination.
Lots of delicate sanding was needed to remove the stuck paper backing from the
side of the enclosure, and I
decided to use the straight flute flush trim bit instead. Besides, the straight
bit is cheaper.
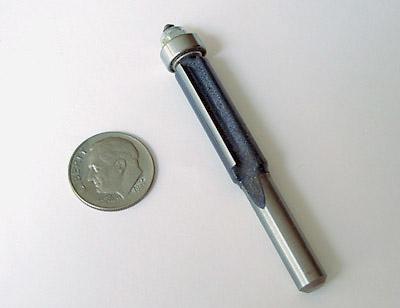
A Bosch straight fluted flush trim bit from
Lowes. The dime is for scale.
The straight fluted trim bit left a little more
fuzz on the veneer edges, but it sanded smooth very easily. The picture below
shows a close-up of an edge of a piece of test material trimmed with a 3/8" straight flute trim bit
(a Bosch bit from Lowes). Despite the alarming appearance in this close-up, a
couple strokes with sandpaper made it invisible. Be sure the sanding direction
goes to the outside. Very easy! By contrast, the spiral down-cut bit made a lot
of extra work by adhering bits of paper backing onto to the side of the box.
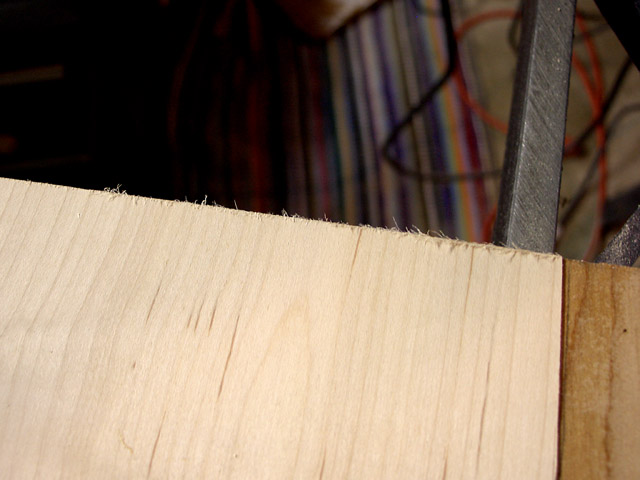
When flush-trimming with the router, fuzzy
edges may be left. A couple strokes with fine sandpaper fixes it easily.
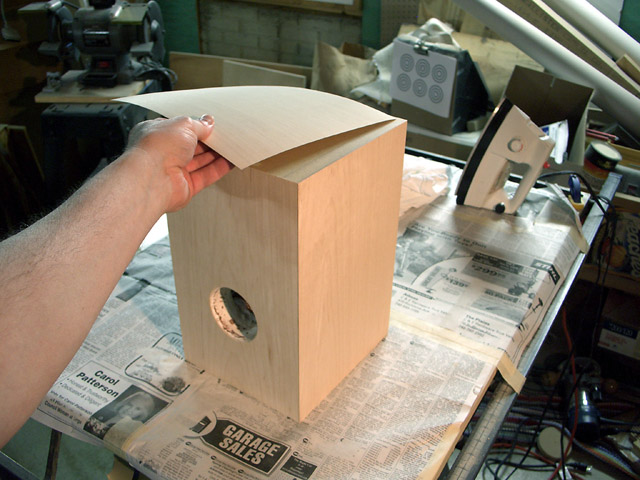
Newly applied veneer ready for a flush trim.
TIP: I had to
sand smooth the base of my new
router before trimming. Thanks to experiments with test pieces, I found that
the router base had raised plastic ridges around the mounting screws. The
elevated areas marred the veneer surface (they produced a glossy area where
they rubbed). Check your own router base around the screw mounting holes to
see if it is truly smooth!
If you have already veneered adjacent sides, put
low-tack masking tape around the edges to prevent
router bit bearing scars. Ordinary blue painter's tape will pull off some of the
veneer grain, so be sure the tape is low-tack. I used drafting tape made for
holding paper to a drawing board (from my pre-CAD days). In addition to reducing scarring of the new veneer where the
bearing rides, it will give you a little bit of veneer overhang to sand
away to perfection.
When done routing, sand any remaining
veneer overhang in the direction of the grain of
the adjacent panel.
The router bit may scar the veneer where the
bearing rides against it. Use low-tack tape to reduce scarring by the router bearing.
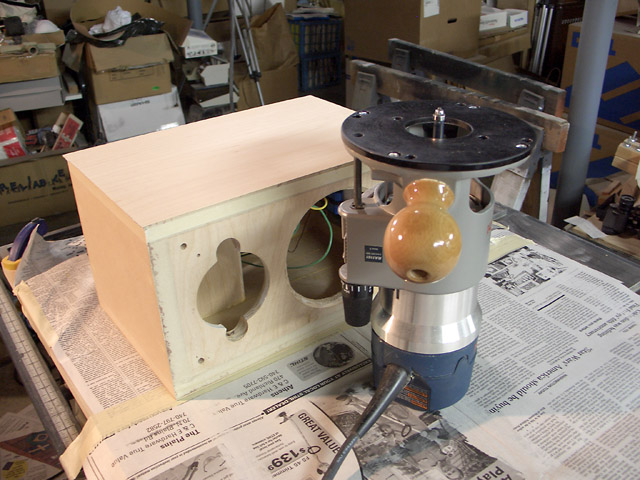
Trimming veneer from
enclosure recesses
I put
instructions for doing this on a separate web page.
Finishing the job
The heat from the iron seems to raise the grain
of the veneer surface. I suspect it's because of lost moisture in the wood.
Don't finish sand for several hours until the veneer has cooled and
re-absorbed lost moisture from the atmosphere.
It's time
to think about what finish you want. Gloss, semi-gloss, or natural. To stain
or not. Those are individual choices for you to make. Start sanding with 120
grit sandpaper and work up to 180 or 220 grit for heavy build finishes like
Minwax Polyurethane, or up to 320 grit for penetrating oil finishes like Watco
Danish Oil.
Whichever finish you choose, the Titebond
glue will not soften like contact cements when exposed to finishing solvents. That's part of
the beauty of this process.
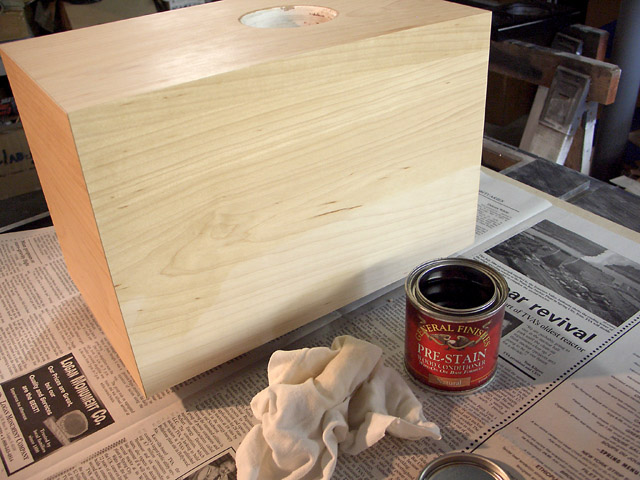
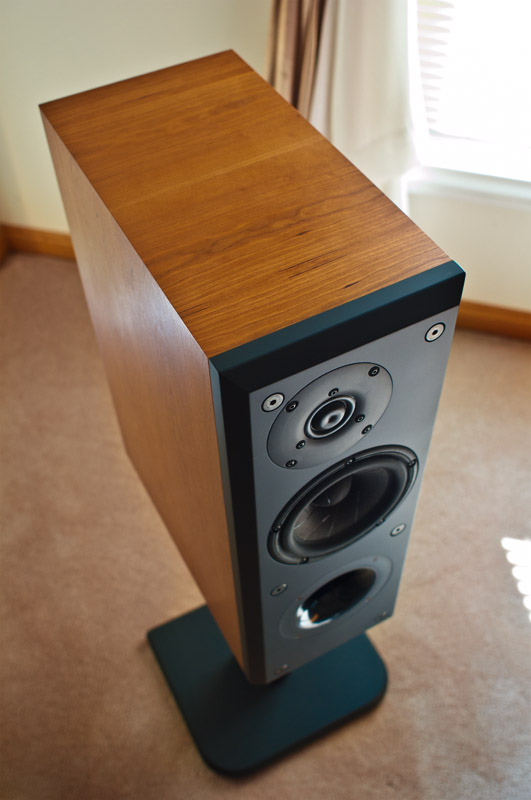
Veneered and lightly sanded loudspeaker
enclosure getting a coat of General Finishes pre-stain. It already looks
very nice!
I used General Finishes Pre-Stain, then
applied General Finishes Honey stain on the veneer. I purchased them from
Woodcraft in Parkersburg. That treatment was followed up with 5 or 6 coats of Minwax clear
Polyurethane semi-gloss. I did some light sanding with 220 grit between coats. Wife likes the looks of them - mission
accomplished!
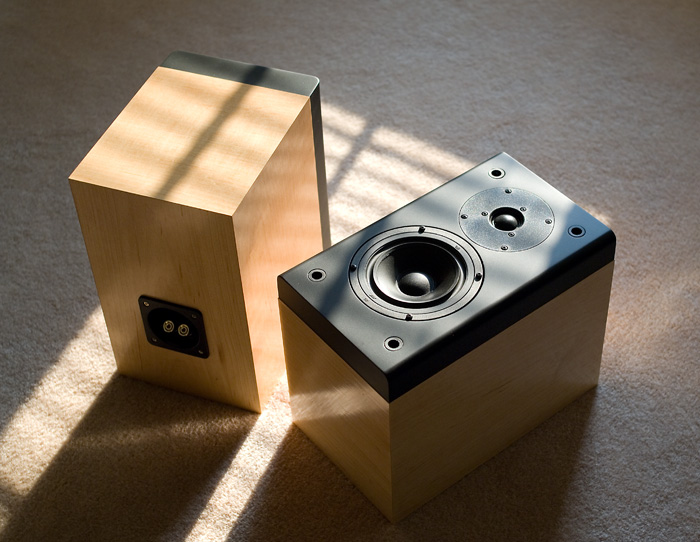
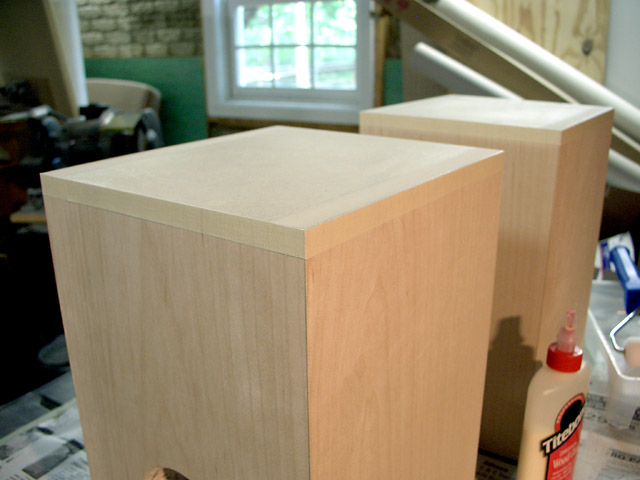
Completed loudspeakers.
[back to top]
*Blog post containing the Titebond data for dried
glue working life -
http://www.webherrera.com/blog/2009/04/19/titebonds-franklin-internationals-iron-on-instructions/9/
Bill Schneider
June 16, 2007
Other Veneered Projects I've Completed Since:
[click thumbnails to enlarge]
Other useful info
and veneering links:
[main audio page]