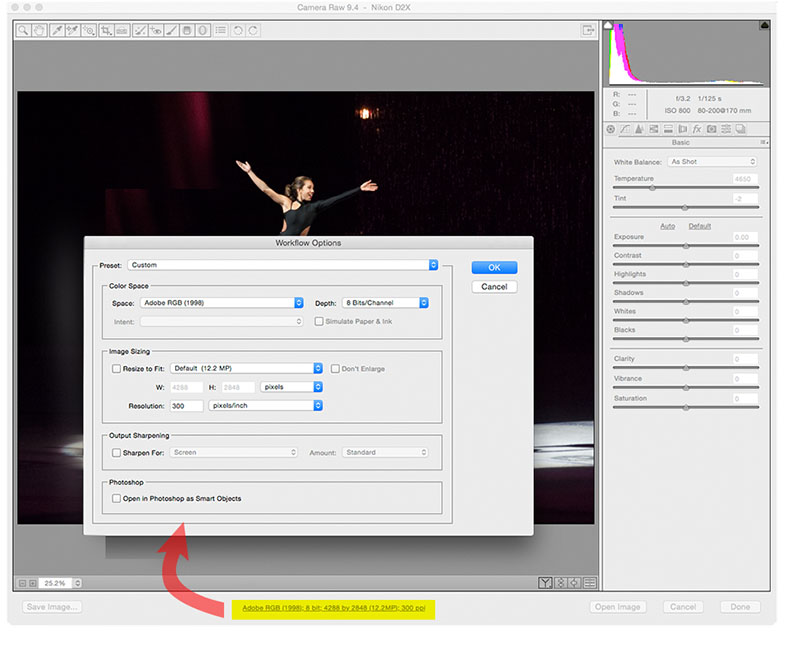
Click the blue text at the bottom of the Camera Raw window to pop-up the Workflow Options dialog.
Workflow Options enable you to choose the color working space, bit depth, pixel size and resolution when opening a camera raw file into Photoshop. Due to the nature of camera raw files, they don't have a native resolution or color working space. The Workflow Options dialog box sets defaults for converting the files into a format that Photoshop and other programs can work with.
Color Space: This lets you select the color working space for the incoming file. The raw file is converted to the color working space chosen when opened in Photoshop. Two common choices are AdobeRGB (1998) and sRGB. When going directly to the web with a file, choose sRGB. If you desire to have the picture commercially printed, or if you have mixed needs for the picture, choose a larger-gamut working space like Adobe RGB (1998). You can always reduce the gamut of a file to sRGB, but you can't put it back if it isn't there.
Depth: Commonly, files in Photoshop and elsewhere are 8 bits per channel (24-bit total). You may elect to have the file brought into Photoshop at 16-bits per channel. Some filters, commands, etc. may not work if you choose a larger bit depth. If you have toned your picture in camera raw to be close in appearance to the desired result, 8-bit per channel is fine. Slight tweaks in Photoshop afterwards won't make much difference. Using 8-bits/channel is a general standard.
However, if you plan to do extensive tonal adjustments in Photoshop after opening the file, it might be worthwhile to choose a higher bit depth. This will reduce posterization when greatly altering picture tones. Remember however that many programs won't be able to handle anything more than 8-bit per channel, so after adjusting a picture using a high bit depth setting, be sure to use Photoshop's Image>Mode 8-Bits/Channel to convert the file before the file is used in a publication or put on the web.
Size: The dialog defaults to the native size for the camera used to shoot the photo. There will be a choice to Resize to Fit to cut the original size of the photo for less demanding puposes. This might be useful if you know that the pictures are destined for the web or email. You can save storage space by downsampling the file. Remember though that the original file information is still completely retained in the camera raw file in case you ever need to save a larger version for printing purposes. Note that there is a check box that will allow you to enlarge the file, but this can cause quality loss because it up-sizes the file through interpolation.
Resolution: By default, Workflow Options assigns 300 pixels per inch to your picture. You can use this number (or other resolutions you choose) to determine the print size of the file when opened into Photoshop.
To show how this works (using the dialog box shown above for a Nikon D2X file), the file will be 4288 pixels wide. Divide 4288 pixels by 300 pixels/inch, and your calculated print size will be 4288/300 = 14.09" wide.
If instead you wanted to have the printed width to be 10" instead of 17.87", find the desired resolution by dividing 4288 pixels by 10 inches. (4288/10 = 428.8 pixels/inch) That calculated resolution can then be typed into the Resolution field.
Choices made in the Workflow Options dialog box are "sticky", meaning that they will remain a preference until changed.
Jump to:
Main window
Adjustment Brush
Spot Removal
Color Sampler
[back to web notes]